1982 Starcraft Center Console 18' Rebuild

GA_Boater

Honorary Moderator Emeritus
Joined
May 24, 2011
Messages
49,038
Some times Starcraft boat "technicians" weren't very concerned about drilling holes and rivet placement. I have a few almost overlapped rivets with the factory blue paint, the same color as my tinnie in my signature. Ooooops, sig pics aren't working yet, so take my word for it. ;)

But none of my stuff looks like yours. Except the PO damaged stuff. That guy gets around!
 

SHSU

Lieutenant Junior+Starmada Splash Of The Year 2019
Joined
Mar 8, 2017
Messages
1,722
I will admit on our project we had our share early on. Not recommending anything we did in such cases, but it worked for us and still hasn't started to leak (Even after some brutal beatings out in Galveston Bay/Gulf of Mexico).

Recommended process would be to drill up a size and use a bigger rivet. We did do that on a couple of them. On others though that weren't horrible, a liberal amount of 5200 and Gluvit was used with the 3/16th rivet (Truth be told that was standard OP for all the rivets though). We also used an epoxy exterior paint coat as well.

Take it for whats its worth...

SHSU
 

Mikesta

Petty Officer 3rd Class
Joined
Mar 15, 2018
Messages
86
Yeah that's not right, looks like someone was using an old dull drill bit rather than a new pilot point bit that has never seen steel. The scratch looks to me like a drill bit walked across the AL.

I'd cut a strip of .080 as a backer with plenty of 5200 to seal up that mess and give the new solids something to hang onto. I made up a couple of angle pieces into brackets that I riveted to the side of the hull and bolted it to the transom as the V5 didn't have them so you could do something like that too while your at it, couldn't see any on your boat. The only other option are AL washers on each of the solids going in the oblong holes but holding them tight against the AL would be tough when setting.

y4mMIn-xZHIWXtpQM7Xg13Ls38f3OLAHGmg8q_ibCr9G3gHpxQbY5qk4gErFJ-GxZFoa0K0V-o1XfmW_neS-NpFrYtjaDgFeohhBt7kU_zv8oEdD5v3I-xFZ5cI6wo1Jyx2mXAMAktweS4h20OVgmrtBYQe6KLx5vH-xtA5FX02abwEo_4N5T9vDZybUBeg1uwZuRAUXYIOL7bwrFREWKeFbQ
The scratches are from the chisel I used to knock out the tail end of the rivets. Luckily itā€™s only the top 25-30 holes so it will be a small and easy patch to make. My boat does have braces but theyā€™re arenā€™t angle like yours. They more like triangles but itā€™s the same concept, the random bolts to it and itā€™s riveted to the sides of the hull
 

Mikesta

Petty Officer 3rd Class
Joined
Mar 15, 2018
Messages
86
I will admit on our project we had our share early on. Not recommending anything we did in such cases, but it worked for us and still hasn't started to leak (Even after some brutal beatings out in Galveston Bay/Gulf of Mexico).

Recommended process would be to drill up a size and use a bigger rivet. We did do that on a couple of them. On others though that weren't horrible, a liberal amount of 5200 and Gluvit was used with the 3/16th rivet (Truth be told that was standard OP for all the rivets though). We also used an epoxy exterior paint coat as well.

Take it for whats its worth...

SHSU
I just ordered some 1/4ā€ rivets with a smaller head diameter to do exactly that. The heads should cover everything on the outside and with a coating of 5200 it shouldnā€™t leak at all, I was more or less worried about rivets not gripping good and the two panels peeling away from each other.
I know you mentioned that you replaced every rivet in your boat so I have a stupid question for you....what did you find was the best way to lather up the rivets with 5200 without making a huge mess and wasting to much 5200? Iā€™ve only done a handful of rivets so far and I know Iā€™d refine my technique as I go on. Iā€™ve been making a puddle of the 5200 and kind of dipping the head in and spinning it but man is it messy. Wouldnā€™t be such a problem if the 5200 wasnā€™t the marine equivalent of anti seize....one tinny little drop ends up everywhere and all over everything
 
Last edited:

BWR1953

Admiral
Joined
Jan 23, 2009
Messages
6,177
I just ordered some 1/4ā€ rivets with a smaller head diameter to do exactly that. The heads should cover everything on the outside and with a coating of 5200 it shouldnā€™t leak at all, I was more or less worried about rivets not gripping good and the two panels peeling away from each other.
I know you mentioned that you replaced every rivet in your boat so I have a stupid question for you....what did you find was the best way to lather up the rivets with 5200 without making a huge mess and wasting to much 5200? Iā€™ve only done a handful of rivets so far and I know Iā€™d refine my technique as I go on. Iā€™ve been making a puddle of the 5200 and kind of dipping the head in and spinning it but man is it messy. Wouldnā€™t be such a problem if the 5200 wasnā€™t the marine equivalent of anti seize....one tinny little drop ends up everywhere and all over everything
I recently used dental impression syringes to apply 5200 around some stainless bolts and they worked perfectly. The 5200 tube tip fit inside the applicator syringe, which allowed filling with zero mess. Then, a gentle squeeze on the syringe during application was all it took. No muss, no fuss. :)
 

SHSU

Lieutenant Junior+Starmada Splash Of The Year 2019
Joined
Mar 8, 2017
Messages
1,722
what did you find was the best way to lather up the rivets with 5200 without making a huge mess and wasting to much 5200? Iā€™ve only done a handful of rivets so far and I know Iā€™d refine my technique as I go on. Iā€™ve been making a puddle of the 5200 and kind of dipping the head in and spinning it but man is it messy. Wouldnā€™t be such a problem if the 5200 wasnā€™t the marine equivalent of anti seize....one tinny little drop ends up everywhere and all over everything

Yep, we did. Not what I would recommend but admiral and I are pretty proud of it.

So the point of the 5200 is to seal between the rivet head and hull, the hull overlapping, and the tail/hull. We used a normal caulking gun, cut the top to pin hole size and would shoot a dab for the inner and then a circle around the hole for the head. We did not immediately clean up the extra. We actually let it dry and then came back with a wire wheel and cleaned it right up. It was suggested to clean up immediately with a rag and acetone, which we could have done. With the number of rivets we were doing, it didn't make sense to spend that much time cleaning up to just do the same thing on the next one. In the end it worked for us.

SHSU
 

Mikesta

Petty Officer 3rd Class
Joined
Mar 15, 2018
Messages
86
I havenā€™t disappeared guys! Just not a whole lot to post about....still chugging along with the rivets. I do have a couple questions for you guys though.
1. I know I saw in another thread about using a dremel to ream out the corrosion.....anyone have recommendations about what kind of tip to use?
2. Do you guys think itā€™s a good idea to remove the ribs to clean out any corrosion under them?
3. Any suggestions how to get the run rail rubber strip back into the channel? I heated it when taking it out and it came out very nicely but I have a feeling going back in is going to be another story
 

classiccat

"Captain" + Starmada Splash Of The Year 2020
Joined
Dec 20, 2010
Messages
3,412
I havenā€™t disappeared guys! Just not a whole lot to post about....still chugging along with the rivets. I do have a couple questions for you guys though.
1. I know I saw in another thread about using a dremel to ream out the corrosion.....anyone have recommendations about what kind of tip to use?
2. Do you guys think itā€™s a good idea to remove the ribs to clean out any corrosion under them?
3. Any suggestions how to get the run rail rubber strip back into the channel? I heated it when taking it out and it came out very nicely but I have a feeling going back in is going to be another story

I used a dremel 9910 tungsten carbide bit...great for moving corrosion laterally but doesn't dig deeper into the aluminum. (thread link).

As far as removing the ribs, I think it depends on whether you have leaks under them & what caused the corrosion you're dealing with. My SS was badly corroded (caused by someone coating the entire hull skin with epoxy).... so the ribs that I removed revealed the cleanest aluminum in my boat. The kneebrace on the otherhand was a mess underneath.

Regarding the rubrail rubber...I 1st fed some heavy bailing wire through the forward rivet hole for pulling. Then put the rubber rail in a bucket of hot water. I lubricated the rubber with Napa RUGlyde as I was feeding it in (i have it for mounting tires)...but soapy water would be sufficient. So pull a few feet out of the hot water, dry it, spray with RUGlyde and then use my pull wire to pull it into the channel. You could also lubricate the channel instead.
 

SHSU

Lieutenant Junior+Starmada Splash Of The Year 2019
Joined
Mar 8, 2017
Messages
1,722
I know how the riveting goes... Its a long and slow process when done right. As time went on we got a lot better, but still.... Not something I am entirely sure I want to do again.

To clean out corrosion that was easy to get to I used a wire wheel on a angle grinder. For the tight areas, I used mini wire wheels on my dremel.

For the ribs, we removed ours because we were re-riveting the whole thing. Plus it gave us a chance to clean out underneath and (if I remember correctly) patch a couple spots with JB Weld that were a little deeper then I was comfortable with.

On the rub rail, not sure what kind you have. For mine, I was able to push it back in with a screwdriver/putty knife.

SHSU
 

Mikesta

Petty Officer 3rd Class
Joined
Mar 15, 2018
Messages
86
I used a dremel 9910 tungsten carbide bit...great for moving corrosion laterally but doesn't dig deeper into the aluminum. (thread link).

As far as removing the ribs, I think it depends on whether you have leaks under them & what caused the corrosion you're dealing with. My SS was badly corroded (caused by someone coating the entire hull skin with epoxy).... so the ribs that I removed revealed the cleanest aluminum in my boat. The kneebrace on the otherhand was a mess underneath.

Regarding the rubrail rubber...I 1st fed some heavy bailing wire through the forward rivet hole for pulling. Then put the rubber rail in a bucket of hot water. I lubricated the rubber with Napa RUGlyde as I was feeding it in (i have it for mounting tires)...but soapy water would be sufficient. So pull a few feet out of the hot water, dry it, spray with RUGlyde and then use my pull wire to pull it into the channel. You could also lubricate the channel instead.
Ahh I thought it was your thread that I saw the dremel info in. Thanks for the link to it as well. Letting the rubber piece of the rub rail sit in soapy water is a good idea, i'm not sure I want to feed it through the entire channel though....that sounds like a very frustrating task. I was hoping to be able to put the bottom in the channel then press the top in with a screw driver. The soapy water will definitely help with that

I'm also removed one of the short ribs in the bow and the aluminum under it was very clean. I don't know if the rest of them will look like that though. The bottom tabs on my knee brace are probably the worst spot for corrosion
 

Mikesta

Petty Officer 3rd Class
Joined
Mar 15, 2018
Messages
86
I know how the riveting goes... Its a long and slow process when done right. As time went on we got a lot better, but still.... Not something I am entirely sure I want to do again.

To clean out corrosion that was easy to get to I used a wire wheel on a angle grinder. For the tight areas, I used mini wire wheels on my dremel.

For the ribs, we removed ours because we were re-riveting the whole thing. Plus it gave us a chance to clean out underneath and (if I remember correctly) patch a couple spots with JB Weld that were a little deeper then I was comfortable with.

On the rub rail, not sure what kind you have. For mine, I was able to push it back in with a screwdriver/putty knife.

SHSU
I don't mind the riveting. If I ever do another boat I don't think I would rerivet the entire boat. I'm only doing it now because the amount of heads that popped off from power washing.

The wire wheel for the dremel works good but I need a small tip that can get down into the deeper corrosion cavities. A wire wheel has worked on most of the spots because the corrosion wasn't to deep but there's just a few spots that are deep enough that the wire wheel cant get into.

Was it a pain taking the ribs off and putting them back in? For some reason I keep thinking they are under pressure and once the rivets come out they're going to pop up and be a real pain to get back down to rivet again.....maybe I'm just thinking worst case scenario.

I probably have the same rub rail as you. I think if I can lube it up as classiccat suggested it will be no problem to push back in with a screw driver. My bigger problem is going to be riveting the channel back on because as soon as I popped the channel off the top of the gunnel kind of warped and is wavy now...again probably overthinking it and probably something the clecos will make short work of
 

classiccat

"Captain" + Starmada Splash Of The Year 2020
Joined
Dec 20, 2010
Messages
3,412
i'm not sure I want to feed it through the entire channel though....that sounds like a very frustrating task.
Easy-peasy man. I was surprised how smoothly mine slid-in.
 

SHSU

Lieutenant Junior+Starmada Splash Of The Year 2019
Joined
Mar 8, 2017
Messages
1,722
I don't mind the riveting. If I ever do another boat I don't think I would rerivet the entire boat. I'm only doing it now because the amount of heads that popped off from power washing.
Yep, if I had known just how much work it would be at the begining I would have walked. Lesson learned and new experience.

Was it a pain taking the ribs off and putting them back in? For some reason I keep thinking they are under pressure and once the rivets come out they're going to pop up and be a real pain to get back down to rivet again.....maybe I'm just thinking worst case scenario.
No issue with removal. The pressure they are under is minimal. For the areas where they were slightly separated we used a nut and bolt to draw it together. Rivet the other side and then remove bolt/nut and rivet that side.

My bigger problem is going to be riveting the channel back on because as soon as I popped the channel off the top of the gunnel kind of warped and is wavy now...again probably overthinking it and probably something the clecos will make short work of
Yep, overthinking it. As you start riveting it back together it will pull together. I also followed what @Watermann did with his gunnels and added extra rivets to secure it in place. It also added some additional peace of mind to the amount of stress that was being put on a single rivet. You will notice as you start putting it back on that there are some areas that seem to be a high stress point. The extra rivets help spread out the load and reduce risk of failure.

I'm also removed one of the short ribs in the bow and the aluminum under it was very clean. I don't know if the rest of them will look like that though. The bottom tabs on my knee brace are probably the worst spot for corrosion
I had some under the front ribs and at the aft side as well. I think how it was stored is the biggest driver. For mine the way she sits on the trailer, the bow section can be slightly lower then the stern. So all the water can drain and puddle there if I am not careful. So when we do a Gulf trip we always do a long soap and fresh water bath while parked in the driveway to let most of the water drain out. What little is left should be fresh water and evaporate off so nothing left to cause issues.

SHSU
 

Mikesta

Petty Officer 3rd Class
Joined
Mar 15, 2018
Messages
86
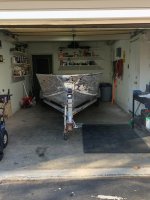
Still nothing new really to post about, I got the garage cleaned up today and brought the boat inside so now I can get back to work on it. The clean up might have been a bigger project than the boat is going to be. Here's a pic of her parked inside where she'll stay for the rest of winter. And no I am not finished with paint removal yet, she'll be nice and clean before fresh paint goes down
35.jpg

Some of the rivets are really fighting me, I've been drilling the heads off with my rivet removal tool and then trying to pound the tails out but some of the tails are just in there to good so I drill through those ones with a smaller bit then pound them out and for the most part they're all coming out. The ones that are the real pain in the butts are the ones that the heads popped off on when I power washed the paint off, they seem to be nearly impossible to drill a straight hole through.....good thing I bought some bigger rivets šŸ˜¬

I cut out my transom as well but of course I didn't think to take any pics of it until now. I cut out each piece separately then glued them together but if I ever have to do it again I would glue two pieces together first then cut it out so both pieces are a perfect match. I'm going to have to sand down the edges to make it look pretty before I hit it with some spar and paint. I'm also not to confident in the glue job, I used liquid nails because that's what I had laying around and then I screwed the pieces together all around and then put a bunch of weight on it and let it sit for several days before moving, hopefully she stays together but the liquid nails has me nervous. I don't want to redo it because I used marine ply and it was almost $90 a sheet

With the boat inside now I'm crazy motivated again to get this thing going so I should have more frequent updates and more interesting updates from here on out
 

SHSU

Lieutenant Junior+Starmada Splash Of The Year 2019
Joined
Mar 8, 2017
Messages
1,722
Some of the rivets are really fighting me, I've been drilling the heads off with my rivet removal tool and then trying to pound the tails out but some of the tails are just in there to good so I drill through those ones with a smaller bit then pound them out and for the most part they're all coming out. The ones that are the real pain in the butts are the ones that the heads popped off on when I power washed the paint off, they seem to be nearly impossible to drill a straight hole through.....good thing I bought some bigger rivets šŸ˜¬
I remember fighting rivets too. I used a punch on the rivet gun and a single punch from it sent them flying, but yes there were several that needed a bigger size. Between the new rivets/5200/Gluvit I figure I have a couple years before I have to worry about loose rivets.

I'm also not to confident in the glue job, I used liquid nails because that's what I had laying around and then I screwed the pieces together all around and then put a bunch of weight on it and let it sit for several days before moving, hopefully she stays together but the liquid nails has me nervous. I don't want to redo it because I used marine ply and it was almost $90 a sheet
If you used enough and had plenty of squeeze out you should be good. Also you can throw some fiberglass and epoxy around it if you want to be sure.

SHSU
 

Mikesta

Petty Officer 3rd Class
Joined
Mar 15, 2018
Messages
86
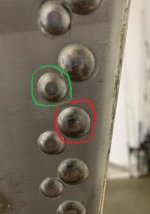
Got quite a few rivets done today, it's slow going but at least it's still going. I don't know if you guys remember probably a few pages back I mentioned that on the seams if I used all brazier head rivets that the heads would overlap each other and wouldn't sit flush. My solution to this was to alternate every other rivet between brazier head and modified brazier head rivets because the modifieds have a smaller head diameter. You can see in the picture below that the rivet circled in red and all the rivets in line with it are normal brazier head and the rivet circled in green and all the ones in line with it are modified brazier heads. This worked really well and doesn't look like it doesn't belong which is what I was worried about.
36.jpg

I also got the 4 ribs in the bow and the first rib in the floor taken off so I can clean them up and get all the crud out from underneath them. No pics of this though as I forgot and I'm to lazy to go downstairs to take one. Going to order some metal for patches online as well as the angle aluminum for the knee brace tabs because you can buy almost the same metal that starcraft uses from the big online shopping giant for a very reasonable price....Starcraft uses 5052 H34 aluminum according to their website and you can buy 5052 H32 online, I don't think the angle is the same but I'm not worried about it.
 

SHSU

Lieutenant Junior+Starmada Splash Of The Year 2019
Joined
Mar 8, 2017
Messages
1,722
Looking good!!!

Ya, didn't see the post on modified vs standard brazier but can see a clear difference in size. Glad you figured a way to work them.

Who is helping you buck them? Need to buy then a case or two... lol

SHSU
 

Mikesta

Petty Officer 3rd Class
Joined
Mar 15, 2018
Messages
86
Looking good!!!

Ya, didn't see the post on modified vs standard brazier but can see a clear difference in size. Glad you figured a way to work them.

Who is helping you buck them? Need to buy then a case or two... lol

SHSU
My dad helps me with everything, not sure who enjoys the projects more...me or him.
Always plenty of cold ones on hand (y)
 

Mikesta

Petty Officer 3rd Class
Joined
Mar 15, 2018
Messages
86
Quick update on the project and a couple questions I have.

All paint stripping is now done inside and out, I really like the citrustrip that I have been using because it doesn't smell terrible while working indoors. I wish I knew from the beginning to cover it with plastic wrap to keep it wet and let it sit for at least 24 hours, most of the paint just comes off when pulling the plastic wrap off of it. I just have a few small spots to hit with the wire wheel where I didn't put the stripper on thick enough and it dried out.
Still plugging away at riveting also, I actually enjoy the riveting quite a bit. It's nice to feel like forward progress is being made instead of still tearing down all the old stuff.
Got some angle to beef up the knee brace, got a piece of 1'x1' .090 5052 that I want to attach to the underside of the hull below the knee brace for some added support, a new drain plug that I will eventually install behind the knee and I got a 2'x4' sheet of 5052 slightly thinner than the above sheet to make some patches on the rest of the hull

Now some questions I have for you guys

I have a few patches that need to be made on spots that are curved, what is the best way to form the patch to the contour of the hull. I assume with a hammer but would I want to use a metal hammer, a rubber hammer, any other kind of hammer? They're going to be small patches probably 3"x3"and maybe a few that are a little bit bigger. I just don't want to do any damage to the metal underneath

Next question is what is your guys take on hitting the entire boat inside and out with muriatic acid to etch for a nice clean surface before gluvit, paint, etc...We use it at work to clean the dump bodies and fuel tanks on our trucks and it comes out nice. My thinking is it would get into the deeper corrosion holes where I cant reach with a wire wheel and give me a nice surface ready to be skimmed over with jb weld and painted. I started sanding the hull inside and out in the bow area to create a nice surface for paint to adhere to but it's quite a pain in the butt, I think just spraying it with muriatic acid would be a million times easier
 
Top