1981 Starcraft Super Sport 180 - Gonna try a Restore

Decker83

Commander
Joined
Apr 5, 2011
Messages
2,592
I just bought 2 of the Moeller fittings from i-boats.. Good price and fast shipping..
The o-ring goes on the outside of the hull..
 

Candutch

Chief Petty Officer
Joined
May 8, 2015
Messages
637
Thanks CC, great pic. While I was looking at it I realized I don't even need to remove it. Funny how you can look forever at something and try to figure out how to deal with it and then look at a picture and wonder why you ever even thought you needed to do anything. Glad I didn't order the parts yet.
 

Candutch

Chief Petty Officer
Joined
May 8, 2015
Messages
637
Had sometime this weekend so got a little more done. I also bought some more supplies (another $250 into the project). For anyone in Canada looking for Gluvit and the large tubes of 3m you can get them at Industrial Plastic and Paints.

20150613_124744.jpg


Removed the knee brace and splashwell. The transom was in rough shape. No wonder everything was bent and broken. The splashwell is toast, 3-4" cracks where it meets the top rail in all three directions.

View attachment y4mOqgIa4IvajHGTj8AVuvGj8XMjmVWCMUy7pUMExXoIZpVUc26bat9CwGVX1_xVTlO-w8H4NFLArNqoETa24owY6ZMm7OgC9Mhd


Lots of pitting in the aluminum but cleaned it up and spread on the JB Weld.


View attachment y4mXdqrsroEJSiIc45Nh3JWgPX7hLzktgbfNQDmOi7_igy-wwkI5cBCs_siqf-vlSUdLtUSxo6ZNjSHgnU11XDQY9YD4KOOs5Zx0


PO's way of dealing with missing rivets on the knee brace was JB Weld over the holes.
 
Last edited:

Candutch

Chief Petty Officer
Joined
May 8, 2015
Messages
637
I hammered out the bent up transom and it is looking nice and flat again but I noticed a crack on the transom aluminum right between the upper and lower attachment areas of the knee brace. Can't tell if it is all the way through as it is right under the rail that holds the bottom of the transom wood. I cleaned it up, drilled the crack ends and covered it in JB Weld. My plan is to cover that area with 1/8" aluminum checker plate, 5200 and bolted through the hull where rivets and other fasteners are already. Does anyone foresee a potential problem with this plan?

View attachment y4mxtJuJOX1AlibAcIO6GjWYiCU6-Mn5pxjqUz27aAzlw1juNFVKp2R138My6sIdDu2CdxkL4AfmbP8wsn0OdqXnI6OrR_pEIMu9
 
Last edited:

Candutch

Chief Petty Officer
Joined
May 8, 2015
Messages
637
I also noted that most of the transom rot was where the splashwell attached to it, probably why there was 2 inches of caulking along there. The way it is designed I can't help but think that this will be the weak point again. I was thinking of skinning the inside of the transom with a thin sheet of aluminum and having the rail that the screws go through inverted and extend 3 inches so the drain holes go through it. This way the water will be contained by the lip extending up wards and not sitting on the seam. Does this make sense?
 

hayko1971

Starmada Splash of the Year 2015
Joined
May 24, 2013
Messages
448
I hammered out the bent up transom and it is looking nice and flat again but I noticed a crack on the transom aluminum right between the upper and lower attachment areas of the knee brace. Can't tell if it is all the way through as it is right under the rail that holds the bottom of the transom wood. I cleaned it up and covered it in JB Weld. My plan is to cover that area with 1/8" aluminum checker plate, 5200 and bolted through the hull where rivets and other fasteners are already. Does anyone foresee a potential problem with this plan?


you might want to drill small holes at each end of the cracks to prevent them from growing. I would then take a dremel tool or die grinder to the cracks to create a bed for Marine JB Weld to set into and bond really good. Then your 5200 buttered up plate.
 

hayko1971

Starmada Splash of the Year 2015
Joined
May 24, 2013
Messages
448
I also noted that most of the transom rot was where the splashwell attached to it, probably why there was 2 inches of caulking along there. The way it is designed I can't help but think that this will be the weak point again. I was thinking of skinning the inside of the transom with a thin sheet of aluminum and having the rail that the screws go through inverted and extend 3 inches so the drain holes go through it. This way the water will be contained by the lip extending up wards and not sitting on the seam. Does this make sense?


The bottom of the drain tube holes should line up with the splashwell so that no water rests in the splashwell and flows out the drain tubes. if water isnt allowed to rest in there, it shouldn't be a problem.
Who knows what storage habbits the PO had, the boat could have sat outside with a splashwell full of leaves and debris blocking off the tubes and letting water just sit there.
 

dozerII

Admiral
Joined
Oct 25, 2009
Messages
6,527
That sucks, post some pictures of your splash well cracks, the 18SS I did had bad splash well cracks as well, if they are the same I will link you to the repair.
 

Watermann

Starmada Splash of the Year 2014
Joined
Jan 12, 2013
Messages
13,753
Some very typical hull repairs for a neglected/abused rescue tin boat.

Clean up the area of the crack on the transom and post another pic of it.

I would drill out the rivets and remove the 'Z' bracket that the transom wood rests in. With that much corrosion and damage above it you won't be sorry you cleaned up whats behind it chewing on the transom skin and bracket. It's just another step in making for a clean rebuild of the most important part of the boat.
 

Candutch

Chief Petty Officer
Joined
May 8, 2015
Messages
637
Thanks Hayko, Watermann and Dozer. Here are the pics of the crack cleaned up and of the splashwell cracks. Probably no going to put the splashwell back, I want to replace it with a deck and smaller splashwell. Just have to figure out how to tie it all in so it is still structurally sound.


Candutch

Chief Petty Officer
Joined
May 8, 2015
Messages
637
The cracks on the other side of the splash well look the same as pictured. The screw flange also has a couple of chunks broken off. Good advice to remove the z bracket, that will be my next job. Can I put it back on with stainless steel machine bolt and nylock nuts? I'm not sure I want to tackle rebucking rivets.
 

g0nef1sshn

Lieutenant
Joined
Feb 24, 2015
Messages
1,291
The bucking if the Z brace wasnt too hard for me with some practice rounds first on other things. If you have the compressor already then the gun and rivets arent too much more of an investment. Those were the first rivets I think I ever did with a rivet gun. If you took the knee brace out, that should be replace with solid rivets anyhow. Do like I did and go for it! The knee brace you will want an extra person on hand though.
 

Watermann

Starmada Splash of the Year 2014
Joined
Jan 12, 2013
Messages
13,753
The cracks on the other side of the splash well look the same as pictured. The screw flange also has a couple of chunks broken off. Good advice to remove the z bracket, that will be my next job. Can I put it back on with stainless steel machine bolt and nylock nuts? I'm not sure I want to tackle rebucking rivets.


Add some 5200 to your shopping list and the ss machine screws with nylocs will work just fine.

On that transom, wholly HE double L! That PO beat the living snot out of it, looks like maybe an OB came loose? ANY cracks should have the ends stop drilled (small bit like 1/8") and filled with the JB or MT. If that part is backed by the transom then I don't see the need for an AL backer plate, 1 1/2" of nice ply is a heck of a backer. Once cured that JB is tough stuff, you would have to beat it out of there with a hammer.
 

Candutch

Chief Petty Officer
Joined
May 8, 2015
Messages
637
"On that transom, wholly HE double L! That PO beat the living snot out of it, looks like maybe an OB came loose?"

The knee brace was totally broken off on top so the transom was flexing at the bottom which caused this mess. Unfortunately the damage is below the transom right at the bottom of the z bracket. I'll fix it as suggested and add the plate over top. Ultimately adding rivets would be the best option but I have a full tube of 5200 so it will be the machine screws as I don't want to drop another $100 on a rivet gun for the dozen or so rivets I have to replace.
 

hayko1971

Starmada Splash of the Year 2015
Joined
May 24, 2013
Messages
448

Candutch

Chief Petty Officer
Joined
May 8, 2015
Messages
637
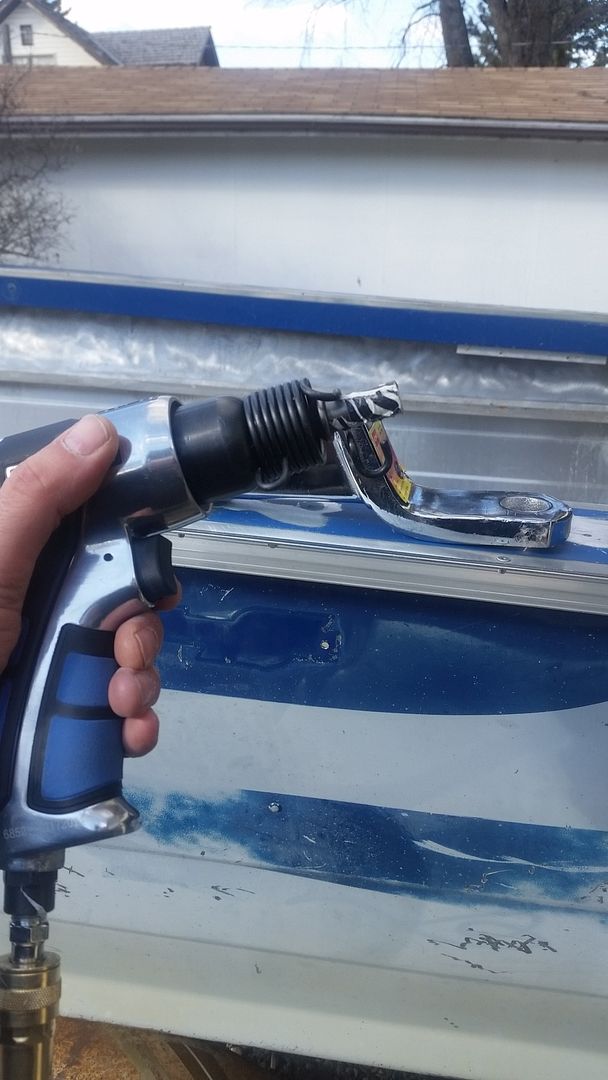
Nice, thanks Hayko. I have that set. How do you modify the chisel? Is it just a flat end?
 

hayko1971

Starmada Splash of the Year 2015
Joined
May 24, 2013
Messages
448
I took the pointy one and cut it so it was flat on the tip, then with the die grinder/dremmel tool I ground the flat tip to a concave surface that a rivet fits in. You'll need a solid rivet to check the shape. I got some from my snowmobile dealer.
 

hayko1971

Starmada Splash of the Year 2015
Joined
May 24, 2013
Messages
448
If you use the air hammer to buck rivets, turn your air pressure right down. I found 40 psi to work best for me.
I started low, 20 psi, that set them okay, but 40 formed the tails nicely. It's pretty easy, just watch you tube videos and go slow.
 
Top