1981 Starcraft SS 16' rebuild

bryan65

Seaman
Joined
Jul 22, 2012
Messages
50
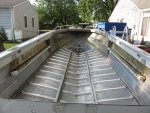
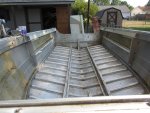
AFter 4 years of asking my dad to let me have his boat which had not been in the water for years. He finally gave in and let me have it. When I got it home it was worst than I thought (My foot went through the floor in many places) What I thought was going to be an easy fix, looks like a major overhaul now. Especially after finding this sight and seeing all the awesome upfits. I kept finding more wrong. Guess I have my work cut out for me, Any help or ideas would be appreciated.

After 14 years in Coast Guard, can't wait to get back in the water!

A few pics.

Boat A.jpg Boat E.jpg Boat B.jpg
Boat C.jpg Boat D.jpg
 

bryan65

Seaman
Joined
Jul 22, 2012
Messages
50
Re: 1981 Starcraft SS 16" rebuild

Re: 1981 Starcraft SS 16" rebuild

To date:

Got the floor out, all the wood is gone (It had two huge ant farms in it) Need to remove console. Checked transcom after seeing a few people do it on this site, My finger went right through it. So need to replace it (Ideas on getting it out?) Motor is Johnson 50 HP, has not run in 10 years. Wiring is frayed and renewed in the engine. Throttle cables need replaced. Might not be getting it in the water this year :(

I guess I can't complain though for the cost..lol
 

Captmills

Petty Officer 1st Class
Joined
Aug 22, 2009
Messages
374
Re: 1981 Starcraft SS 16" rebuild

Re: 1981 Starcraft SS 16" rebuild

we used a cinder block and a 2x4 and pried one side then the other till it popped out, make sure all bolts are out or she ain't budging. try to get it out in one piece, you'll be needing a pattern.
 

bryan65

Seaman
Joined
Jul 22, 2012
Messages
50
Re: 1981 Starcraft SS 16" rebuild

Re: 1981 Starcraft SS 16" rebuild

Thanks for the Info, That "#9" is awsome. alot of good info there. I found that yesterday when someone told me from the starcraft owner's thread. And thanks for the help Capt, I will try to get that out this weekend. I need to find or build something to hold the motor before I can do this. Alot more tear down when I thought I was done.

My Goal was to try to get it to original shape, and get it in the water, then look to upgrade in the off season when I could (I have no garage to put it in) but that is slowly changing as I find more wrong with it. Thankfully while inspecting, the hull looks to be in great shape so no repair needs done there. The only thing I found wrong there is the three screw holes where the speed sensor used to be. I did not see it until I washed the hull. and noticed light coming in when I was inside looking aft.
 

Bob_VT

Moderator & Unofficial iBoats Historian
Staff member
Joined
May 19, 2001
Messages
26,030
Re: 1981 Starcraft SS 16" rebuild

Re: 1981 Starcraft SS 16" rebuild

Once that old deck is out and the consoles etc........ Gluvit (a 1 quart size can) is your best insurance against leaks. It is a thick flowing creeping epoxy that will seal up the seams and rivets.

All of the tips and tricks listed in that sticky will help you ;) i.e. flotation and what to use.

The single most pain in the butt for this entire job will be the splashwell. Everyone who has rebuilt a SS will tell you the same thing.

So before you get sticker shock as another new iboats member did (LOL) everyone uses stainless steel nuts, bolts and screws ...... one member had to sell a kidney to buy his !!:)

Oh those holes from the screws on your transom...... get some aluminum pop rivets and fill the holes. When you gluvit the interior then you also hit those rives and it is sealed forever. Not many use the old fashioned speedometer with a pitot that worked off of water pressure anymore and have deleted it.
 

bryan65

Seaman
Joined
Jul 22, 2012
Messages
50
Re: 1981 Starcraft SS 16" rebuild

Re: 1981 Starcraft SS 16" rebuild

Once that old deck is out and the consoles etc........ Gluvit (a 1 quart size can) is your best insurance against leaks. It is a thick flowing creeping epoxy that will seal up the seams and rivets.

All of the tips and tricks listed in that sticky will help you ;) i.e. flotation and what to use.

The single most pain in the butt for this entire job will be the splashwell. Everyone who has rebuilt a SS will tell you the same thing.

So before you get sticker shock as another new iboats member did (LOL) everyone uses stainless steel nuts, bolts and screws ...... one member had to sell a kidney to buy his !!:)

Oh those holes from the screws on your transom...... get some aluminum pop rivets and fill the holes. When you gluvit the interior then you also hit those rives and it is sealed forever. Not many use the old fashioned speedometer with a pitot that worked off of water pressure anymore and have deleted it.

Yes, I am not looking forward to that one, being a newbie and all. My wife is not excited either, but I showed her how bad the wood was and what kind of damage could be caused when the motor started applying alot of torque to that rotted wood and she agreed. The floor was so bad I could hardly use it as a pattern to cut new floor. Although I did it, but used PT wood which I heard is a nono, so still have to get new wood (although my PT wood sheets did fit, I had half of them in just did not mount them yet) I am so hoping transcom comes off in one peace so I have a pattern.

Thanks for the info on the gluvit, that will put my mind to rest, even though I see no damage (I am not planning on repainting the exterior of the boat anytime soon. it is not in bad shape, and want to spend money elsewhere)

You answered my question about the pilot for water pressure for the speedometer. I was going to ask about replacing it later, but if people are doing away with it. I will just buy a new kit. (we had a roller that checked speed when I was in the coast guard in the early 90's)

As for stainless. I had already planned replacing everything with either stainless or aluminum (rivits) There are already some non stainless bolts I have to take out which are rusted and probably need to be cut off. I plan on keeping this boat for a long time, so do not want to screw myself for any future repairs I may need to do!
 

North Beach

Commander
Joined
Sep 29, 2008
Messages
2,022
Re: 1981 Starcraft SS 16" rebuild

Re: 1981 Starcraft SS 16" rebuild

Welcome to iBoats bryan. Once you go thru this SS you'll have a really nice boat at a fraction of the cost of a new one and you'll have the satisfaction of knowing you did it all yourself. Plus it belonged to your dad and that's a plus in my book.

Lots of good info and really helpful folks here so use it to your advantage. And keep postin those pictures. It passifies the mob....
 

bryan65

Seaman
Joined
Jul 22, 2012
Messages
50
Re: 1981 Starcraft SS 16" rebuild

Re: 1981 Starcraft SS 16" rebuild

Welcome to iBoats bryan. Once you go thru this SS you'll have a really nice boat at a fraction of the cost of a new one and you'll have the satisfaction of knowing you did it all yourself. Plus it belonged to your dad and that's a plus in my book.

Lots of good info and really helpful folks here so use it to your advantage. And keep postin those pictures. It passifies the mob....

Thanks, And yes, it will be personalized. and I can have something to be proud of.

I already have some ideas and help by looking at other people who did this (mostly pictures have not started reading yet) I had thought I had finished tearing up, But since reading in here, I see I need to take consoles out completely (the wood needs replaced anyway so why keep it in) I also want to redo the console dash boards, make them nice. My plan is to take the front seats and change them so you can raise a seat for storage underneath, Hope to find ideas on how to do this, I just think it will be more efficient than the small openings at the bottom. Will probably make more changes as I get ideas.

The seats are stained and two have small holes, otherwise in great shape. Going to patch holes and repaint seats and other vynyl areas which are not damaged, the front V section of vinyl is wasted and needs replaced. so makes changing the arrangement and how it works easier. I have been taking pics as I take apart for reference when putting back together, will post some more pics later when I get home.
 

bryan65

Seaman
Joined
Jul 22, 2012
Messages
50
Re: 1981 Starcraft SS 16" rebuild

Re: 1981 Starcraft SS 16" rebuild

Ok more picks of what I found when I started taking boat apart.

Wood in back of boat, (I stepped through this wood in the centerline, went clean through.
Wood.jpg

Bow seating, Vinyl is toast, Wood is rotten will have to replace, Thinking of changing design anyway to allow for seat on both sides to life to access storage
Bow Seat.jpg

Electrical, big mess, wires corroded and broke, Not much done here, probably factory, I am going to mount fuze panel up front on console and redo all electrical,
Electrical.jpg

Seating, as you can see, a few holes, Do not want to spend much to buy new (at least not yet maybe in a few years) plan is to patch and repaint vinyl
Seating.jpg

Seats removed, Skilocker, you can see where I stepped on it and it caved in also. not sure if i am going to put this back in, might for storage,
Skilocker.jpg

plan to remove console, motor and transcom wood tomorrow, will take pics.
 

Captmills

Petty Officer 1st Class
Joined
Aug 22, 2009
Messages
374
Re: 1981 Starcraft SS 16" rebuild

Re: 1981 Starcraft SS 16" rebuild

before it's all said and done you will be buying seats and spiffing this and that up, so on and so on. What lessens the pain a bit is to buy SS screws and bolts a bit at a time before you need them (SS screws and bolts are a $$$ killer) Great to see some progress, I have to get out and get busy on mine:) Oh, buy the way, sorry to hear about the PT, DON'T use it, another tip, read lots of threads before you do anything. Somebody here has done this and been there before and can save you alot of heartache and $$$
 

bryan65

Seaman
Joined
Jul 22, 2012
Messages
50
Re: 1981 Starcraft SS 16" rebuild

Re: 1981 Starcraft SS 16" rebuild

Last two days been stormy, wish I had a garage

Storm.jpg

The cover for the boat was rotten, Hope I can find a good cover custom fit when I get done. Any one know of anyplace that has custom fit covers for starcrafts?
Stormy1.jpg
 

bryan65

Seaman
Joined
Jul 22, 2012
Messages
50
Re: 1981 Starcraft SS 16" rebuild

Re: 1981 Starcraft SS 16" rebuild

before it's all said and done you will be buying seats and spiffing this and that up, so on and so on. What lessens the pain a bit is to buy SS screws and bolts a bit at a time before you need them (SS screws and bolts are a $$$ killer) Great to see some progress, I have to get out and get busy on mine:) Oh, buy the way, sorry to hear about the PT, DON'T use it, another tip, read lots of threads before you do anything. Somebody here has done this and been there before and can save you alot of heartache and $$$

Yes, read lots of threads, hard to keep up when I see something i like, then to try to find it again. I figure I will replace the seats in a few years, more important stuff now. ,, And Yes SS can be expensive, But already taking a bunch of rusted stuff out so.. Worth it!
 

bryan65

Seaman
Joined
Jul 22, 2012
Messages
50
Re: 1981 Starcraft SS 16" rebuild

Re: 1981 Starcraft SS 16" rebuild

Update, busy day today, Took both consols off, Splashguard off and engine off. Removed wiring and cables. Purchased Gluvit, epoxy, and some goodies for later. Here are some pics.

Consol off.jpg

Engine Off.jpg

Aft.jpg
Electrical was a mess under the console, going to have to redo all of this
Elect 1.jpg

Ok I am stuck, I have everythign off. Now how do I get the wood out without taking any more apart? Or can I, Can I just cut some of the metal around to let the wood slide out??
 

Attachments

  • Transcom wood.jpg
    Transcom wood.jpg
    119.6 KB · Views: 1

Bob_VT

Moderator & Unofficial iBoats Historian
Staff member
Joined
May 19, 2001
Messages
26,030
Re: 1981 Starcraft SS 16" rebuild

Re: 1981 Starcraft SS 16" rebuild

Yes, you can make a small cut bend away that metal and slide the wood out.

It is common for the SS and Jupiter hulls.
 

GA_Boater

Honorary Moderator Emeritus
Joined
May 24, 2011
Messages
49,038
Re: 1981 Starcraft SS 16" rebuild

Re: 1981 Starcraft SS 16" rebuild

Ok I am stuck, I have everythign off. Now how do I get the wood out without taking any more apart? Or can I, Can I just cut some of the metal around to let the wood slide out??

Bryan - I see you still have the cap strip on top of the transom. Take that off and drive in some lag bolts and a piece of chain. Use the chain to pull up on the transom wood. Maybe some support inside the boat and a 2X4 or 4X4 to see-saw it out. Once it starts to move it should come the rest of the way.. Good luck.
 

bryan65

Seaman
Joined
Jul 22, 2012
Messages
50
Re: 1981 Starcraft SS 16" rebuild

Re: 1981 Starcraft SS 16" rebuild

Thanks for the info. I did as you guys said (although I put 2 eyebolts in and my son in law and myself lifted up, Still had to pry to get it started though, then 2x4 the rest of the way,

a few questions, The drain holes for the splashwell, had what looked like aluminum channel, I had to destroy to get it out, What is an easy way to replace? (I have looked in alot of threads and have not seen this mentioned yet, or somehow missed it)

anyway here are some pics.

Transom wood.jpg

Transom wood 2.jpg

Back boat.jpg

Inside.jpg

Some notes. They did not cut this as one peace of wood, As you can see the upper curved peaces were separate, will not be doing this when replace. We alsmost decided not to do this as damage was not as bad as we thought, glad I decided to do it. Alot of ants eating wood (third nest we have found) and parts were soaked in water clean through.

Now going to try to vacuum, power wash and hopefully get gluvit down today.
 

jasoutside

Supreme Mariner
Joined
Dec 20, 2009
Messages
13,269
Re: 1981 Starcraft SS 16" rebuild

Re: 1981 Starcraft SS 16" rebuild

Good move getting that transom out. I think most fellas who are thinking they may just use what is installed are thankful they pulled it out. Yah, best course of action is to build out a one piece transom instead of three;)

The drain holes for the splashwell, had what looked like aluminum channel, I had to destroy to get it out, What is an easy way to replace? (I have looked in alot of threads and have not seen this mentioned yet, or somehow missed it)

I do believe you are talking about the drain tubes here eh?

If you are you can check my Sea Nymph thread here, I just replaced mine not too long ago:

http://forums.iboats.com/showthread.php?t=545380&p=3875891&viewfull=1#post3875891

If you don't want to spend the dough you can always goe with something like this:

http://www.iboats.com/Seachoice-Spl...84403267--session_id.887988986--view_id.20368

Cheers:)
 

bryan65

Seaman
Joined
Jul 22, 2012
Messages
50
Re: 1981 Starcraft SS 16" rebuild

Re: 1981 Starcraft SS 16" rebuild

Yes, that is exactly what I was looking for thanks!

Good move getting that transom out. I think most fellas who are thinking they may just use what is installed are thankful they pulled it out. Yah, best course of action is to build out a one piece transom instead of three;)


I do believe you are talking about the drain tubes here eh?

If you are you can check my Sea Nymph thread here, I just replaced mine not too long ago:

http://forums.iboats.com/showthread.php?t=545380&p=3875891&viewfull=1#post3875891

If you don't want to spend the dough you can always goe with something like this:

http://www.iboats.com/Seachoice-Spl...84403267--session_id.887988986--view_id.20368

Cheers:)
 

bryan65

Seaman
Joined
Jul 22, 2012
Messages
50
Re: 1981 Starcraft SS 16' rebuild

Power washed inside of hull, alot cleaner, Still have found no bad rivits, which is good.

attachment.php


attachment.php


Applied Gluvit to boat. Excited that tear down is complete and I can start getting stuff ready to put everything back together!!
 

Attachments

  • Clean 1.jpg
    Clean 1.jpg
    148.6 KB · Views: 2
  • clean 2.jpg
    clean 2.jpg
    145.3 KB · Views: 2
Top