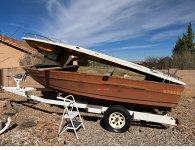
1981 Citation Marquis restoration...

Luposian

Petty Officer 2nd Class
Joined
Aug 15, 2015
Messages
117
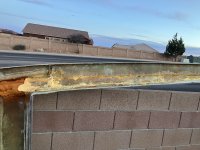
Well, I just learned a new boat term! BOOT STRIPE! Aaaand, I now know what that black line on my boat is! Yay, me! :cool:
 

Attachments

  • IMG_3789.jpg
    IMG_3789.jpg
    1.1 MB · Views: 15

Luposian

Petty Officer 2nd Class
Joined
Aug 15, 2015
Messages
117
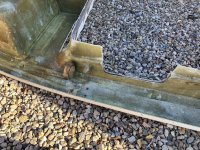
1 year and 5 months later... I'm kinda getting back into the mood to work on my boat again. But I'm horribly bothered by the way the foam was applied under the bow. I'm trying to understand WHY it was done the way it was. Even sloppy work is done that way, for a reason. May not be a good reason, but there is a reason. I shouldn't care, but I do. I want to know why it's there, and why it was applied the way it was.

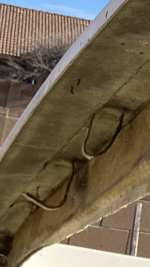
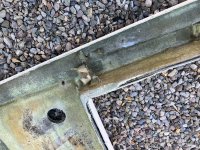
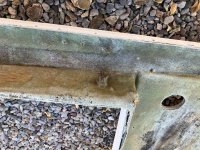
For example, if you look at the prior pics, they foamed under the gunwale on the port side, but only so far (not all the way to the stern). Any idea why? They applied a thin layer of foam (it has black splatching on it) to the starboard side of the steps, but not the port side. If the foam was meant as sound/vibration dampening, why one side and not the other?

As it is, the foam is definitely "gone" (failing; useless, I assume), as I can rub it and it just comes off on my hand as yellowish powder. It looks and feels a lot like the foam you use the fills cracks in your house with. Does closed-cell flotation foam degrade like that? It's yellow and old looking/feeling (crumbly).
 

Scott Danforth

Grumpy Vintage Moderator still playing with boats
Staff member
Joined
Jul 23, 2011
Messages
49,854
They foamed the cap when it's upsidedown

They did the absolute minimum amount of work at the factory to get foam in the boat to meet IMO/USCG requirements for emergency flotation at the time of manufacturer

The boat was originally designed to last 15 years

Yes, the over time the flotation foam will deteriorate.
 

Luposian

Petty Officer 2nd Class
Joined
Aug 15, 2015
Messages
117
They foamed the cap when it's upsidedown

They did the absolute minimum amount of work at the factory to get foam in the boat to meet IMO/USCG requirements for emergency flotation at the time of manufacturer

The boat was originally designed to last 15 years

Yes, the over time the flotation foam will deteriorate.
So, what I should do is get the cap off the hull (well, get it on the ground, since it's already separated), chip/chunk/cut out all the old foam and basically refoam it? Or could a different type of flotation be considered, like capped 20oz/2ltr bottles and foam those into place? Should I do more than they did (apply flotation/foam in more places) or keep it basically about the same? The loops to support the wiring and steering cable (on the starboard side) are nothing more than sections of cardboard tube! Seriously! Just held in with a little resined fiberglass strip. I'm thinking maybe similar sized pieces of PVC held in with resined fiberglass strip would be much longer lasting and better? Or maybe longer sections of PVC tube (a couple inches long)? Wouldn't be wise to make a complete wiring conduit out of PVC, would it?

Gonna also redo a lot (or all) of the cleats, rails, etc. as they're just screwed in with sheet metal screws or similar course threaded screws. Some are machine screws, but have no backing support (washers or metal plate), so it wouldn't take a whole lot to rip them out.
 

Scott Danforth

Grumpy Vintage Moderator still playing with boats
Staff member
Joined
Jul 23, 2011
Messages
49,854
Yes on the foam. You won't be owning the boat 45 years from now

Resin will come loose from the PVC, use fiberglass tube, or duplicate what was there

There may be aluminum plates in the laminate schedule where the cleats are
 

Luposian

Petty Officer 2nd Class
Joined
Aug 15, 2015
Messages
117
Yes on the foam. You won't be owning the boat 45 years from now

Resin will come loose from the PVC, use fiberglass tube, or duplicate what was there

There may be aluminum plates in the laminate schedule where the cleats are
So just refoam or my other flotation idea + foam?

I've looked underneath the cleats and they're just coarse-threaded metal screws through the fiberglass... no aluminum (laminate schedule? What is that?).
 

cyclops222

Lieutenant Commander
Joined
Mar 21, 2024
Messages
1,503
You have not looked at modern boat screws at a dealer.
Shiny SHEETMETAL screws. Some in stripped out holes.
YEEEHAWWW
Buy a brand new boat. With rejects included. Free of additional charges.
 

Scott Danforth

Grumpy Vintage Moderator still playing with boats
Staff member
Joined
Jul 23, 2011
Messages
49,854
So just refoam or my other flotation idea + foam?

I've looked underneath the cleats and they're just coarse-threaded metal screws through the fiberglass... no aluminum (laminate schedule? What is that?).
Inside the layers of FRP (the laminate schedule), where the cleats are, will most likely be 3/16" (5mm) thick aluminum plates

It's been common reinforcement practice for about 70 years

Easy to tell, just lightly drill up from the back side, between the cleat mounting holes.
 

cyclops222

Lieutenant Commander
Joined
Mar 21, 2024
Messages
1,503
I had to add large enough Backer Plates on some cleats. Much larger on all that have dock or towing lines.
 

todhunter

Canoeist
Joined
Sep 15, 2020
Messages
1,318
I would not do the bottle/foam idea - just go back with regular foam. In case you or a loved one in the future decide to sell the boat. If I was buying a boat and saw a bunch of 20oz bottles foamed under the deck, I'd walk away. Honestly, glass laid over thin carboard tube isn't a bad idea - the cardboard tube is just there to hold the shape until the resin hardens. Personally, I'd probably put packing tape over the carboard tube so that after the resin hardens, you can pull the cardboard tube out and be left with a fiberglass-only tube.

I wouldn't do a long single tube for the wiring and control / steering cables. My boat has short (~4" diameter, ~6" long) tubes about every 2 ft under the gunwale to feed things through. Once you get all your wiring and control cables in place, you can zip tie everything together between the tubes to prevent wires from sagging down into view.
 

Luposian

Petty Officer 2nd Class
Joined
Aug 15, 2015
Messages
117
I would not do the bottle/foam idea - just go back with regular foam. In case you or a loved one in the future decide to sell the boat. If I was buying a boat and saw a bunch of 20oz bottles foamed under the deck, I'd walk away. Honestly, glass laid over thin carboard tube isn't a bad idea - the cardboard tube is just there to hold the shape until the resin hardens. Personally, I'd probably put packing tape over the cardboard tube so that after the resin hardens, you can pull the cardboard tube out and be left with a fiberglass-only tube.

I wouldn't do a long single tube for the wiring and control / steering cables. My boat has short (~4" diameter, ~6" long) tubes about every 2 ft under the gunwale to feed things through. Once you get all your wiring and control cables in place, you can zip tie everything together between the tubes to prevent wires from sagging down into view.
If I go the plastic bottles+foam route, I do NOT plan to have the bottles visible (that would be so redneck)! All you'd see is the foam. But I'm assuming a bottle of air is more buoyant than plain foam, so you get more buoyancy, overall, combining the two. The chemicals in foam don't dissolve plastic, do they? If the bottles were compromised, then you're left with LESS buoyancy than if you used 100% foam, as the air pocket (compromised bottle) could hold water, once it got past the surrounding foam.

The interesting thing is, the cardboard tube sections are about 1" thick and they are completely untreated... just plain cardboard, held in with a thin strip of resined fiberglass! That's all! Absolutely bare minimum effort. I ended up breaking all of them, as I was gutting the boat years ago (2019), trying to pull all the wires and steering out. But, no matter... it's all gonna be redone a LOT better!
 

Attachments

  • IMG_6221.PNG
    IMG_6221.PNG
    3.1 MB · Views: 3

Luposian

Petty Officer 2nd Class
Joined
Aug 15, 2015
Messages
117
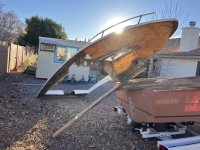
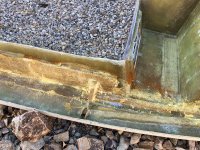
I managed to lift and then prop the cap up against the block wall of our backyard and now working on removing the old foam with a wide metal spreader (for drywall work), using a hammer to drive it into the foam at different angles and chiseling it out, piece by piece. Time consuming work and a little messy but, otherwise, joyous amounts of fun! Seriously! šŸ˜

Question: Can you apply new flotation foam over old bits remaining (like shown) or do you have to clean out every trace of the old or the new won't cure/stick properly?
 

Attachments

  • IMG_6223.jpg
    IMG_6223.jpg
    3.7 MB · Views: 7
Last edited:

88 Capri (2022 SOTY)

Master Chief Petty Officer
Joined
Aug 25, 2019
Messages
834
IMHO I would remove it, I don't think it would affect the curing but would inhibit its adhesion. Some foam assists with structural integrity but I can't say for sure with your application. I'm sure someone else will be able to add more definitive information.
 

Luposian

Petty Officer 2nd Class
Joined
Aug 15, 2015
Messages
117
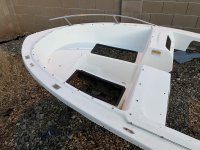
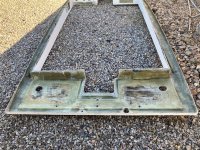
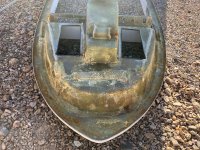
I decided, for the most effective approach, to flip my cap upside down. Thankfully I had my 26 yr. old son to help lift and position it, and then turn it over. Tonight, I removed the last of the majority of the foam. It's just cleanup "chisel work" to get rid of the last remaining bits.

It's amazing to see what did (and didn't) go into constructing the cap. The aft section has plywood supporting the fiberglass, but it looks like it was not well done. Not glassed properly (the plywood is showing through). Just slapped together to work "good enough" and they called it a day. There is a rectangular strip of glassed-in plywood under the foremost cushion section in the bow (for fiberglass support), but it's not even cut square! One end is narrower than the other! Why not trace out the whole section, cut a piece of plywood to match and then glass that in?

I swear... if I ever design/make boats... you'll have to wait for your boat to be built, because it will be built the way I want a boat to be done, not slapped together like a bunch of monkeys were put on the assembly line! Ugh!
 

Scott Danforth

Grumpy Vintage Moderator still playing with boats
Staff member
Joined
Jul 23, 2011
Messages
49,854
"good enough" and they called it a day.

I swear... if I ever design/make boats... you'll have to wait for your boat to be built, because it will be built the way I want a boat to be done, not slapped together like a bunch of monkeys were put on the assembly line! Ugh!
There would be no profit in making a boat perfect back then.

Your boat was designed to last no more than 15 years and it's now 45 years old.

So good enough was really good enough

Today, they have CNC cut material and molded stringer tubs. However the boats are still slapped together as fast as possible to make a profit
 

Luposian

Petty Officer 2nd Class
Joined
Aug 15, 2015
Messages
117
There would be no profit in making a boat perfect back then.

Your boat was designed to last no more than 15 years and it's now 45 years old.

So good enough was really good enough

Today, they have CNC cut material and molded stringer tubs. However the boats are still slapped together as fast as possible to make a profit
Wouldn't it be nice if companies chose to make money a different way than just selling new models of things? I've often thought that an ongoing warranty could be one such way, for those who don't WANT to have to buy the latest/greatest new thing every few years, but want protection for their purchases, til they decide to upgrade.

I'm wondering... were/are ANY boats ever built with quality, care, and pride? Or are they ALL just variations of the same Ferengi profit-motivated mindset?
 

Scott Danforth

Grumpy Vintage Moderator still playing with boats
Staff member
Joined
Jul 23, 2011
Messages
49,854
Italian Riva's are probably the best example of a boat built with quality and pride. the second would probably be Hinkley made up in Maine. however unobtainable by anyone but the top 1%
 

Luposian

Petty Officer 2nd Class
Joined
Aug 15, 2015
Messages
117
All the foam removed... now what next?

- I'm thinking, if I were to replace the plywood, at the rear, I'd size it a little bit wider, port and starboard, as well as closer to the aft edge. This way, the new wood covers all existing holes, allowing me to fill in the "holes" only as deep as the existing fiberglass, rather than trying to make plywood "plugs" and then fill in the remainder with epoxy. However, that entails resin/glassing an entire sheet of plywood rather than just filling in a few holes.

- As for the bow section, I discovered that a 20oz plastic bottle (and (even better) a 33oz tall bottle (more oz = more air)) fit snugly into that round glassed-in cardboard tube area! Glue in some formed pink insulating foam on the sides, some 33oz bottles in narrower areas, 1ltr and 2ltr bottles elsewhere... lotsa air/buoyancy and then foam everything in, so nothing "redneck" shows. Yup! I think this could work!

IMG_6236.jpg
 

Attachments

  • IMG_6238.jpg
    IMG_6238.jpg
    5.1 MB · Views: 3
  • IMG_6237.jpg
    IMG_6237.jpg
    5.5 MB · Views: 3
  • IMG_6239.jpg
    IMG_6239.jpg
    5 MB · Views: 3
  • IMG_6240.jpg
    IMG_6240.jpg
    3.7 MB · Views: 3
  • IMG_6241.jpg
    IMG_6241.jpg
    3.3 MB · Views: 3
Joined
Jan 14, 2025
Messages
12
I just read through your project. I've been repairing boats for a bit over 11 years now. Here are my thoughts.

Bracing: What you did should be fine. If it was me though, I would bolt some blocks to the outside, through the rivet holes, amd use ratchet straps. You can adjust them easier if needed, I think it would be more secure.

Floor and Stringers: Hopefully you can still see the old floor line on the hull. Make your stringers a bit taller than that, set them in the same places, and trim them down later. It's so much easier than cutting too short and having to work around that. Youll need some boards screwed across the tops to keep them in place, set them in with thickened resin, and will be glassing along the sides to attach them to the hull. Do the entire stringers, floor, and might as well do the transome too.

Foam: Take it all out, it will at best be in the way. Use a reciprocating saw to cut into squares, then a flat bar to pry it up in big chuncks. Quick, easy, and clean. New foam should be poured in after the floor is done.

The Cap: Don't do all of that mixing and matching with bottles and extruded poly foam. Some two part or spray cans when everything else is done will be fine. In this case, maybe spray cans. The two part might be a bit messy for that job. If the wood on the rear needs replaced, don't go side to side. You need those open areas to glass to. You can add small plywood blocks to support deck hardware now too.

At the beginning of this, you said you didn't care about time or money, you wanted it right. It's definitely going to be a lot of time and money to get it there, but don't skimp out.
I'll add more detailed responses as the project goes.
 
Top