1979 Starcraft 16’ SS Refresh

SHSU

Lieutenant Junior+Starmada Splash Of The Year 2019
Joined
Mar 8, 2017
Messages
1,658
Already close to my budget but it was blown by buying tools so not too worried.
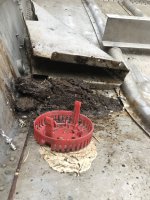
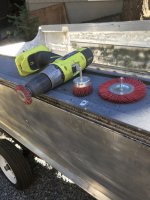
lol, I we all have that moment when we realize "SSSSSS*******************TTTTTTTTTTT"

Lots of work to do but getting closer to the next big step - riveting. I know once Im there that the boat starts going back together. Trying to just keep cracking away an hour or 2 a day at a minimum when I can.
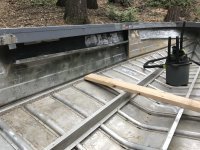
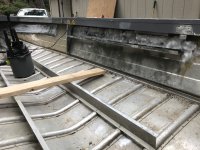
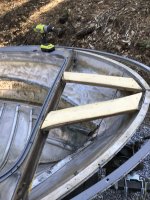
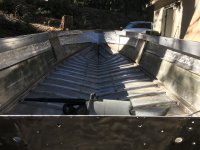
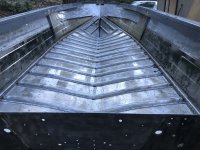
Yep, its starts to get better when you are putting her back together. It was a long time getting there for us, but once we turned that corner with the riveting and started to put the floor and stuff back in it seemed to fly.

SHSU
 

Moserkr

Chief Officer + Starmada Splash Of The Year 2021
Joined
Nov 23, 2020
Messages
826
@SHSU the s*******t is still coming as I figure out bracing costs. Either way I dont see it being as low as I hoped. Oh well, boat will look good, Ill be happy, family safe. That doesnt have a price.

As I wait on rivets and such to arrive, Ive been polishing up the side panels inside the boat that i know will be exposed. I was going to paint them, but after how much work it takes to get glue and paint off, they will be staying as shiny AL. Will give it character to have some metal showing and so that no one can deny this old girls roots. After Im done nyloxing everything I can, Im going to start removing rivets that are broken in the transom first, then work my way forward. Transoms probably the worst as far as rivets and nyloxing goes, lots to finish.

Will be on a hunting trip soon and weather comes in around that time of course, so back in the garage she will go no matter where Im at in the project. If Im lucky, I will have banged in my first new rivets before I go. After that time off, I should have everything on hand to get her ready for reassembly. Hard work will pay off!!
 

Attachments

  • 9A88DABF-EBF0-4834-BD96-E5FAC00A37B2.jpeg
    9A88DABF-EBF0-4834-BD96-E5FAC00A37B2.jpeg
    2.6 MB · Views: 12
  • A4958B10-BD1A-4A88-85E8-3E3AF186E30E.jpeg
    A4958B10-BD1A-4A88-85E8-3E3AF186E30E.jpeg
    1.8 MB · Views: 12

Moserkr

Chief Officer + Starmada Splash Of The Year 2021
Joined
Nov 23, 2020
Messages
826
Found 1/8” 5052 AL 4x8’ sheet for $180. 1/16” for $120. @classiccat I believe I read you cut your own sheets with a jigsaw? Also is the HF bending brake able to bend that 1/8” sheet? Id rather go big with the bracing than small. I want to do the braces under the gunwale shelf, and the L bracket along the ribs and tie them into the new braces. I dont plan on doing the z brace though. Looks like it will be cheaper to cut and bend myself with a new tool, also less time intensive. If I have the shop do it I have to go to the big city twice. Have to go to the big city to get the sheet metal but its in stock. I know 6061 is stronger but id like to keep it all the same as the boat was made with.
 

classiccat

"Captain" + Starmada Splash Of The Year 2020
Joined
Dec 20, 2010
Messages
3,405
the HF brake should be able to handle that thickness (0.125") of 5052; I did alot of 0.090" without trouble. If you have to do really wide pieces, you may need heat it to make it more malleable but I doubt that would be necessary.
 

Moserkr

Chief Officer + Starmada Splash Of The Year 2021
Joined
Nov 23, 2020
Messages
826
@classiccat Awesome! Thanks. Then thats on the list to get and do. At least all my cuts of AL will be covered up so no one can see how bad they were hahaha.
 

SHSU

Lieutenant Junior+Starmada Splash Of The Year 2019
Joined
Mar 8, 2017
Messages
1,658
As I wait on rivets and such to arrive, Ive been polishing up the side panels inside the boat that i know will be exposed. I was going to paint them, but after how much work it takes to get glue and paint off, they will be staying as shiny AL. Will give it character to have some metal showing and so that no one can deny this old girls roots.

Yep, that is why I covered mine, I quickly realized how long it would take to get the glue off and decided to just cover it. With that also came its own challenges and won't be doing that again. Getting vinyl glue to adhere to Aluminum isn't fun...

SHSU
 

Moserkr

Chief Officer + Starmada Splash Of The Year 2021
Joined
Nov 23, 2020
Messages
826
@SHSU I take it you left the old glue then to cover it with vinyl. I was just going to paint it, cause thats cheap, but the old glue is so bumpy it would look horrible. So had to remove the old glue to smooth it to paint, then I figured why even paint?! It took me around 45 min to do half the bow with the nylox cup brush, and 3 rechargeable drill batteries. Will pull out the ole milwaukee corded drill to finish the job. Only thing I plan on gluing down in the boat is the foam flooring cover. Not sure how it will stick to the gunwales that are still painted but we will find out haha.
 

Decker83

Commander
Joined
Apr 5, 2011
Messages
2,592
I used some Klean-Strip from the big box store to remove the glue
from the sides on mine.. Just brush it on and scrape it off. Works great..
 

SHSU

Lieutenant Junior+Starmada Splash Of The Year 2019
Joined
Mar 8, 2017
Messages
1,658
Only thing I plan on gluing down in the boat is the foam flooring cover. Not sure how it will stick to the gunwales that are still painted but we will find out haha.

For the gunwales, you have the finish trim along the edge. If you remove that and glue the vinyl under it you shouldn't have an issue. I have had zero issues with mine on the gunwales and floor. Just the ones on the side have been my problem children...

I used some Klean-Strip from the big box store to remove the glue
from the sides on mine.. Just brush it on and scrape it off. Works great..
That is a great idea, I didn't even think about that. Mostly tried with the nylox and wire wheels. To much effort and didn't think about using a chemical remover.

SHSU
 

Moserkr

Chief Officer + Starmada Splash Of The Year 2021
Joined
Nov 23, 2020
Messages
826
@Decker83 Really.... and I thought I was all done with kleen strip lol. Going to have to give that consideration. It would take probably 2 more hours to polish that glue off with the drill.

@SHSU Now why didnt I think of that?! At this point Ive deconstructed so much of the boat, whats a few more pieces? Lol. I like the idea of having the foam (vinyl in your case) held down like that too. That way its sandwiched down and the edges wont come up from use...

Thanks for the intel gentlemen! Thats why I love this forum. Tomorrow Ill be back in the boat. Was going to wire wheel tomorrow, but I think Ill get that knee brace and other transom rivets out instead. Will see how much time I have. Cheers!
 

Moserkr

Chief Officer + Starmada Splash Of The Year 2021
Joined
Nov 23, 2020
Messages
826
Almost to riveting!! Guns still in the mail, but my rivets are here. Also ended up just nylox wheeling the glue/paint off since I had already started. Wasnt that bad once I got going, just took a few beers. Those beers also included getting my knee brace and transom shelf off, as well as prepping the transom. There was a dirt turd under that knee brace!! Lol. Then I drilled out a ton of rivets, and counted the holes in my transom. Including the little screws for the transom’s cap, its 108!!!! Counted twice since i thought i screwed up but its right... like swiss cheese! Must have been 8 fish finders added in the back. Still lucky my boat has no visible cracks, and very little pitting.

Im going to sand it as smooth as I can, and nylox all the rust tomorrow. Plan is to have the boat pretty much prepped for riveting in the garage by weekend’s end. Even going to wash it with soap inside n out. Will pick up the sheet metal after I get back from my hunting trip, and should be set to reassemble. Cant wait!!!

One bummer was the gas tank I found online almost doubled in price... hope they bring that deal back by the time I need it!!
 

Attachments

  • 9D4A51F4-1D47-47B7-9602-CACBDF8A422F.jpeg
    9D4A51F4-1D47-47B7-9602-CACBDF8A422F.jpeg
    3.7 MB · Views: 18
  • 843FFEB7-6461-4E6C-8C1A-9D9F06109040.jpeg
    843FFEB7-6461-4E6C-8C1A-9D9F06109040.jpeg
    3.2 MB · Views: 19
  • A136DB55-86B8-4914-8DA8-8B34D748B68F.jpeg
    A136DB55-86B8-4914-8DA8-8B34D748B68F.jpeg
    1.6 MB · Views: 18
  • DE9C378D-B613-4FE3-8F59-DD284A61ACF2.jpeg
    DE9C378D-B613-4FE3-8F59-DD284A61ACF2.jpeg
    2 MB · Views: 20
  • E081AF30-65F1-4276-B88C-C53D8C3C1A8F.jpeg
    E081AF30-65F1-4276-B88C-C53D8C3C1A8F.jpeg
    4.8 MB · Views: 19

SHSU

Lieutenant Junior+Starmada Splash Of The Year 2019
Joined
Mar 8, 2017
Messages
1,658
Also ended up just nylox wheeling the glue/paint off since I had already started. Wasnt that bad once I got going, just took a few beers. Those beers also included getting my knee brace and transom shelf off, as well as prepping the transom. There was a dirt turd under that knee brace!! Lol.

Mine wasn't that bad, but was a big reason why I wanted the drain plug moved. Not sure why Starcraft opted to install them so high....

SHSU
 

Moserkr

Chief Officer + Starmada Splash Of The Year 2021
Joined
Nov 23, 2020
Messages
826
@SHSU not sure why they put the drain hole up so high either. Im not too keen on drilling another hole though. Will take a closer look, but i dont want to have to use 2 plugs. No live well or reason to use another hole.

Got a ton done today. Spent some time nylox wheeling everything, and almost got it all done. Wont take long to finish that tomorrow. Opened up the bow and got the wood out from under original mustard color vinyl. Wood is solid so will refinish and seal before putting it back. Im thinking I can get the bow back together first, then the transom when I start riveting. Shes a little wobbly right now with all the supports taken out. Also have the bunks built and ready for the trailer. Just need steel brackets to be built for the trailer, so i can mount the bunk brackets on to them. Will have precise adjustability when its done so worth the hassle. Last i got the windows and consoles separated and cleared out a table in the garage. Boat should be washed and back in the garage by tomorrow! Next step will be riveting!!

As Im working I have had a lot of thoughts about bracing and brackets too. Really looking forward to beefing her up. With no bracing in, she is pretty flimsy.
 

Attachments

  • 97EA6D6A-F7E4-41E4-9A78-72815BE0F38D.jpeg
    97EA6D6A-F7E4-41E4-9A78-72815BE0F38D.jpeg
    1.8 MB · Views: 17
  • 6D119AB0-8049-4EA9-BFAF-0C7A4CE8732C.jpeg
    6D119AB0-8049-4EA9-BFAF-0C7A4CE8732C.jpeg
    2.2 MB · Views: 17
  • 4E61E6BB-C31F-4CD8-A7C9-C06C603BDF33.jpeg
    4E61E6BB-C31F-4CD8-A7C9-C06C603BDF33.jpeg
    1.6 MB · Views: 17
  • ACDBE7CD-F04E-46BD-96AE-108723CCE8A4.jpeg
    ACDBE7CD-F04E-46BD-96AE-108723CCE8A4.jpeg
    1.6 MB · Views: 17

Moserkr

Chief Officer + Starmada Splash Of The Year 2021
Joined
Nov 23, 2020
Messages
826
Live update during my lunch break. Nyloxing the old glue is done, all thats left it the few bits of rust/corrosion on the floor. Then its time for a bath!!! Also got the bow wood pieces sanded, and the visible wood piece has now been stained (red oak color). Admiral’s orders. She also requested a high gloss finish so will be doing that tomorrow. I thought it would be cool to have some stained / sealed wood on board, especially the original wood they covered in ugly vinyl. Surprisingly the wood was in great shape for not being sealed from the factory. Also looks like oak, but im no expert. Will match the bow wood to my gunwale and console boards when it gets to that time.

Rivet gun is delayed in illinois, so wont have a chance to use until im back from hunting. The rest of my time this week will be to quickly prep all the support pieces with a nylox brush. Then hopefully no more of that!! Last pic is of the crowded garage. Surprisingly there are paths all around it!! Back to work. Truck needs a bath too.
 

Attachments

  • 584483C8-F067-48E7-95CF-1FE606827B61.jpeg
    584483C8-F067-48E7-95CF-1FE606827B61.jpeg
    2.4 MB · Views: 18
  • 3727E296-851F-4A86-9ACD-3BA3F5DDF285.jpeg
    3727E296-851F-4A86-9ACD-3BA3F5DDF285.jpeg
    1.6 MB · Views: 17
  • D30AB42C-2A94-45EF-91CB-84CDA414264F.jpeg
    D30AB42C-2A94-45EF-91CB-84CDA414264F.jpeg
    3.7 MB · Views: 17
  • BF609B45-9549-4BB3-8864-FC9C354BA4C9.jpeg
    BF609B45-9549-4BB3-8864-FC9C354BA4C9.jpeg
    2.9 MB · Views: 17
  • ED7C436E-BAD1-446F-9CFE-A4F09D8C7C69.jpeg
    ED7C436E-BAD1-446F-9CFE-A4F09D8C7C69.jpeg
    1.3 MB · Views: 18
  • E696EB2C-F6DB-46B8-9664-BF5D6DF012BF.jpeg
    E696EB2C-F6DB-46B8-9664-BF5D6DF012BF.jpeg
    795.4 KB · Views: 18

classiccat

"Captain" + Starmada Splash Of The Year 2020
Joined
Dec 20, 2010
Messages
3,405
I'm no expert either but I've heard it identified as mahogany. Looks good!
 

Moserkr

Chief Officer + Starmada Splash Of The Year 2021
Joined
Nov 23, 2020
Messages
826
@classiccat lmao damn wood once it got to CA it identified as a different species. Mahogany it is. Looks nice and is plenty tough. Put my full weight on it and it didnt flex at all.

Boat is hand washed and back in the garage!! Washed my truck and Admirals car too while i was at it. Buying bonus points for the hunting trip lol. Will be a few weeks before Im doing anything major again. I ended up nylox wheeling all the rust/corrosion, then did every rivet on the inside too so they are clean for the future coat-it. I did find one screw in the hull left over from PO2... also learned that the log impact popped up most of the ribs in the bow and busted all the rivets. When i fix her up ill work stern to bow along the bottom, and try to hammer everything into good order so its nice n tight. Feels good to be semi-on schedule and budget. Will do some odds n ends before I leave and will be ready to rock n roll when im back. Until then Ill just be lurking in the forums watching other peoples builds. Cheers! Cleanest she has been since the factory.
 

Attachments

  • 328B3C8D-620D-4D68-8624-97215A23A3F1.jpeg
    328B3C8D-620D-4D68-8624-97215A23A3F1.jpeg
    3.6 MB · Views: 11

SHSU

Lieutenant Junior+Starmada Splash Of The Year 2019
Joined
Mar 8, 2017
Messages
1,658
Man that is a pretty sight!!!! So clean and shiny!!!!

Looks like a really good job of cleaning off the glue. One comment, where the console is I noticed you didn't clean that area even though it will be exposed. Do you have plans for it?

SHSU
 

Moserkr

Chief Officer + Starmada Splash Of The Year 2021
Joined
Nov 23, 2020
Messages
826
@SHSU yes she is! Thanks, lots of elbow grease. You have a sharp eye. Yes I left under there alone as I plan on covering it with wood, and putting foam between that and the hull. Going to have brackets and braces that allow me to run wood panels from the transom to the front of the consoles. Measured it at roughly 10 feet. Havent looked at what kind of wood yet, but plan is to stain and match with the high gloss seal it so its visible. Want a tongue and groove kind of look. We shall see once I look at the cost, but i have stain and spar so its just wood then. Any suggestions on wood is welcome. Cant match it to that original mahogany piece cause thats expensive!! Not sure whats available near me for a steal. PO had cheap unsealed ply with the green vinyl over it. Id rather skip the vinyl and just see real wood.

Admiral and I were also looking at the faux teak type foam flooring. Not sure whether to go light or dark brown. With the dark reddish brown wood stain it could be too much dark. But with white? seats and trim colors it could be ok. Another point to decide on, and input is welcome. Hard for others to visualize exactly like I am though.

Then, to complete the interior color picture, add in the vinyl of the boat seats - was thinking white to match the console seats I already have. But they arent in great condition, just functional and not yet trashed. Then I have an off white bow casting deck seat too which Im planning to use thats in excellent condition. Would like to upgrade the console seats one day. Do i go off white or white?? Admiral will probably have the final say but I do know white never stays that way.
 

Moserkr

Chief Officer + Starmada Splash Of The Year 2021
Joined
Nov 23, 2020
Messages
826
Been wasting time looking at pics of boats, boat parts, motors, lol you get the point. Then UPS man came unexpectedly... rivet gun is here!!! Time to unbox my air compressor now that I know it is powerful enough to run a 4x gun. Read the rivet gun instructions and looks like I need to keep it well oiled. Remember seeing other people’s setups in past threads so will start on my hw. Not sure what my compressor comes with but its an 8 gallon and 3.7 cfm @90 psi. So the plan for the rest of my week is now get my air setup done, and polish any remaining AL pieces. Will try to pick up a sheet of AL on my way home from the big city airport after my hunting trip. Should have a cooler full of pheasants too!

Really cant wait to get back out on the water... with our mild winter I could have been fishing still. More motivation to get her done! Even though lots of snow is now forecasted, at least Im now mostly set for garage work. A little video of an outing with my BIL... we were testing rivet strength that day lol.
 

Attachments

  • IMG_2081.MOV
    28.8 MB · Views: 0

SHSU

Lieutenant Junior+Starmada Splash Of The Year 2019
Joined
Mar 8, 2017
Messages
1,658
@SHSU yes she is! Thanks, lots of elbow grease. You have a sharp eye. Yes I left under there alone as I plan on covering it with wood, and putting foam between that and the hull. Going to have brackets and braces that allow me to run wood panels from the transom to the front of the consoles.
lol, not a sharp eye. Just experience of having done it my self.

As for the panel idea, you don't need mahogany wood, but you can get pine and stain/dye it to look like mahogany. Sheet of plywood paneling should do the trick. Also suggest moving away from gloss, takes a lot of effort to keep perfect and shiny. Once it gets nicked or scratched it stands out pretty sharp against the rest.

Admiral and I were also looking at the faux teak type foam flooring. Not sure whether to go light or dark brown. With the dark reddish brown wood stain it could be too much dark. But with white? seats and trim colors it could be ok. Another point to decide on, and input is welcome. Hard for others to visualize exactly like I am though.
While dark flooring may look good in a show room, think about walking on it in the middle of the day with bare feet. It will be a heat magnet and may not be what you are looking for. This also plays true with a lot of the gloss, shiny spots reflect a lot of sun rays.

Not sure what my compressor comes with but its an 8 gallon and 3.7 cfm @90 psi. So the plan for the rest of my week is now get my air setup done, and polish any remaining AL pieces. Will try to pick up a sheet of AL on my way home from the big city airport after my hunting trip. Should have a cooler full of pheasants too!
Start low on the PSI and build your way up to figure out what works best. I think I was running mine at under 40 psi to drive them correctly. To high and my 4X would obliterate the head and tail. Leading to a drill out and redo which took more time then my original belief I was saving time by going faster....

SHSU
 
Top