1979 Starcraft 16’ SS Refresh

classiccat

"Captain" + Starmada Splash Of The Year 2020
Joined
Dec 20, 2010
Messages
3,412
I used a mix of 0.063” and 0.090” al sheet in both 6061 and 5052. if I recall, 5052 was used for forming patches (more malleable after annealing) and 6061 for my braces (more rigid) it was several years ago so hard to remember what I paid. If I recall a 4x8’ sheet ran around $100 from a sheet metal shop close to my house and didn’t really shop around. I bought a smaller sheets off of eBay.
 

SHSU

Lieutenant Junior+Starmada Splash Of The Year 2019
Joined
Mar 8, 2017
Messages
1,726
I used a mix of 0.063” and 0.090” al sheet in both 6061 and 5052. if I recall, 5052 was used for forming patches (more malleable after annealing) and 6061 for my braces (more rigid) it was several years ago so hard to remember what I paid. If I recall a 4x8’ sheet ran around $100 from a sheet metal shop close to my house and didn’t really shop around. I bought a smaller sheets off of eBay.

Two years ago I got a 1/8 thick 4x8 sheet of 6061 for $140 in Houston. Big box stores and ebay have a stiff price increase. I quickly learned to keep all my extra aluminum.

SHSU
 

Watermann

Starmada Splash of the Year 2014
Joined
Jan 12, 2013
Messages
13,787
I forgot, besides bracing, I have a simple question on my bunk placements. Where should the boat sit on the 10’ 2x6” bunks? Along the furtherest outside point or closer to the center? Thanks for the advice guys.
10' bunks on a 16'r, a few feet too long that your hull won't sit on. My 18'r on 8' bunks has some bunk with no weight up at where the bow starts to V.

The only place you can put the single set of bunks is between the outside strakes far out as you can.

y4m2_mMwylwYTlOFuUDgo1TKIRw0GeIwfmyOZxy2yOL7_XaJTLDsQtyxwJKSPwv_jM5j9HQXEltRDcNa1NPczaP68QxTMDy0L-geQnnRMPHabtVN59klzX5c2-FJ5EbDE-ytcU6iec2frCn2823o4pzJmmYcTmn6d2y-2JAOqpIXwzowvu2HakJ9LjpiDrMsb9i


y4mhqYzdMqI-jOn46FTQaml_W-hcN6xJjoxvURLvHWGPgvfJPGeUxJwhTTKV_ScZHwsEJveSTRA7D_XSBU8bVRFbdU0XPeiNodfkxLGcUUu5Ik5MjwoVuVGJ0BHQEVrcB9J2oUQ_obBidJtamM0utuYHBhRpcp4O_bJcAAz1m_8-4JmhTaFD3jKvAiS2tiHJDva
 

Moserkr

Chief Officer + Starmada Splash Of The Year 2021
Joined
Nov 23, 2020
Messages
869
Thanks @Watermann I will test fit the bare hull and cut to length as far out as I can sit it. New brackets and carpet come today. I also have rollers all the way to the front, as well as some bow supports I can still use. She should still be sitting pretty.

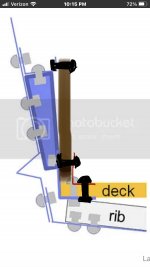
As for the bracing, i found @classiccat ’s drawing in post #522 or something like that. Used your drawing and marked it up so explain again my “wood box” bracing plan. Only point to note is the L braces would go between the bulkheads so theres no interference with the rivets. Going to make calls for metal today and crunch numbers between sheet and a bender vs store bought angle/flat bar. Plan A and B, i know which is better, will see what my wallet thinks. At least my Admiral is on board for the better plan with a sheet and bender 😁. Is that overkill though for a little 16’er??
 

Attachments

  • FC1D93E6-9CB6-4EED-9776-9D42CE4159D6.jpeg
    FC1D93E6-9CB6-4EED-9776-9D42CE4159D6.jpeg
    79.3 KB · Views: 16

Watermann

Starmada Splash of the Year 2014
Joined
Jan 12, 2013
Messages
13,787
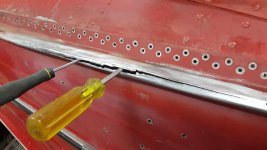
It might be overkill, but here is a 16'r I saw on another group. Of course the just weld her up crowd was the loudest :rolleyes:

cracked.jpg
 

classiccat

"Captain" + Starmada Splash Of The Year 2020
Joined
Dec 20, 2010
Messages
3,412
It might be overkill, but here is a 16'r I saw on another group. Of course the just weld her up crowd was the loudest :rolleyes:

View attachment 331410

"Just smear some 5200 on the melted seams...it will be fine"

"while you're there, just weld all of the rivet holes closed" 🤣

(not verbatim but that was the line of comments)
 

Moserkr

Chief Officer + Starmada Splash Of The Year 2021
Joined
Nov 23, 2020
Messages
869
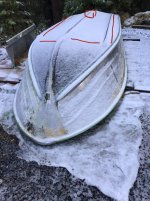
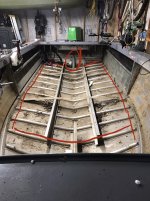
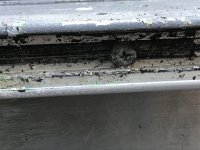
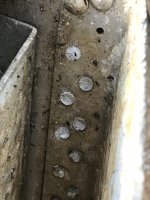
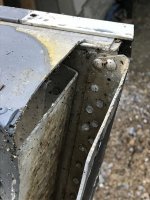
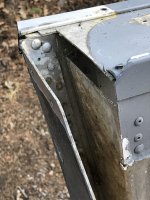
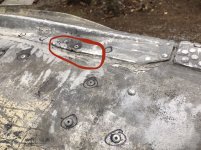
@Watermann Whoa!!! Thats not good lol. @classiccat I can only imagine the cringe worthy responses to that thread. Thats some crazy damage right there. My boat has its dents n dings but nothing like that! Still counting my blessings for its minimal damage and overall good condition. I was looking at my broken rivets and they are along the chine but are not the ones holding it together. The rivets I broke are the furthest outside on the ribs or bulkheads - same thing? See pics. Along the bottom edge, tried to lay the red line on the very outside just before the chine. Then across where the consoles are and the knee brace. I actually believe it was my poor trailer setup now that caused most of the rivet damage. Very hard and minimal support in the middle of the boat put pressure on the outer edge. Makes sense to me. I actually do not have one bad rivet along my chine. Sorry for the lack of proper boat terms - Im learning. Never rebuilt a boat so a lot of new terms and tools but Im having fun with it. Except for paint stripping lol 🥴

Got all the bunk stuff last night so will see if I can get it fitted up today. I have calls in to a few sheet metal places around here and I know of a big metal shop in the city I can call too if all else fails. So far only found a 4’x12’ sheet of 1/8” 6061 for $260 - more than I need and want to spend. Still waiting on rivets too but thats ok since I need the bracing plan in place before that.

Also polished up the SW, transom cap, and corner pieces with the nylox brush. Got the stickers off too with a razor blade scraper and some adhesive remover. Just a little paint left to remove and Im good to go. Got 2 weeks of good weather and temps into the 60’s coming!! Woohoo!!! Have a great day gentlemen!
 

Attachments

  • 6F456244-64B6-43A0-9C22-AA79D1B7CE9F.jpeg
    6F456244-64B6-43A0-9C22-AA79D1B7CE9F.jpeg
    1.1 MB · Views: 11
  • 4E48C743-9C82-4D13-BC60-54ABA5D8470B.jpeg
    4E48C743-9C82-4D13-BC60-54ABA5D8470B.jpeg
    1 MB · Views: 11

classiccat

"Captain" + Starmada Splash Of The Year 2020
Joined
Dec 20, 2010
Messages
3,412
@Moserkr you get a mixed bag of responses but the guys holding the lightning sticks often have the loudest opinions. This OP on that particular spray rail crack is adding supports to keep it from flexing & cracking the aluminum at the weld. The challenge will be resealing the joint, not contaminating the weld with liquified sealant...and not having it warp 6 ways to Sunday.

On my 18SS, I too believe that the trailer setup did most/all of the damage.
On top of that, he used a ratchet strap that went over the gunnel which pulls down the outer chine.

0.125" thick 6061 is pretty stout and may be a challenge to bend into a 90 if you're making longer brackets. see if you can get 1/16" (0.0625") for making brackets and look for small 1/8 for braces where you only want to add a kink to it.
 

Moserkr

Chief Officer + Starmada Splash Of The Year 2021
Joined
Nov 23, 2020
Messages
869
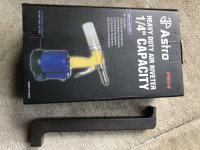
@Watermann @classiccat @SHSU need your help regarding rivets too. Finally got a hold of the guys at rivetsinstock, as recommended here, and we realized I need a grip range for the 3/16” brazier solids. (Not in the rivet sticky!!). Also going to order some 1/4” brazier solids just in case i need em for expanded holes. I also do not know if my rivet gun that i ordered will do solid braziers. Pic attached. Thanks for the help!
 

Attachments

  • 7E366DB9-1D7F-4932-8251-C7F4DD2CE5E9.jpeg
    7E366DB9-1D7F-4932-8251-C7F4DD2CE5E9.jpeg
    2.3 MB · Views: 3

SHSU

Lieutenant Junior+Starmada Splash Of The Year 2019
Joined
Mar 8, 2017
Messages
1,726
@Watermann @classiccat @SHSU need your help regarding rivets too. Finally got a hold of the guys at rivetsinstock, as recommended here, and we realized I need a grip range for the 3/16” brazier solids. (Not in the rivet sticky!!). Also going to order some 1/4” brazier solids just in case i need em for expanded holes. I also do not know if my rivet gun that i ordered will do solid braziers. Pic attached. Thanks for the help!

Taken from a website:
The optimum length for a solid rivet will be equal to the thickness of the material to be joined, plus an exposed tail equal to the rivet diameter times 1.5. For example, a 1/8-inch rivet should have an exposed tail of 1.5 x .125 inch or .188 inch. If you add that to the two sheets of .032-inch aluminum, you get a total length of .252 inch or about inch.

Website Link: Source

That being said, I used 3/16 heads x 1/2 length which was to long for most areas. For the two sheet seam, I cut down the rivets by an 1/8th to get them to buck correctly. When it was three sheets (In the bow), 1/2 was the perfect length. The 1/4 inch I think I got in an 1 inch long. That way I could cut it down if needed but also use it for the front bow eye that I re-riveted.

SHSU
 

classiccat

"Captain" + Starmada Splash Of The Year 2020
Joined
Dec 20, 2010
Messages
3,412
I did as @SHSU described; order longer rivets and snip them down to size once they're through holes and ready for bucking.

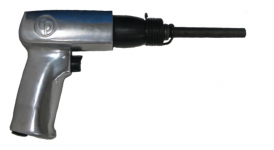
The riveter you have shown is for blind rivets only. You'll need an air hammer/riveter & a bucking bar for solid rivets.

1609991178579.png
 

Watermann

Starmada Splash of the Year 2014
Joined
Jan 12, 2013
Messages
13,787
@Watermann @classiccat @SHSU need your help regarding rivets too. Finally got a hold of the guys at rivetsinstock, as recommended here, and we realized I need a grip range for the 3/16” brazier solids. (Not in the rivet sticky!!). Also going to order some 1/4” brazier solids just in case i need em for expanded holes. I also do not know if my rivet gun that i ordered will do solid braziers. Pic attached. Thanks for the help!

If 2 layers of AL, say bottom and rib which are .090 then 3/8" when going to 3 layers 7/16". I have both in 2117T4 for my boats and some pure AL 1100's to check out. If they have 5052 solids then get those as a match for your boats hull AL. Pure AL rivets are very soft and could act like a anode sacrificing to the other alloy AL metals in the boat which are much harder and more durable. If 1100 is used do it above the water line just in case. :)
 

Moserkr

Chief Officer + Starmada Splash Of The Year 2021
Joined
Nov 23, 2020
Messages
869
Thank you guys!!! I feel much better about getting the right rivets and tools now. Looking at them was a foreign language and now im more educated. Was trying to google the answer yesterday and didnt even think to look at aircraft building as a reference! Looks like I will be needing more tools than I thought. Always wanted an air compressor lol, and would be easier if I had one in house. Who needs a budget for a boat?! 🤪

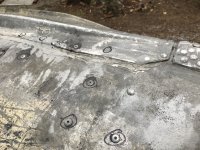
Total solid rivet count I found is 124, so will order at least double plus many more for my floors n such. I have to replace all the rivets the PO and POx2 put in - they are closed end blinds. Some may be steel too..... Also found out yesterday that the POx2 hit a log with the front which explains a massive amount of sealant in the area, broken rivets, along with a small dent. The log also was what hit the motor and broke the fins apparently. See pics. Any ideas of how to address this issue? It did not leak from the sealed area, just from rivets nearby. Im inclined to leave it be and just fix the rivets. So much 5200 sealant and coat-it though that I cant see the metal under it. I will have to remove some of it just to replace rivets.
 

Attachments

  • 4007C8FE-57F0-4069-9EF9-9D377BB89D97.jpeg
    4007C8FE-57F0-4069-9EF9-9D377BB89D97.jpeg
    3.4 MB · Views: 11

Moserkr

Chief Officer + Starmada Splash Of The Year 2021
Joined
Nov 23, 2020
Messages
869
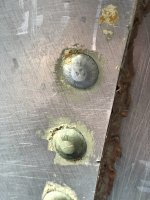
What a long day! Ordered 500 rivets and bought an air compressor. Solid rivet gun is coming next once I narrow down the one I want tomorrow. After 5 hours on the phone for work and ordering parts for the boat, finally had a few minutes to flip the boat back over and put it back on the trailer on the old bunks. Why? Cause the new brackets for the big new bunks need to be welded in place and I dont want to guess or measure lol. Boat is wider than the trailer so only way they will fit is to weld the brackets to the outside. No problem.

Also found other curious issues. I need to clean up the remaining paint along the rails and inside, as well as nylox wheel the inside. Since I was looking at the inside, I noticed rivets that looked deteriorated - kinda dusty? Touched the tail and it disintegrated... I assume all the corroded ones like that need to come out. Also found a bunch that had different colored heads. How do you tell what could be steel vs aluminum?? They are both solids but one has a shinier silver look and the other more of a brass coloration. Hoping they are all aluminum or Ill be looking at a s&$! ton of riveting.

Last when looking at my rub rail area, noticed that it was held together with long screws all the way around, and someone cut my corners in the transom under the caps, which I guess is common. Id assume the screws need to be replaced with aluminum rivets. Fun stuff. At least with a compressor in house I can get more done and not be dependent on dragging my boat down the street to the in laws during winter to use their air compressor. Beer tab would have been higher than a hippie on a tuesday!
 

Attachments

  • D7E5E953-F80D-4515-B2C3-3ADDF492B544.jpeg
    D7E5E953-F80D-4515-B2C3-3ADDF492B544.jpeg
    1.1 MB · Views: 19
  • 27B27DE2-4BD7-4C85-9268-0DF48810D32F.jpeg
    27B27DE2-4BD7-4C85-9268-0DF48810D32F.jpeg
    1.9 MB · Views: 18
  • C20B6D53-058D-46D9-B3AF-4F18F091464E.jpeg
    C20B6D53-058D-46D9-B3AF-4F18F091464E.jpeg
    1.1 MB · Views: 18
  • ADB21B11-B19B-418B-A469-1210E13291DD.jpeg
    ADB21B11-B19B-418B-A469-1210E13291DD.jpeg
    1.2 MB · Views: 19
  • 44697046-D79D-4BE7-A2CE-54BEE511D2F6.jpeg
    44697046-D79D-4BE7-A2CE-54BEE511D2F6.jpeg
    1.1 MB · Views: 19

classiccat

"Captain" + Starmada Splash Of The Year 2020
Joined
Dec 20, 2010
Messages
3,412
What a long day! Ordered 500 rivets and bought an air compressor. Solid rivet gun is coming next once I narrow down the one I want tomorrow. After 5 hours on the phone for work and ordering parts for the boat, finally had a few minutes to flip the boat back over and put it back on the trailer on the old bunks. Why? Cause the new brackets for the big new bunks need to be welded in place and I dont want to guess or measure lol. Boat is wider than the trailer so only way they will fit is to weld the brackets to the outside. No problem.

Also found other curious issues. I need to clean up the remaining paint along the rails and inside, as well as nylox wheel the inside. Since I was looking at the inside, I noticed rivets that looked deteriorated - kinda dusty? Touched the tail and it disintegrated... I assume all the corroded ones like that need to come out. Also found a bunch that had different colored heads. How do you tell what could be steel vs aluminum?? They are both solids but one has a shinier silver look and the other more of a brass coloration. Hoping they are all aluminum or Ill be looking at a s&$! ton of riveting.

Last when looking at my rub rail area, noticed that it was held together with long screws all the way around, and someone cut my corners in the transom under the caps, which I guess is common. Id assume the screws need to be replaced with aluminum rivets. Fun stuff. At least with a compressor in house I can get more done and not be dependent on dragging my boat down the street to the in laws during winter to use their air compressor. Beer tab would have been higher than a hippie on a tuesday!
That’s quite a beer tab 😝

they are all aluminum rivets picture and highly unlikely there are steel solids in your boat.

the rub rails are fastened with size 10 machine screws & locknuts at the factory. Do you plan to remove your rubrail channel?
 

Moserkr

Chief Officer + Starmada Splash Of The Year 2021
Joined
Nov 23, 2020
Messages
869
@classiccat Beer isnt cheap when friends n family can hold their own!! Also keeps me moving, only thing better than an ice cold beer in freezing temps is an ice cold beer on the boat in the summertime...

Thats a sigh of relief that the rivets are likely all aluminum. I dont believe anyone after the manufacturer has put in solids, but asked to make sure.

I dont plan to remove the rub rail channel unless the screws were not factory. If those screws are original, then I will leave it be. Reminds me, need to order that rub rail too. Hopefully all these new parts keep me busy this month so i can make more money to pay for the rest of the rebuild 😂😂
 

SHSU

Lieutenant Junior+Starmada Splash Of The Year 2019
Joined
Mar 8, 2017
Messages
1,726
Who needs a budget for a boat?! 🤪
lol, I don't think any of us staid within our budgets.... I know I sure didn't.

Also found out yesterday that the POx2 hit a log with the front which explains a massive amount of sealant in the area, broken rivets, along with a small dent. The log also was what hit the motor and broke the fins apparently. See pics. Any ideas of how to address this issue? It did not leak from the sealed area, just from rivets nearby. Im inclined to leave it be and just fix the rivets. So much 5200 sealant and coat-it though that I cant see the metal under it. I will have to remove some of it just to replace rivets.
The picture is of your keel. It is a separate aluminum piece from your hull. It uses some of the same rivets as your Ribs, so you can redo those at the same time if you want as well.

Also found other curious issues. I need to clean up the remaining paint along the rails and inside, as well as nylox wheel the inside. Since I was looking at the inside, I noticed rivets that looked deteriorated - kinda dusty? Touched the tail and it disintegrated... I assume all the corroded ones like that need to come out.
Yep, you need to inspect each one of your rivets then (head and tail). Tap them with a hammer and if the head/tail) falls off or disintegrates it needs to be redone. I don't think I had any tails disintegrate but we had a lot of heads that just fell off.

Good thing you found them know. It would be worse if you were further along or out boating and it just fell off...

I dont plan to remove the rub rail channel unless the screws were not factory. If those screws are original, then I will leave it be.
I removed the rub rail and resecured it with rivets. The screw and bolts just didn't seem to fit with everything being riveted, but maybe that was just me.

SHSU
 

Moserkr

Chief Officer + Starmada Splash Of The Year 2021
Joined
Nov 23, 2020
Messages
869
@SHSU What the admiral dont know wont kill her 😂. Maybe just me later lol. Nice having tools anyway and shes already talking about the next, bigger boat lmao.

Yes it was the keel that was damaged, as well as the hull. Both just slightly, maybe 1/8” pushed in. Definitely have some rivets to redo and 5200 to clean up there. Will see what I find when I get to it.

Ive had quite a few heads fall off over the summer and a handful of tails just disintegrate when I touch them with my finger... At least with the coat-it on the bottom, if the head was bad then the coat-it would break with it under the stress. Was wonder how to test them all so they will get the hammer. I dont want to have to tear up all my work to fix more rivets...

Did you put solids or blinds in on your rub rail? Those long screws sure are funny on an aluminum riveted boat.
 

Attachments

  • 78EAB050-8D14-4026-B590-01894FCA06DF.jpeg
    78EAB050-8D14-4026-B590-01894FCA06DF.jpeg
    1 MB · Views: 9

SHSU

Lieutenant Junior+Starmada Splash Of The Year 2019
Joined
Mar 8, 2017
Messages
1,726
Ive had quite a few heads fall off over the summer and a handful of tails just disintegrate when I touch them with my finger... At least with the coat-it on the bottom, if the head was bad then the coat-it would break with it under the stress. Was wonder how to test them all so they will get the hammer. I dont want to have to tear up all my work to fix more rivets...
Yep, right now with everything out is the best time to test.

Yes it was the keel that was damaged, as well as the hull. Both just slightly, maybe 1/8” pushed in. Definitely have some rivets to redo and 5200 to clean up there. Will see what I find when I get to it.
Ah I see what you mean. With the floor torn out you should be able to bang most of it out.

Did you put solids or blinds in on your rub rail? Those long screws sure are funny on an aluminum riveted boat.
Both, so there is a C channel that runs the length of the hull on both sides. I used solids on that one. Then the channel for the rub rail I used blind rivets to secure it.

SHSU
 

Moserkr

Chief Officer + Starmada Splash Of The Year 2021
Joined
Nov 23, 2020
Messages
869
Slowly moving along, but gearing up to start moving faster. Bunch of tools and rivets are on their way. Im finishing stripping and prepping the boat - still have some paint to get off. Took the rub rail off today. Nyloxed 90% of the transom. Noticed a lot of pitting but only 1 bad little spot thats pretty deep. Still have to do the bottom and get the bracing out. Noticed today that my rib ends are lifted up like you guys have mentioned. Makes sense why my rivets broke there but luckily no cracks noticed, yet. Got hardware for the bunks, but need some brackets made for the trailer to mount the bunk brackets. Also need to cut out some cardboard as templates for braces. Wont know whether Im building my own with a bender or having them made until I go to a metal shop nearby. Already close to my budget but it was blown by buying tools so not too worried. Lots of work to do but getting closer to the next big step - riveting. I know once Im there that the boat starts going back together. Trying to just keep cracking away an hour or 2 a day at a minimum when I can. Got a good 2 week weather window so pushing hard as I can right now in case it changes.
 
Top