1978 Starcraft 22 ft SS v5 restore

Status
Not open for further replies.

M2HB

Petty Officer 1st Class
Joined
Oct 7, 2017
Messages
206
That boat is going to be a great project. I'm looking forward to watching the progress.
 

mojoso72

Petty Officer 3rd Class
Joined
Aug 15, 2017
Messages
83
BobJohnson You are correct! Sounds like you know your V5s:D
I made a typo in the title.

I'll see if the moderators can change it.

Take care!
 

Watermann

Starmada Splash of the Year 2014
Joined
Jan 12, 2013
Messages
13,787
I want one of those emblems!

fetch
 

mojoso72

Petty Officer 3rd Class
Joined
Aug 15, 2017
Messages
83
I think I'm gonna go with the Nautolex for flooring. Do I need to countersink the floor rivets? Will they show through?

Just wondering how y'all have do this before. The old ones look like they are, but that could be because the wood was not sealed.

Thx!
 

mojoso72

Petty Officer 3rd Class
Joined
Aug 15, 2017
Messages
83
Foam is coming out tomorrow! I'll inspect the inside and the leak test will commence. There is not any damage on the bottom, but we'll see.

I know there are some loose rivets and others that need to be replaced. I'm sure there are many more I'll find too.

Wish me luck!

JO
 

Watermann

Starmada Splash of the Year 2014
Joined
Jan 12, 2013
Messages
13,787
I think I'm gonna go with the Nautolex for flooring. Do I need to countersink the floor rivets? Will they show through?

Just wondering how y'all have do this before. The old ones look like they are, but that could be because the wood was not sealed.

Thx!

It all depends on how you plan on installing the decking, You have 2 options, pre-wrap the deck panels and rivet them down so the rivet heads are visible. The other way is to install the decking with the rivets in the decking counter sunk and then lay the vinyl in one run.
 

mojoso72

Petty Officer 3rd Class
Joined
Aug 15, 2017
Messages
83
It all depends on how you plan on installing the decking, You have 2 options, pre-wrap the deck panels and rivet them down so the rivet heads are visible. The other way is to install the decking with the rivets in the decking counter sunk and then lay the vinyl in one run.

I plan to put the decking down first, rivet it down, then lay down the Vinyl. So I would just use a counter sinking tool, right?

Thx! JO
 

Watermann

Starmada Splash of the Year 2014
Joined
Jan 12, 2013
Messages
13,787
For counter sinking the large flange rivets I used a drill guide so they would all be an even depth and a 5/8" spade bit is the perfect diameter. Then you should cover over the rivets filling the holes, I used my left over Marine Tex.
 

mbroughton02

Petty Officer 2nd Class
Joined
Jan 17, 2015
Messages
198
For what it's worth, I did not countersink mine under the vinyl, and it's hardly noticeable unless you're looking for them. Just my .02. I would agree that countersinking & filling the holes is the ultimate in clean work, but I didn't find it necessary.
 

Watermann

Starmada Splash of the Year 2014
Joined
Jan 12, 2013
Messages
13,787
Yah to tell you the truth if I were to do another fishing boat build I would do like I did with my Chief and pre wrap the panels and leave the rivet heads exposed on top of the vinyl. It's so much easier than doing one run layout not too mention way less room for error with the smaller pieces. One run you also have the edges that are not secured with anything but adhesive so if nothing is over them holding them down like side panels it will let go sooner of later and curl up.
 

mojoso72

Petty Officer 3rd Class
Joined
Aug 15, 2017
Messages
83
@mbroughton02 & @Watermann Thanks for the intel.

I think I'm going to do 1 run up the middle. The exposed area is 72" and the Nautolex is 74" wide and I'll be putting back the side panels so that will hold them down as well. Plus I'll be cutting out the middle section where the gas tank is so I can put one wrapped section down with screws over that incase I need to get at that later.

I pulled up the gas tank tonight to find rotted wood underneath it. My brother had the tank replaced a few years back, but whoever did it just used bare 1x6, not sealed, wood for braces and it's rotten. The tank is in great shape though!

Thanks!
 

mojoso72

Petty Officer 3rd Class
Joined
Aug 15, 2017
Messages
83
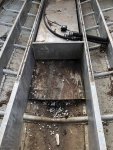
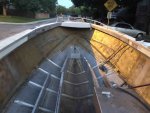
Here's the progress from tonight.

Foam is out and rough clean up. Plan to power wash it tomorrow to clean it up a little better.

I was checking some rivets. I'll do a leak test tomorrow by filling it up and checking underneath for weeping rivets. I know I'm gonna find some. Just not sure how many...

Also, planning to order more rivets tonight. I only got 100 of each 3/16 x 3/8, 3/16 x 7/16, 1/4 x 7/16. I believe most of the holes are 3/16 so I plan to order another 100 of each of those. I'd rather not have anything slow me up.

Any thoughts on the rivets?

Thanks for the help!
 

Attachments

  • photo290141.jpg
    photo290141.jpg
    1.1 MB · Views: 11
  • photo290142.jpg
    photo290142.jpg
    1 MB · Views: 11

mojoso72

Petty Officer 3rd Class
Joined
Aug 15, 2017
Messages
83
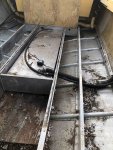
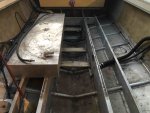
More pic's

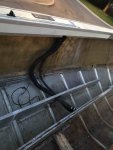
I plan to replace the wood under the tank and all fuel lines. The lines in the pic look like the originals! There was some fuel staining on the hull so not sure if that was from before or after the tank was replaced. I'll clean the stains and feel beeter if the hoses were all new too.
 

Attachments

  • photo290143.jpg
    photo290143.jpg
    508.1 KB · Views: 17
  • photo290144.jpg
    photo290144.jpg
    521.8 KB · Views: 17
  • photo290145.jpg
    photo290145.jpg
    380.1 KB · Views: 17

mojoso72

Petty Officer 3rd Class
Joined
Aug 15, 2017
Messages
83

Watermann

Starmada Splash of the Year 2014
Joined
Jan 12, 2013
Messages
13,787
I wouldn't use wood under the tank, what happened to the AL sheet that was a tank bed? Here is what my V5 belly tank support looked like, with the neoprene padding I put on, rather than the 3 little strips they had tossed in. There's also cross supports underneath the tank pan.

y4mQpPbo_6KVAyNy0lvyIO2mrCog9UXK5GmU1Gfph7kIsdY5hHJhMfdBtBrIabSWK6kDrqPQ_8M35KVFS_-8x1_0ZnRChhrPgUju8MA8sns_nRu7z8Hu2hGrYZeTYD26PSu8HITeVSvG82raLM_RUBjv8onl5sHBKxogHJrRYsZBbLCety7-8I2prgtoo3Pff2geukSKDf6av6yFBWCxQ6Nnw
 

66Holiday924

Chief Petty Officer
Joined
Aug 21, 2017
Messages
578
You can't use treated wood on an aluminum boat, it will cause corrosion. If you decide to replace or install wood somewhere, you have to buy untreated wood and treat it yourself.
 
Status
Not open for further replies.
Top