1978 SS 16 restoration

Siva283

Petty Officer 1st Class
Joined
Aug 28, 2022
Messages
226
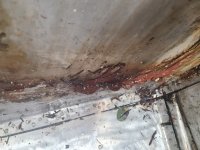
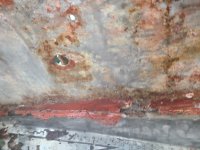
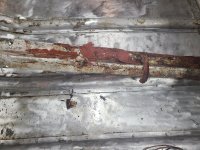
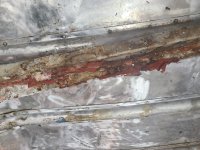
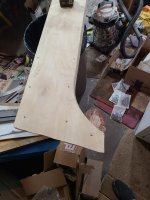
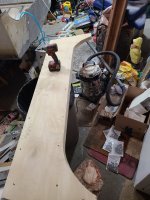
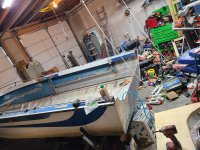
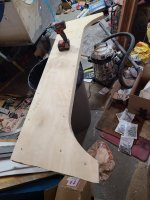
Well finally got the transom out. I'm guessing I am gonna find some corrosion when I clean the no less than two tubes of silicone out of there. He had the z bar siliconed to the boat and the transom siliconed to it and the aluminum skin. I set up two block and takles so I could alternate pulling more on one side then the other to try to break it loose. The wood is trash. It good enough to use as a template
 

Siva283

Petty Officer 1st Class
Joined
Aug 28, 2022
Messages
226
Pics of all the freaking silicone. I know I am gonna find some pinholes so I am taking a shower of aluminum cut to the samw shape and buttered in 5200 and rivited in place. Found a deep gouge on the bow to the other side from the crack so I am gonna stop drill that and patch it too.
Since I am doing the entire inside in gluvit and the bottom outside in gatorglide I think I'll be ok. Also found some pin holes where I yanked out some pressure treated wood. Most of them will get drilled in a rivit the really tiny ones I'll let the gluvit and gatorglide take care of
 

Attachments

  • 20220925_142259.jpg
    20220925_142259.jpg
    3.5 MB · Views: 19
  • 20220925_142255.jpg
    20220925_142255.jpg
    3.9 MB · Views: 19
  • 20220925_142253.jpg
    20220925_142253.jpg
    2.3 MB · Views: 19
  • 20220925_142250.jpg
    20220925_142250.jpg
    2.3 MB · Views: 19

SHSU

Lieutenant Junior+Starmada Splash Of The Year 2019
Joined
Mar 8, 2017
Messages
1,665
Man I see what you mean when you say "crack". Not 100% its a crack, wonder if something really sharp scraped the bottom. In your last picture it looks like the "crack" jumps which doesn't seem natural.

SHSU
 

Siva283

Petty Officer 1st Class
Joined
Aug 28, 2022
Messages
226
Man I see what you mean when you say "crack". Not 100% its a crack, wonder if something really sharp scraped the bottom. In your last picture it looks like the "crack" jumps which doesn't seem natural.

SHSU
It's continuous it's very fine and just doesn't show well. Though I won't rule out a scratch I don't know a way to really tell for sure so I'll probably treat it as a crack. You couldn't see it till I removed the paint so I don't think it's new. Unless I can for sure call it a scratch though I think I am gonna treat it as a crack
 

Siva283

Petty Officer 1st Class
Joined
Aug 28, 2022
Messages
226
I just took another good look at it and tried to get better pictures but they just aren't turning out any better. It very well may be a scratch but I figure I have nothing to lose treating it as a crack but if I don't and it is that could be very bad. When I stop drill it I am gonna use a 3\16 drill bit that way if I discover it's not I can pop a rivit in there and call it good
 

BOYS & TOYS

Petty Officer 2nd Class
Joined
Mar 1, 2008
Messages
141
It would be strange to see a crack from only one side. Hard to say from the picture but from here it looks like a scratch. If so not likely to be a problem.
Don't think I have owned a boat without a dent,scrape or scratch somewhere 🤔
 

Siva283

Petty Officer 1st Class
Joined
Aug 28, 2022
Messages
226
It would be strange to see a crack from only one side. Hard to say from the picture but from here it looks like a scratch. If so not likely to be a problem.
Don't think I have owned a boat without a dent,scrape or scratch somewhere 🤔
There's scratches everywhere they don't bother me. The paint will hide them no issue. There's a few dents I'll be popping out.
I take kids on this boat in the Chesapeake bay so I can't take chances with cracks. Once I go over the bottom with some 120 grit for the primer that might show it better
 

Siva283

Petty Officer 1st Class
Joined
Aug 28, 2022
Messages
226
Anyone got any ideas on how to make it show better. I though about the dye for checking cracks but I dont want to put anything on that might mess up paint adhession since the paint I am using is over $250 for 8 pounds or roughly a gallon. I dont know if it does or not but I know crack or scratch I will never be able to clean it all back out.
 

renns

Petty Officer 1st Class
Joined
Dec 20, 2017
Messages
316
With a good cleaning and bright light you should be able to see if it's actually a crack. If it is a crack, surely it would go all the way to the inside, so clean that area as well. I would expect cracks to normally propagate from stress points like rivet locations. Yours looks like it avoids the rivets, which also seems to indicate it might just be a sharp scratch as B&T suggests above.
 

Siva283

Petty Officer 1st Class
Joined
Aug 28, 2022
Messages
226
With a good cleaning and bright light you should be able to see if it's actually a crack. If it is a crack, surely it would go all the way to the inside, so clean that area as well. I would expect cracks to normally propagate from stress points like rivet locations. Yours looks like it avoids the rivets, which also seems to indicate it might just be a sharp scratch as B&T suggests above.
I will have to look again tonight. One side runs to the seam. I will have to see if it catches any rivits there.
Yall may have just made me a very happy camper. I got a dozen or so tiny pinholes to deal with which really shouldnt be hard with my plan. That crack well possible crack had me quite aggravated. I would be very happy if it turns out to be a scratch.
With my luck lately though. Well we shall see. WHile I didnt go all out on this project I have spent the money to do it correctly. Break out another Thousand right
 

Siva283

Petty Officer 1st Class
Joined
Aug 28, 2022
Messages
226
I still cant be %100 sure but I am leaning towards scratch now. I cant find any sign of it on the inside at all. From the inside I can see the edge of that piece and I am seeing nothing there either so it would seem I am getting lucky.
 

renns

Petty Officer 1st Class
Joined
Dec 20, 2017
Messages
316
When you do a leak test of the hull, tilt the hull so that area gets submerged, and inspect well from the outside. That will expose any issues.
 

Siva283

Petty Officer 1st Class
Joined
Aug 28, 2022
Messages
226
When you do a leak test of the hull, tilt the hull so that area gets submerged, and inspect well from the outside. That will expose any issues.
Dude it leaks everywhere right now. I have a fair amount of bad rivits to replace then the inside is getting gluvit and that outside is getting gator glide. I garuntee itll make it through a leak test dry after that.
I wonder if aluminum can be magnafluxed like an engine block. All it takes is a magnet and ferrous dust maybe I will try to rig something up and try that
Its also getting cold here so leak test wont be happening till spring. I have a heated garage where I am going to be doing the work in.
 

Siva283

Petty Officer 1st Class
Joined
Aug 28, 2022
Messages
226
Working on the transom today got the first peice cut out letting my compressor cool down she's been a busy girl today. Got some rivets replaced last night. I need some longer ones for the thick front brace. Finally feel like I am almost over the hump even though the second side of the hump with take longer but atleast you start seeing progress.
Pics to come this evening. Hopefully the transom will get glued tonight and epoxy coated tomorrow
 

Siva283

Petty Officer 1st Class
Joined
Aug 28, 2022
Messages
226
Didn't take many pics today getting the transom cut and sanded and fit took way longer than it should have. I remember why I prefer to work with metal than wood now
 

Attachments

  • 20221002_140554.jpg
    20221002_140554.jpg
    1.6 MB · Views: 17
  • 20221002_140552.jpg
    20221002_140552.jpg
    2 MB · Views: 17
  • 20221002_140548.jpg
    20221002_140548.jpg
    4.2 MB · Views: 18
  • 20221002_140540.jpg
    20221002_140540.jpg
    1.7 MB · Views: 18

Moserkr

Chief Officer + Starmada Splash Of The Year 2021
Joined
Nov 23, 2020
Messages
833
Great progress!! The moment she starts getting buttoned back up always feels good.
 

Siva283

Petty Officer 1st Class
Joined
Aug 28, 2022
Messages
226
Great progress!! The moment she starts getting buttoned back up always feels good.
Yeah finally feels like it since it's slowly going back together. Still got a bunch of rivets to do but got a few dozen done
 

Siva283

Petty Officer 1st Class
Joined
Aug 28, 2022
Messages
226
Been sick most of this week on top of my mother still being in the hospital. There will be more updates this weekend. Hoping to get the transom mounted and weld up the knee brace where its cracked and get it back in along with hopefully a large chunk of the rivits I want to replace. I didnt have ones long enough for the thick braces like along the bow. Those rivets should be sitting on my porch waiting on me to get home today. After this the hard work starts. Painting and assembly. I have 4 gallons of 2 part pour foam, I need to make the floors I can use the hold ones as templates. When all is reassembled I have the faux teak vinyl flooring stuff for the floor and anywhere else I want to look like wood. I have some screw holes to weld up along the top of the gunwales too
 

SHSU

Lieutenant Junior+Starmada Splash Of The Year 2019
Joined
Mar 8, 2017
Messages
1,665
I wish I had the tools/experience to weld aluminum. That would make things easier for repairs.

SHSU
 

Siva283

Petty Officer 1st Class
Joined
Aug 28, 2022
Messages
226
I wish I had the tools/experience to weld aluminum. That would make things easier for repairs.

SHSU
There's not much on these you want to weld. The hull skin for example doesn't like to be welded. I have no choice with the knee brace I can't find another one. And the tops of the gunwales aren't really structural so being a little more brittle is no biggie. What you weld will be more brittle though
 
Top