1976 Tom Boy Boat, 1976 40 HP Johnson Outboard and who knows what Trailer

gm280

Supreme Mariner
Joined
Jun 26, 2011
Messages
14,604
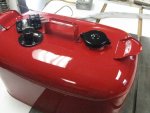
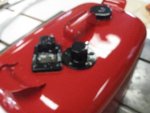
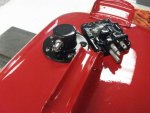
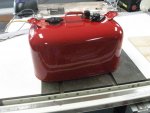
I was going to post a few updates with pictures along the way, but decided to post after I had something actually finished. So here is the gas tack finished.

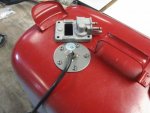
As you can see I cut into the top of the 6 gallon metal gas tank to add a reed type fuel sensor. It was a little iffy to try and make sure it was located in a place the didn't interfere with the handle, the existing fuel gauge and fittings. But I finally settle on where it is installed. It gives me a super quick connection and disconnection to the front fuel gauge and be able to carry it to refill or whatever. I had to really modify the reed sensor and that was a little bit discerning. But if I messed it up, I would have to make a new one. I used a stainless steel BNC type quick connector and since the wires are already pulled for that type connection, it works perfectly.

Yes, I know this is way way over kill for a little stick steering setup, but I couldn't help myself after the ideas started flowing into my head back some years ago. If I would have simply rebuilt this boat to just fish, I'd be fishing years ago now. But stupidity gets the blame...I guess!

I powder coated the gas cap and then reassembled it again. I like the finish. However, I used PPG base coat with PPG clear coat final finishes on everything else. I only wish I could have made the original logos and mixing instructions like the original tanks had. That is coming for the second tank though.

So this is the final for the tank. Now I need to push to finish the transom cap and then the Live-well CUSHION is all that is needed to finish and install the engine. I haven't installed the seats yet, but they are merely bolt in place (already fitting and tried) so not much to really do. I'm waiting for the absolute final to install such things to not get them messed up while I work on other boat things.

More to come soon...
 

Attachments

  • Reed sensor install (1).JPG
    Reed sensor install (1).JPG
    92.9 KB · Views: 1
  • FInished tank (1).JPG
    FInished tank (1).JPG
    93.2 KB · Views: 1
  • FInished tank (2).JPG
    FInished tank (2).JPG
    81.2 KB · Views: 1
  • FInished tank (3).JPG
    FInished tank (3).JPG
    93.6 KB · Views: 1
  • FInished tank (4).JPG
    FInished tank (4).JPG
    85.5 KB · Views: 1

gm280

Supreme Mariner
Joined
Jun 26, 2011
Messages
14,604
Thanks archbuilter and sphelps, some times I get lucky...

Today is already a good day. I received my new trolling motor last evening. So expect some pictures of it mounted on the boat soon. Noting amazing, just a MotorGuide X3 five speed. But since I have a PWM circuit, it becomes a variable speed set up. :D

I am pushing the aluminum welding more also. I have to get that finished to mount the engine. If I could just get over the blow through's and just weld the relief cuts, all would be well! Have tried different current settings and A/C pulse duration and such, but one day it seems to work, then next, blow through's with the same settings. I am using a stainless steel backer plates to help reduce the blow through's and absorb heat. Oh well, I am not giving up...yet! :cool:
 

Hab

Petty Officer 2nd Class
Joined
Jul 4, 2017
Messages
158
Keep at it GM you'll get it. Aluminum can be a fussy mess. It seems to like a little warming up and a soft touch. The tank looks good too.
 

gm280

Supreme Mariner
Joined
Jun 26, 2011
Messages
14,604
Keep at it GM you'll get it. Aluminum can be a fussy mess. It seems to like a little warming up and a soft touch. The tank looks good too.

Thanks for the kind words. I wish aluminum welding was as easy as printing things. But it is certainly not.

I tried some welding this morning and again, seems to not want to form a puddle and then instantly vaporizes the aluminum with expanding blow through's. And that was after I wire brushed the aluminum AND even Acetone both the part to be welded and the filler wire. But for every success I mistakenly get, I have at least three or more blow outs. If this were mere steel or even stainless steel, I would have been done months ago... Aluminum takes a certain amount of heat to get it to puddle, any more it seems to vaporize, any less and it never welds... I'll keep trying. I will either get it or burn up every piece of aluminum I own trying...
 

AShipShow

Lieutenant Commander
Joined
Jul 8, 2016
Messages
1,792
Sounds like you're still not removing the oxidation layer... have you tried sanding or using a flap wheel instead of a wire brush... Aluminum oxide is really really hard (thats why they use it for sand paper grit)... You may not be removing it with a wire brush. I've found I need to sand or use a flap disc to get rid of the oxide.

I'm by no means an aluminum welding expert, but it sounds a lot to me like an oxide issue... (aluminum oxide melts at a way higher temp than the aluminum itself, so once you get the oxide hot enough to melt it will just blow thru the base material.
 

gm280

Supreme Mariner
Joined
Jun 26, 2011
Messages
14,604
Sounds like you're still not removing the oxidation layer... have you tried sanding or using a flap wheel instead of a wire brush... Aluminum oxide is really really hard (thats why they use it for sand paper grit)... You may not be removing it with a wire brush. I've found I need to sand or use a flap disc to get rid of the oxide.

I'm by no means an aluminum welding expert, but it sounds a lot to me like an oxide issue... (aluminum oxide melts at a way higher temp than the aluminum itself, so once you get the oxide hot enough to melt it will just blow thru the base material.

At this point anything is an option I'll try. And I totally know about the outside Aluminum Oxide issue. And it doesn't take very long for it to form either. But your idea sounds like something I will try.

I set the Primeweld 225X welder up for the thickness of the aluminum. That being 1 amp per .001" thickness. And since I am using 1/16" thick aluminum, I set the welder at 60 amps AC with a 30% to 40% direct weld and the rest cleaning weld current. I think I am using around 100 hzs in the AC mod (variable knob from 10% to 90%). Although I have tried lower and higher frequencies as well. Seems once I get the puddle to form, it is pretty easy after that. But some times once it forms it instantly goes into vaporization. And that is vaporizing so quick, it blows out... Frustrating since I seem to easily weld steel and even stainless with very little issues. And even MIG welding is light-years easier too. But I can't weld aluminium with MIG. Well I am not even going to try and setup MIG for aluminum, let's put it that way...

Thanks for the suggestions and anything else you can offer, I'm all ears... Well not really, but that is how the saying goes! :D
 

Hab

Petty Officer 2nd Class
Joined
Jul 4, 2017
Messages
158
Sounds like your set up right. All I can offer is to pre-heat your part, and back off the pedal once your arc is started.
 

gm280

Supreme Mariner
Joined
Jun 26, 2011
Messages
14,604
Sounds like your set up right. All I can offer is to pre-heat your part, and back off the pedal once your arc is started.

I happen to watch a great video yesterday about the exact situation that I am trying to do. It was a UTube video with a place in Los Vegas welding school presenting it. The instructor was actually using the exact same PrimeWeld 225X and went over every knob on that welder and what it did and how to set them. Then he took two aluminum coupons (his name for the aluminum practice plates) and showed both how NOT to weld, and how to do the welds the right way. I learned so much watching that video since it covered exactly what I am trying to do.

https://www.youtube.com/watch?v=YoWSOC_Gx0w

So between you and that video, I now can try so many things to get me to being able to weld thin aluminum...I hope!
 

nurseman

Lieutenant Junior Grade
Joined
Jun 2, 2013
Messages
1,045
Good video! Sometimes seeing what NOT to do is more instructive than having someone just show you how it should be done. If you like the YouTube thing, Weld.com has a good channel as well. They cover all types of arc welding.

I'm sure you will have a good grasp on it in no time at all. Practice is indeed the key.
 

gm280

Supreme Mariner
Joined
Jun 26, 2011
Messages
14,604
Good video! Sometimes seeing what NOT to do is more instructive than having someone just show you how it should be done. If you like the YouTube thing, Weld.com has a good channel as well. They cover all types of arc welding.

I'm sure you will have a good grasp on it in no time at all. Practice is indeed the key.

Yes nurseman, no truer words could be said. The fact that this video does show it being done wrong, exactly like I am presently doing, and then shows how to do it right, makes all the difference.

Easy to pop up a how-to-do and everything comes out perfect. But showing the many things that contribute to doing it wrong, are so much more instructional to me anyways! Funny how he is making this video on the exact things I am trying to do. It is almost lie he knew I was having problems and made this video to instruct me... Like I stated before, some times I get lucky. I won't stop until I get this right!

Oh, and I just bought a metal shrinker / stretcher as well. If I can stretch the metal and shrink it to allow me to form the transom cap, that will certainly be worth the purchase price. However, the welding aspect will certainly continue now because I have to get this right and learn to do this anyway.

I have to say, this is a much more challenge then I would have ever thought. Soldering, and MIG welding is a snap in comparison!
 

gm280

Supreme Mariner
Joined
Jun 26, 2011
Messages
14,604
what shrinker strecher did you get? Eastwood?

Actually archbuilder, I bought a used set from an Ebay company for well less then half new price. It is a TP371 from US Industries. I have no idea what real quality they make, but the new price is higher then most others out there. So I hope it is some thing worth the half price. It is used but looks like no one has ever used them. We'll see. I hope I am able to do what I think I can with them.

But you can never ever have too many tools... That is my statement and I'm sticking to it! :cool:
 

archbuilder

Vice Admiral
Joined
Sep 12, 2009
Messages
5,697
do they have the foot pedel or do you operate it with one of your hands? I have never used one, but that is on my bucket list. Seems like the foot operated ones would be best, but of course they cost more. I can see the hand operated ones would be fine for smaller parts like you are doing.
 

gm280

Supreme Mariner
Joined
Jun 26, 2011
Messages
14,604
do they have the foot pedel or do you operate it with one of your hands? I have never used one, but that is on my bucket list. Seems like the foot operated ones would be best, but of course they cost more. I can see the hand operated ones would be fine for smaller parts like you are doing.

Sorry archbuilder, I thought I already replied to your question. But since I don't see the reply, I guess I forgot to post it.

It is a hand use setup. Actually used with a bench vice is what they say on the place selling them. However, A really great auto-body metal worker on Utube has a hand setup that he modified to use with his foot. So simple and easy that I will probably try that myself. That guy never ever uses any body fillers whatsoever. Every part he hand makes regardless of the vehicle he is working on or teh part he needs including fenders, floors, roofs, hoods you name it. He really is an amazing metal worker.

Glad I am here to post. I have another goody to post. Never ever buy anything from "Factoryoutletstore.com" ever! I searched the net for the best price I could find on the Motor Guide X3 45lbs bow mount foot control Trolling motor. I came across the factory outlet store. They had that TM for $429 dollars and free shipping. Okay, sounds like a great deal (first mistake).

So I searched through the TM sizes and thrust. I selected the 45lbs because it is going on a mere 14' stick steering boat. and the listed one that said 36" to 50". Great a variable shaft length too. Bring it on. Well I receive it. And it was brand new and 45 lbs BUT it was a 50" version and not adjustable like listed. So I though maybe I still could use it. Not a chance. The motor mount section comes all the way back to the stick steering arm. Not good if I want to travel on the water with the TM stored in the cradle lie usually done.

So I contacted "the Factory Outlet Store" to explain to them that it was not an adjustable setup like they advertised, but that it was a way too long shaft. They basically say so what, it is yours. There are NO returns...period! Even though they falsely advertised it as such, they refuse to even swap out the bow motor mount section for the shorter version.

So I call Motor Guide. The guy on the customer service started that he wish "The Factory Outlet Store" would close up shop. He said they get complaints about that place every day of the week. It is a buyer's be-where for certain. And he stated that unless some other Motor Guide dealer wanted to swap the bow mount, there is nothing they can do from their factory...

So a "good deal" will cost me another $185 dollars to get the correct motor mount now... Live and learn... I realize some will say; why didn't you buy it here at iboats? And that is a very good question. I had everything ready to purchase here on iboats UNTIL I got to the shipping section and seen their cost. Shipping was going to cost me an extra $260 dollars on top of the $429 dollars. So that deal was so far off, I didn't even consider ordering it here.

I will get things worked out and "blue light" the too long bow motor mount somewhere...
 

archbuilder

Vice Admiral
Joined
Sep 12, 2009
Messages
5,697
Sucks about the trolling motor....you had to say motor mount didn't you lol

Not sure what guy you saw on you tube, but Lazze is an amazing artist. I would like to take one of his classes, crazy what he can do with sheetmetal!
 

gm280

Supreme Mariner
Joined
Jun 26, 2011
Messages
14,604
Sucks about the trolling motor....you had to say motor mount didn't you lol

Not sure what guy you saw on you tube, but Lazze is an amazing artist. I would like to take one of his classes, crazy what he can do with sheetmetal!

When I see the metal body worker post up another video, I let you know when and who. I think you will certainly like his work. Last one I watched he was making an entire roof for an old truck. And between the rollers, shrinkers/stretchers and English wheel, I have yet to see anything he couldn't make. He is very finicky and if a panel doesn't fit absolutely perfect, he will work on it until it does. And with so many compound curves on the roof, he has worked on this for a few videos now... I don't believe I ever seen him buy and metal part for anything. He literally disassembly every metal panel on the vehicle he is rebuilding, down to the individual floor pans and then rebuilds everything back again...
 
Top