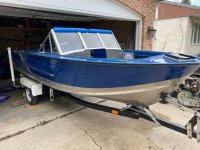
1974 Starcraft SS16 Restortation

SHSU

Lieutenant Junior+Starmada Splash Of The Year 2019
Joined
Mar 8, 2017
Messages
1,741
Very nice!!!

What are the foam noodles for?

SHSU
 

FIGMO

Petty Officer 1st Class
Joined
Jun 18, 2017
Messages
321
Very nice!!!

What are the foam noodles for?

SHSU
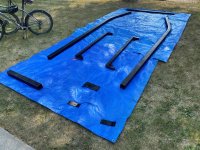
I'm thinking the noodles will protect the cover from the metal edges of the window frame. Same for the trolling motor mount, those edges look like they will tear through fabric.
 

SHSU

Lieutenant Junior+Starmada Splash Of The Year 2019
Joined
Mar 8, 2017
Messages
1,741
I'm thinking the noodles will protect the cover from the metal edges of the window frame. Same for the trolling motor mount, those edges look like they will tear through fabric.

Gotcha, makes sense. Have only put my cover on once when I took a picture for the forum, lol. So didn't think about possible wear on the cover.

SHSU
 

Moserkr

Chief Officer + Starmada Splash Of The Year 2021
Joined
Nov 23, 2020
Messages
869
I keep my cover over mine constantly and never noticed any wear on it. But now Im going to go double check lol. Covers are cheap insurance to keep the boat nice and clean, especially where I live in the forest.
 

Watermann

Starmada Splash of the Year 2014
Joined
Jan 12, 2013
Messages
13,794
Everything looks great! :love: Off the rack and on the trailer then power up. Should be hitting the waves before too long.
 

FIGMO

Petty Officer 1st Class
Joined
Jun 18, 2017
Messages
321
Back again!

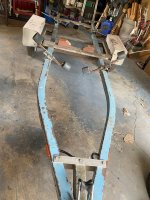
Some trailer shots:
230.JPG

The trailer is pretty rusty, but that is to be expected for a 1973. The PO had attached wood to the frame, not sure why other than to maybe strengthen the frame?
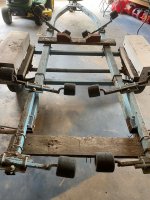
231.JPG

The wood board in the back has the transom saver mounted on it. I will need to get an extension made for the back so I can mount the transom saver. I do not plan on using the rollers, I will be going to bunks.
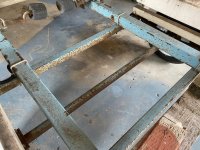
232.JPG

Another good shot of the rust.


234.JPG

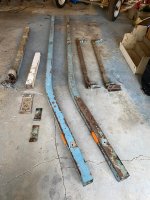
The main components of the trailer frame ready for sandblasting. I found a great place in Winnipeg for the sandblasting. I dropped my parts off in the morning and they had them done by lunch. The finished product looked great, and the price was reasonable.
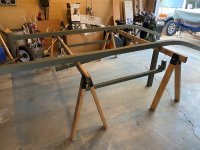
235.JPG

Self-etching primer coats complete!

237.JPG

I decided to go with black vice white or blue. The main reason for this is that I may yet apply Linex to parts of the trailer where it takes a fair amount of gravel strikes. I seem to remember Candutch doing this to his trailer rebuild.
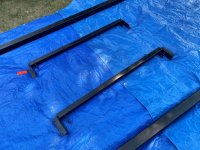
238.JPG

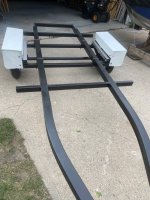
The finish on the trailer worked out well. I am happy with it. I just finished with the axle and leaf springs. They get the top coat today. Once that is done, I am ready to start putting it back together.

A question for the experts. Is it possible to get bunk brackets that mount to the main frame instead of the cross members? See pic below:
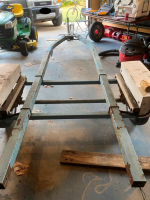
233.png

As you can see there are no cross members. I am looking to get Budski's son John to weld some L brackets along the main frame so that I can mount cross members in place. However, it seems to me that the bunks would be quite narrow. Open to thoughts and suggestions on this one...
 

MNhunter1

Lieutenant Junior Grade
Joined
May 12, 2014
Messages
1,058
The SS turned out great and the trailer looks like it's coming along as well! Must be a great feeling to be on the final stretch. Can't wait to see her on the water!
 

SHSU

Lieutenant Junior+Starmada Splash Of The Year 2019
Joined
Mar 8, 2017
Messages
1,741
Can't wait to see how the trailer turns out!! The boat and trailer will make a great looking pair.

SHSU
 

Watermann

Starmada Splash of the Year 2014
Joined
Jan 12, 2013
Messages
13,794
That was well worth the money to have that rusted steel sandblasted, came out looking super nice!

For a 16' SS I think the bunk width would be fine, you just have to hit the sweet spot between the bottom strakes with the bunks. I've not seen any bunk brackets that work on lateral frames but a simple piece of angle welded to the frame would make for a good bracket mounting location. The angle could be welded on the outside of the frame rather than the inside to give that wider support you're looking for.
 

FIGMO

Petty Officer 1st Class
Joined
Jun 18, 2017
Messages
321
That was well worth the money to have that rusted steel sandblasted, came out looking super nice!

For a 16' SS I think the bunk width would be fine, you just have to hit the sweet spot between the bottom strakes with the bunks. I've not seen any bunk brackets that work on lateral frames but a simple piece of angle welded to the frame would make for a good bracket mounting location. The angle could be welded on the outside of the frame rather than the inside to give that wider support you're looking for.
Hey Watermann,

That sounds like a good idea. I am going to do some measurements on the cradle right now to see what the spread is on the supports. The cradle is actually aligned very nicely. I will see if I can come up with a plan to replicate that.

My son and I will be reassembling the trailer tomorrow. Once that is done I can do some comparisons to the cradle. After that I will talk with Budski's son John and see what ideas he has. The other issue will be creating anchor points for the transom tie downs, and for the transom saver mount.
 

FIGMO

Petty Officer 1st Class
Joined
Jun 18, 2017
Messages
321
Hey Folks!

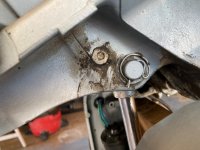
While I was messing around with the trailer I discovered a minor issue with the motor that is tied to the grease nipples for the power trim. Have a look at the pics:

230A.png

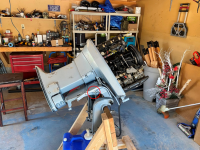
This is the current state of the motor. My neighbor and I pulled the lower end, and took it to a guy that deals in older motors to have the seals and the impeller changed. It will probably be another couple of weeks before that is ready. The red circle is the area of interest.

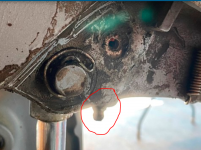
231.JPG

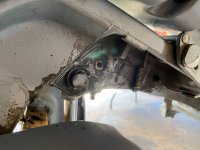
A close up of the area in question. You can see the hole. There was some sort of rubber plug with a metal center that was in both side of the motor, but they have pretty much disintegrated. I have temporarily plugged the holes on both sides with rivets. Not to worry I just slid them in there to stop anything from going in the holes.

232.JPG

A close up of the hole itself. You can see the grease in the hole.

233.PNG

I am not sure how well the picture will turn out, but I found some plans on line and it looks to me like its a lubrication fitting. Apparently an eight dollar part. I will need two of them if my guess is right.

Open to advice from the experts.
 

classiccat

"Captain" + Starmada Splash Of The Year 2020
Joined
Dec 20, 2010
Messages
3,412
I could be wrong but I believe the zerk in your picture is the one circled. That one makes sense since you're greasing the pivot pin. If you could slide in a rivet into the backside of that empty hole, what on earth are you lubricating? (8 bucks for a single zerk is highway robbery)

1628159114421.png
 

FIGMO

Petty Officer 1st Class
Joined
Jun 18, 2017
Messages
321
I could be wrong but I believe the zerk in your picture is the one circled. That one makes sense since you're greasing the pivot pin. If you could slide in a rivet into the backside of that empty hole, what on earth are you lubricating? (8 bucks for a single zerk is highway robbery)

View attachment 347173
Hey Classic!
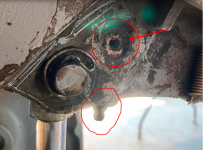
I was referring to the hole directly above it. Have a look at the pic:

hole2.png

My question is what is the name of the part that goes in the hole that the arrow is pointing at? There was some sort of rubber plug with a metal core that broke up when I was trying to clean it.
 
Last edited:

classiccat

"Captain" + Starmada Splash Of The Year 2020
Joined
Dec 20, 2010
Messages
3,412
Hey Classic!
I was referring to the hole directly above it. Have a look at the pic:

View attachment 347299

My question is what is the name of the part that goes in the hole that the arrow is pointing at? There was some sort of rubber plug with a metal core that broke up when I was trying to clean it.
yep, the hole you're pointing to is the one I'm referring to; I don't think that's for a "lubrication" fitting (aka a Zerk). I have no idea what it IS actually for though. šŸ¤£
 

FIGMO

Petty Officer 1st Class
Joined
Jun 18, 2017
Messages
321
yep, the hole you're pointing to is the one I'm referring to; I don't think that's for a "lubrication" fitting (aka a Zerk). I have no idea what it IS actually for though. šŸ¤£
You're hilarious Classic! I'm going to talk to the fella that is rebuilding my lower end. My guess is that he will know what it is, and will probably have the part. Cheers
 

FIGMO

Petty Officer 1st Class
Joined
Jun 18, 2017
Messages
321
Some updates:

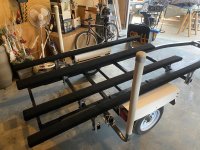
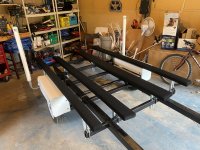
The trailer is pretty much complete. I am still waiting for the bunk brackets. Hopefully those will be in next week. I picked up some fir boards for the bunks. I am going with 2 X 6 X 8 for the centers, and 2 X 4 X 8 for the outer bunks. I also have post guides on order, and they should also arrive in the next week or so. Sadly I ran out of epoxy, so now I have to buy more.....
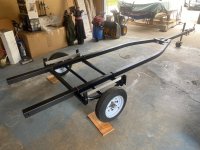
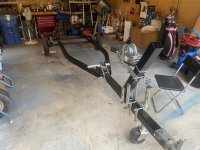
I finished the wiring for the lighting on the trailer. John Junior did his welding job on the trailer to provide me with cross members and extensions on the outside of the existing frame as it was too narrow (recommendation from Watermann, greatly appreciated). And now some pictures:

213.JPG

The trailer reassembled, prior to the addition of the cross members, and the outside extensions. It went together very smoothly. The hard part was remembering which bolts went where after I soaked them in cleaning vinegar, and then hit them with the wire brush on the drill press. I was amazed at how the vinegar and wire brush worked at cleaning off decades of rust and dirt. They were pretty much like new.

214.JPG

Just a shot of the front. I also invested in some new chains and hooks for the front.

215.png

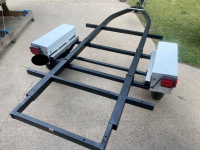
Okay, now here is a shot with the cross members and outside extensions in place. I also got john to weld an extension in the back so I can mount the transom saver, and have a place to secure the transom tie downs.

216.JPG

Same thing, just from the front. I ordered 8" brackets for the bunks, and I am hopeful that they will be high enough to clear the fender wells. There is a difference of 6" so I am fairly certain it will work.

Some painted motor pictures next.
 

FIGMO

Petty Officer 1st Class
Joined
Jun 18, 2017
Messages
321
Okay painted motor pictures!

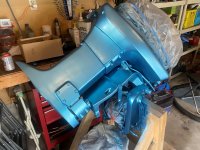
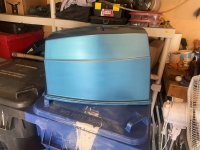
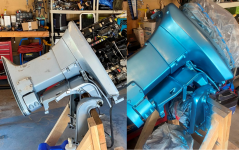
I decided to paint the motor Metallic Maui Ocean Blue, to match the trim on the boat. I am also ordering Evinrude decals in Sapphire Blue to match the boat. I'm thinking it will look pretty cool once the motor is back on the boat.

I just finished painting today. However, it may have been to humid. Not entirely happy with the finish. I am going to let it sit for a day or two, and then re-attack. I need to buy more paint. For some reason the finish on the engine cowling was no where near as nice as on the motor itself.

Some pics:

218.JPG


219.JPG
 

Watermann

Starmada Splash of the Year 2014
Joined
Jan 12, 2013
Messages
13,794
Oh heck yeah, nice to get that trailer work in the rearview mirror and the Rude's motor color is sweet (y)
 

FIGMO

Petty Officer 1st Class
Joined
Jun 18, 2017
Messages
321
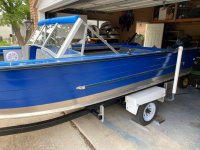
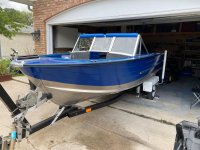
It's been a couple of weeks with some progress made. The trailer is done and the boat is on the trailer. Sadly I will not see my lower end until the end of next week. So much for a launch during the long weekend. Some pics:

300.JPG

I ordered some boat guides for the boat, seen attached. Unfortunately I had to go back to John to weld a couple more extensions on in order to get them wide enough. The bunk brackets and everything went on fairly smoothly.

302.JPG

A better close up of the bunks.

303.JPG

The boat fit on the trailer like a glove, with some minor adjustments. Nothing that we weren't able to sort out in a short period of time.

304.JPG

The front end fits in nicely, again some minor adjustments to make everything snug.

305.JPG

One last glamour shot!

So now I am just waiting on the lower end. I did a final top coat on the motor this evening. I will pick up some clear coat and hit the motor with that tomorrow night. I need to order some decals now....
 
Top