1969 Mako cut and gut project by Lectro88

Lectro88

Petty Officer 1st Class
Joined
Oct 24, 2020
Messages
303
this is the thread I am starting for my mako project that was mildly discussed or started being discussed in another thread.
Now I am going to admit.
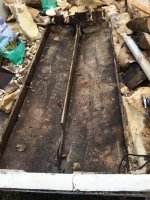
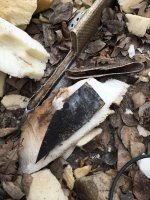
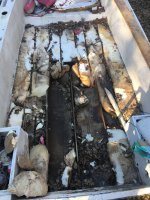
Pictures will be ugly at times. Debris, cans leaves and other stuff that should/could have been removed to make pretty images. I don’t fool with sugar coating.
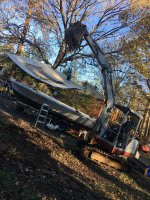
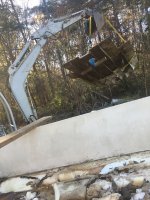
It is what it is. A project,
It can start to be pretty after the work is done.
Will start pics later.
Thank you all for your help so far. This has been a very helpful site.
Maybe something I do here can help others someday.
 

buxmj

Petty Officer 1st Class
Joined
Jun 9, 2018
Messages
294
Welcome to the madness! I don't think anyone will mind pics with debris. As you see more projects you realize that is what we all started with. Looking forward to pics and progress!

Buck.
 

Lectro88

Petty Officer 1st Class
Joined
Oct 24, 2020
Messages
303
I should have stated this earlier.
There are pics that I posted of the floor out on my other thread about Hull Thickness Question by Lectro88. Post #7, 13, 15 There are also pics of another boat, yes I am gutting 2
I had the Pisces 15yrs never put it in the water(didnt get trailer title paperwork)and it needed floor when I got it.
Then I found this Mako which is what I had always wanted and grabbed it.
The guys asked for pics.. and I posted over there. I am not going to repost same pics here but I may ask Mods. to move them later as this gets rolling.
 
Last edited:

Scott Danforth

Grumpy Vintage Moderator still playing with boats
Staff member
Joined
Jul 23, 2011
Messages
48,761
just post the links with the hypertext image tags.....easy peasy and the pics will show up here.
 

Lectro88

Petty Officer 1st Class
Joined
Oct 24, 2020
Messages
303
Going to see if I can cover a few things at 1nce here.

I’m still in the dismantling stage and exploratory surgery.
I’m kinda thinking that the stringers aren’t maybe as bad as I originally had thought.
I found a breech in glass at end side, transom end of middle keel stringer, if I said that right. still learning lingo/phrases.
Dug around and gouged at the wood.
It was black not really rotten but not solid either.
In tree or firewood we have a term. And not sure I spell it right. Doety. (Doe-tee or doddy) it’s a spongy almost rotten state. But not quite there yet.
The stringers are 51yrs.
So it’s time regardless and being this deep and not replacing should be unthinkable.
Now I have been stockpiling 1X lumber from box stores. The #1 shelving or finish 1x4-1x12’s. That people pick over. Dings, miscolored, nic or gouge here or there. 2nd. 1st. Grade lumber at 70% off.
I have already epoxy coated several pieces(10-15 boards)to keep them from blue-johning. That’s when wood left out starts to black speckle or mold kinda,, and inspectors used to make you remove framing that had bluejohned in new construction. (For those that never the heard term)
Sorry for the ramble.
When I pulled the floor up with excavator and that was a bear, picked whole back of boat up and it was cut free. Just stuck together that good.
The upper floor stringers appeared to be weeping water. And that section of floor was probably 400 pounds.
So I have all this wood already.
But seeing how it was weeping and all that moisture made the wheels start turning again.
Now I don’t know if that’s just how boats do all time. Or that was just state this had got to for the last 10 yrs.
They are in water all time.
I found marine grade ply, danget... after the stockpiling.
Should I reconsider to using M.ply rather than several coats epoxy then glass.
Or is it not that big of deal either way.
I really thought I had this planned out already.
Now I’m 2nd guessing my original plan.

Thanks everyone in advance.
 

JASinIL2006

Vice Admiral
Joined
Feb 10, 2012
Messages
5,618
Not exactly sure what you’re asking, but if the wood is black, it’s rotten and needs to come out. It may not yet have turned to mulch, but it is rotten.

Also, there is nothing special about marine plywood, other than it is an exterior plywood with no voids. Any exterior rated plywood will work, but regardless of the type, it needs to be encapsulated in resin (polyester or epoxy) and fiberglass.
 

Scott Danforth

Grumpy Vintage Moderator still playing with boats
Staff member
Joined
Jul 23, 2011
Messages
48,761
15 years before the wood turns black it would have been saturated with water

read some of the resto threads. both exterior grade and marine use the same glue. the wood is a slightly different species, however both will rot when exposed to water....... which is where the encapsulation comes in.
 

Lectro88

Petty Officer 1st Class
Joined
Oct 24, 2020
Messages
303
Looking to start building the stringers. And I have been doing a lot of reading.
Seems that bedding stringers is done with a cushionable adhesive like a polyurethane. And what I know about the roof/gutter poly it’s tough stuff but takes months almost to cure(completely). But once it cures you are not pulling it of.
Then we glass everything down and there is the ability to flex.
Am I on the right track with this thought process.

Everything I have demo’ed thus far.
Did not go to the trouble to create this said cushion, from what I have seen.
15 years before the wood turns black it would have been saturated with water

read some of the resto threads. both exterior grade and marine use the same glue. the wood is a slightly different species, however both will rot when exposed to water....... which is where the encapsulation comes in.
So am green to the boating repairs.
The wood that I have uncovered is 1/2 obviously marine plywood. It’s still solid in places and those places I cannot break it no kinda shape or form. In any direction.
Now there are bad places down at the hull that has splits or bad deterioration.
They could have done a better job encapsulating.
Even the plywood under the center console that was encapsulated with no visible breeches where I cut it was soaked... everything bottom side has been soaked
 

Lectro88

Petty Officer 1st Class
Joined
Oct 24, 2020
Messages
303
A few pics.
I extracted this section as a test and see how bad it is.
 

Attachments

  • 55568E45-4634-4AE6-96AB-A040DE643089.jpeg
    55568E45-4634-4AE6-96AB-A040DE643089.jpeg
    2.6 MB · Views: 27
  • 00027365-6818-4EBD-80E6-9B31FA68F4B6.jpeg
    00027365-6818-4EBD-80E6-9B31FA68F4B6.jpeg
    2.4 MB · Views: 26

Scott Danforth

Grumpy Vintage Moderator still playing with boats
Staff member
Joined
Jul 23, 2011
Messages
48,761
recreational boats are designed with a 15 year design life and about a 20 year service life (depending on care and maintenance). getting 51 years out of a recreational boat is commendable.

Boats from the 80's and 90's barely lasted 15 years.
 

gm280

Supreme Mariner
Joined
Jun 26, 2011
Messages
14,602
If you were to look at so many other resto's on these threads, your pictures look exactly like every other boat resto project. It is how they get when they are way over do for a rebuild... Keep posting and ask questions for ideas and help. We all had to learn the boating lingo and the how-to's along the way as well... So basically no question is stupid! Ask away...
 

Lectro88

Petty Officer 1st Class
Joined
Oct 24, 2020
Messages
303
Ok.
I got a question.
How did they secure the cap to hull on 69 eara cc.
I have been picking at this for maybe 2 months.
I have picked back boat up with excavator off trailer. Cut 4” holes in cap chewed away foam from top to bottom with tool I made that give me 4-5 maybe 6 foot weak spot from transom forward.
I see plywood on gunnel and I suspect it’s fused or glassed together in corner at transom.
But I don’t see foam holding this intense.
I had boat in air and several crowbars prying between lip cap and transom at tie down. Just bows to point of cracking and I back off before that happens. But 0 attempt to budge any.
I have not gotten too seriously aggressive and opted to cut floor loose to get bottom side to see what culprit needed to be cut to free things up.
I will get this cap off EVENTUALLY. (enough time money and effort will conquer almost anything)
Anyone else split a old Mako.

Thanks everyone.
 

Lectro88

Petty Officer 1st Class
Joined
Oct 24, 2020
Messages
303
Sorry posted before upload pics
 

Attachments

  • CAD35F0D-766C-4898-9F47-FA1A226C4D0B.jpeg
    CAD35F0D-766C-4898-9F47-FA1A226C4D0B.jpeg
    4.1 MB · Views: 56
  • 45F7628D-AF6B-478B-95B8-505E10668F19.jpeg
    45F7628D-AF6B-478B-95B8-505E10668F19.jpeg
    3.6 MB · Views: 54
  • CCCE3590-46AB-4486-8EBC-5A51C699EC95.jpeg
    CCCE3590-46AB-4486-8EBC-5A51C699EC95.jpeg
    2.4 MB · Views: 50
  • 6C44D059-4CAF-4794-8F74-30CB0CFA8B8E.jpeg
    6C44D059-4CAF-4794-8F74-30CB0CFA8B8E.jpeg
    2.1 MB · Views: 55

Lectro88

Petty Officer 1st Class
Joined
Oct 24, 2020
Messages
303
That section floor was I’d say +-400 lbs.
and it was weeping water profusely along stringers and underside.
 

Lectro88

Petty Officer 1st Class
Joined
Oct 24, 2020
Messages
303
Ok.
I got a question.
How did they secure the cap to hull on 69 eara cc.
I have been picking at this for maybe 2 months.
I have picked back boat up with excavator off trailer. Cut 4” holes in cap chewed away foam from top to bottom with tool I made that give me 4-5 maybe 6 foot weak spot from transom forward.
I see plywood on gunnel and I suspect it’s fused or glassed together in corner at transom.
But I don’t see foam holding this intense.
I had boat in air and several crowbars prying between lip cap and transom at tie down. Just bows to point of cracking and I back off before that happens. But 0 attempt to budge any.
I have not gotten too seriously aggressive and opted to cut floor loose to get bottom side to see what culprit needed to be cut to free things up.
I will get this cap off EVENTUALLY. (enough time money and effort will conquer almost anything)
Anyone else split a old Mako.

Thanks everyone.
So no takers on how they bulletproof secured top to hull.
Like I said earlier, I suspect that inside the gunnel back toward the transom about the corner it is secured some kind of funky way(out of sight.. sealed). more than just rub-rail and foam I suspect.
That 3/4" plywood I saw inside the gunnel "May" be tied to the transom, however it is mush and wouldn't be locked down that tough is my thoughts.
And I have removed the foam under the corner live well to the hull and nothing there, and you can pick up at the tank and its solid.
My next move is lace 2 tie down straps through the well drain plug and I can lay the force to that, its 1" thick there. something will have to give.
 
Last edited:

Lectro88

Petty Officer 1st Class
Joined
Oct 24, 2020
Messages
303
Ok back to stringers topic.
I have read so much my eyes are crossed.. and its clear as mud.
some say bed stringers with goo.. poly. some say it doesn't matter.
others say anything is an improvement over mass production.
my 69 mako seems to be thick glass on the belly. so I'm not sure the hard spot would ever show through, to speak of.
I had thought about and this and this is a lot of extra work. and it would eat 3-4 times the adhesive for bedding.
Most talk of a radius at base of stringer.
I had considered ripping angle wedge and gluing that to each side of stringers, basically a corner mold, like you would see where wall and ceiling meet in houses.
several reasons for this thought.
It would help stringer stand during bedding and give a wider footprint is the key thought. and its adding some support. I was thinking a 3/4"- 1-1/2" wedge both sides the entire length.
that makes the stringer base easy 3" wide if I'm not carful.
my stringers are 1X's to start, so laming adds to each side or triple width at base.
And as you can imagine bedding this with a poly in caulk tubes it'd take 2 cases. Minimum.
So, good idea or scrap it.
I'm in no hurry so I don't mind the work if you seasoned builders think its worth the effort, and yes its more to initially seal with epoxy, so several extra steps.
maybe the soft bed could be omitted with this added step.
I just see the stringers single layer being a pain to rig in upright position at initial setting.
I'm asking before I do this. so there it is.

Thanks in advance.
 

gm280

Supreme Mariner
Joined
Jun 26, 2011
Messages
14,602
You sound like so many others contemplating a rebuild of their rotted hull, self included. But try not to over think it because it really isn't rocket science that you will only see after it is all finished. There are things to be said for a wider footprint, but there are negative things as well. Adding basically "wedge" parts against the stringers and bulkheads just adds weight that you certainly can do without. 1 X 's or even plywood (3/4") will work every day of the week and give enough support to the floor all by itself. And it also takes less work by not fabricating the wedges to fit as well. Since your boat lasted all these years how it was initially built, you can't go wrong redesigning the new wood parts to mimic that same structure layout. But when you do that same layout, it will be tons better then the factory because you will pay attention to the details. The factory built for quick turn-a-round and profit. So if they missed things...who cares. JMHO
 

Lectro88

Petty Officer 1st Class
Joined
Oct 24, 2020
Messages
303
So I spent some time tinkering at the saws, just experimenting,(Playing)
It started out simple and it evolved into a special kind of crazy.
Here’s the results.
This is my idea for stringers.
Peanut butter between slots and glass over.
This was just a dry run on a small scale to see if I could apply my ideas.
The idea is set to the contour of the boat.
And I figure this will eliminate any and all so called hard spots.
I am not concerned about time or weight in this matter.
Only the final outcome.
 

Lectro88

Petty Officer 1st Class
Joined
Oct 24, 2020
Messages
303
Pics have been a pain to upload today
 

Attachments

  • 10F752D8-013A-4610-B872-2911F5EEF0F9.jpeg
    10F752D8-013A-4610-B872-2911F5EEF0F9.jpeg
    1.3 MB · Views: 19
  • E3508301-A067-49E4-B797-1E40E448908A.jpeg
    E3508301-A067-49E4-B797-1E40E448908A.jpeg
    1.6 MB · Views: 18
  • 5188D454-41A8-4D70-BB3E-44C4CEF456D3.jpeg
    5188D454-41A8-4D70-BB3E-44C4CEF456D3.jpeg
    1.3 MB · Views: 18
Top