1969 Mako cut and gut project by Lectro88

GSPLures

Chief Petty Officer
Joined
Sep 3, 2019
Messages
564
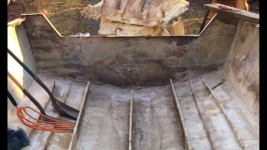
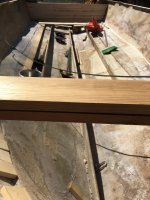
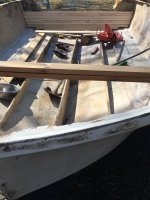
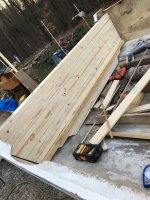
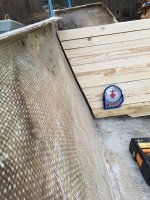
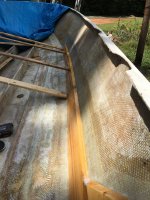
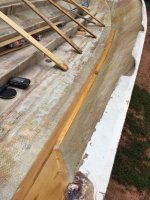
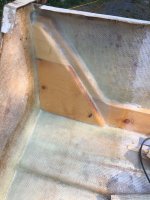
First off nice work lectro second I like the relief cut idea to give the wood some contour ability, wish i would have though of that when doing my stringers.

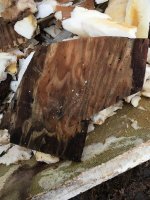
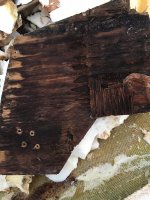
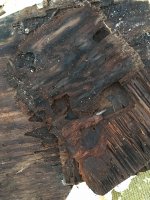
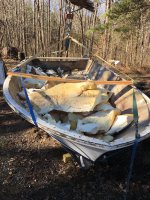
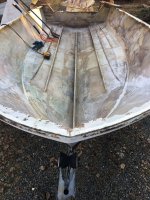
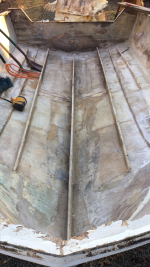
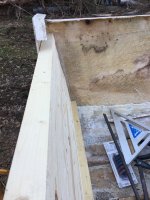
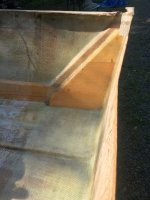
For the cap issue. I could definitely see it happening, although I did not have to remove my cap. My rebuild was complete rot with no structure left. Add on top of that my bunks were sagging which cracked the hull and you could see the hook in the bottom from it deforming. I am assuming (I know the saying;)) removing the support from the top of the hull along with getting in and out and leaning on things then installing the structure would keep the hull in a deformed shape making it difficult to install the cap without further deformity or possible breakage in areas
 

Lectro88

Petty Officer 1st Class
Joined
Oct 24, 2020
Messages
302
I have made a good bit of progress over the last few days.
2, things to contribute to that.
The cap of opened the door.
And we have had a few really spring like days here in nc 70’s. And break from rain til tomorrow.

So, many pics and pretty good update to follow.

You may remember I had said ants were in foam and that was 1 main reason to get cap off. That and wet foam.
The ants not only tunneled in foam but tunneled in wet rotten transom plywood, both being wet made a perfect habitat for them.
Well... I ruined their day... ants went bye bye.
Turned them white with a cocktail of raid, hotshot and cutter yard guard.
 

Attachments

  • 116469D6-EC8B-4E3D-A6A5-29B92C0E7673.jpeg
    116469D6-EC8B-4E3D-A6A5-29B92C0E7673.jpeg
    1.1 MB · Views: 10
  • 010CDB67-21D7-486B-B08C-166AFAC604DD.jpeg
    010CDB67-21D7-486B-B08C-166AFAC604DD.jpeg
    1 MB · Views: 9
  • 381D9D44-1889-4887-83B8-D759C555707D.jpeg
    381D9D44-1889-4887-83B8-D759C555707D.jpeg
    1.3 MB · Views: 10
  • 91037ADB-428C-459E-98D1-414D0CCAEB28.jpeg
    91037ADB-428C-459E-98D1-414D0CCAEB28.jpeg
    1.1 MB · Views: 10

gm280

Supreme Mariner
Joined
Jun 26, 2011
Messages
14,602
Looks like the first picture the two ants are plotting their revenge against you now since you exposed their plot. Ants can be very destructive. Next to terminate, the are right up there. Glad you found the "WET" junk and have plans to remedy all the issues. Keep posting with pictures...
 

Lectro88

Petty Officer 1st Class
Joined
Oct 24, 2020
Messages
302
Weighed boat and got foam removed.
I am monitoring weight before during and after.
The transom was shot mostly mush but where it was glassed or attached to transom it still had good color.
Amazing it was holding cap in it’s condition.
 

Attachments

  • 55036F8F-57F1-4D6C-A284-93EBA46F5B63.jpeg
    55036F8F-57F1-4D6C-A284-93EBA46F5B63.jpeg
    2 MB · Views: 12
  • 2718FA55-F7C4-4900-985A-6EC0402B6B17.jpeg
    2718FA55-F7C4-4900-985A-6EC0402B6B17.jpeg
    1.8 MB · Views: 10
  • 312CB0C6-08C5-4519-B41A-C7FFAB300AE2.jpeg
    312CB0C6-08C5-4519-B41A-C7FFAB300AE2.jpeg
    1.7 MB · Views: 9
  • 7BFEFBB9-A497-4500-A5A8-CE9C3687FC34.jpeg
    7BFEFBB9-A497-4500-A5A8-CE9C3687FC34.jpeg
    1.8 MB · Views: 9
  • AA667970-433B-4978-9D1D-9DAC9820B2A9.jpeg
    AA667970-433B-4978-9D1D-9DAC9820B2A9.jpeg
    3.1 MB · Views: 11
  • C7E067E3-99D0-4393-9326-8E8900378518.jpeg
    C7E067E3-99D0-4393-9326-8E8900378518.jpeg
    1.8 MB · Views: 12

Lectro88

Petty Officer 1st Class
Joined
Oct 24, 2020
Messages
302
After loading hull back on trailer drug it to our dumpster 200 or so feet away and threw foam out.
Then figured it’s time to sweep after a little sanding.
This finally feels like progress and a 1st. Mile stone.
 

Attachments

  • AD7F6C61-FBE6-4D71-B1BE-2D4B01F3EDAF.jpeg
    AD7F6C61-FBE6-4D71-B1BE-2D4B01F3EDAF.jpeg
    2.6 MB · Views: 17
  • D199C70A-BE4D-4730-BE8B-2B232C998768.jpeg
    D199C70A-BE4D-4730-BE8B-2B232C998768.jpeg
    2.7 MB · Views: 16
  • E7C175B2-C4BB-4CC7-8985-9E32CDA27507.jpeg
    E7C175B2-C4BB-4CC7-8985-9E32CDA27507.jpeg
    2.2 MB · Views: 17
  • 9E429AB5-8D11-4454-A06C-56FFCA874A76.jpeg
    9E429AB5-8D11-4454-A06C-56FFCA874A76.jpeg
    2.4 MB · Views: 17

Lectro88

Petty Officer 1st Class
Joined
Oct 24, 2020
Messages
302
Now I threw 1 big batch of wet foam away prior to this load. Most of under floor except the step up section and gunnels of foam.
I am not going to have concrete numbers for total wet foam as I didn’t attempt to weigh boat with cap on.
So I am going to just have a best idea on exact numbers.
I will weigh wet stringers. They are sopping soaked.
 

GSPLures

Chief Petty Officer
Joined
Sep 3, 2019
Messages
564
Good work. I feel ya on the ants. I had carpenter ants in mine when I started tear down. I could hear them moving around under the bow. Luckly my wife's uncle works for orkin so one call to him and he took care of them.
 

gm280

Supreme Mariner
Joined
Jun 26, 2011
Messages
14,602
Two things. First the "terminate" in my last post, should have been termites. Another case of hands not typing what my mind is thinking. Second, I'd say you are in this for the duration now. No turning back at this point. But "YES" it is progress and looks very nice cleaned out. The day you splash it, you will have a smile from ear to ear knowing YOU rebuilt it and it is solid as a rock and so much better then factory...
 

tank1949

Lieutenant Commander
Joined
Apr 4, 2013
Messages
1,770
Not exactly sure what you’re asking, but if the wood is black, it’s rotten and needs to come out. It may not yet have turned to mulch, but it is rotten.

Also, there is nothing special about marine plywood, other than it is an exterior plywood with no voids. Any exterior rated plywood will work, but regardless of the type, it needs to be encapsulated in resin (polyester or epoxy) and fiberglass.
It's been my experience that the Marine stuff is straight or flat. BCX, CDX, etc, not so much. Sometimes the crap that is not 100% flat can be a nightmare to put into place and encapsulate. If you are rebuilding a transom for an I/O, you may run into voids near your I/O cut out. I have always been a fan of epoxy and fumed silica paste.
 

mickyryan

Rear Admiral
Joined
Apr 18, 2016
Messages
4,214
i use bcx ply haven't had a issue i usually do a layer of csm between the ply or 6 oz fabric, my transom on the aqua sport is 3" as that was max thickness Yamaha recommended , i also did a extra set of stringers to my transom on floor because all the engines are heaver now adays then when my boat was made , also i raised my transom to allow for a 26" shaft since they seem to be easiest to find now adays. just some engine weights the 100hp yamaha is 360 the 150 two stroke is 410 most engines now adays are 100 lbs heaver then older comparable hp.
 

Lectro88

Petty Officer 1st Class
Joined
Oct 24, 2020
Messages
302
Mickyryan, thanks for you guidance.

To everyone else thank you for the replies and help too.

Also
I just noticed that I didn’t have any pics that showed transom with wood removed and down to bare glass.
All anchor points are removed, the only thing left that is soon to be removed are the old rotten, soaked stringers.
This is down to basically a bare shell with 0 Hardware now.

And the pics I'm loading when they post are cropped differently, thats why I added the 2nd in edit... And even its modded.
 

Attachments

  • 5768E755-CF41-4EC5-A721-2C8A85575507.png
    5768E755-CF41-4EC5-A721-2C8A85575507.png
    5.9 MB · Views: 16
  • 26C9AAE1-C361-4A0D-A896-1E34C53EA480.png
    26C9AAE1-C361-4A0D-A896-1E34C53EA480.png
    4.9 MB · Views: 14
Last edited:

Lectro88

Petty Officer 1st Class
Joined
Oct 24, 2020
Messages
302
Started and got most of the boards cut for transom.
My idea or method is different, time consuming in an unbelievable manner.
But when completed I think it will outlast me.
Its 2x3’s layed flat, 1/2” oak doweled, epoxied together then coated again and fiberglassed. All penetrations such as engine bolts will be epoxy finished, or poured/potted , then sleeved with plastic or rubber pipe to accommodate 1/2 bolts, (like a bushing) this will or should keep water from getting in for a good while.
You will notice the original height of transom, and you can see I’m passing the 20” mark going to 25”.
I have 2-3 boards left to cut. And drill tie down loops through(need longer bolts)
I spent most of the day on these 11 boards, but it was a lot of back and forth to saw and it was chilly today.
So anyone that’s been in transom knows that double ply is not full width, only 1 layer full width. Couldn’t tell if it was 1/2” or 3/4”
so thats 1”- 1-1/2”
my method is 2-1/2” and on its way to full solid 3” with fiberglass installed.
The wood dowel is exciting as the back of boards are ripped at 10 degrees so board lays flat/level and matches back fiberglass at transom, so the boards kinda stager 1/4” or stair step from the back degree, and the dowels. Have to slightly Angie to keep centered of the boards and not run out, so it’s funky at best. True, keeping true with untrue, so again slam exciting.
I was going to use my 20yr old treated, but it was heavier
than I wanted.
oh and I will fill the voids at bottom with super custom mitre, just more time to consume.
Hope you enjoy my insanity.

I figure... If anyone tries to rebuild what I have done to this boat... they are going to hate me.
 

Attachments

  • C0C79216-FC55-4476-BA62-445F66DEB161.jpeg
    C0C79216-FC55-4476-BA62-445F66DEB161.jpeg
    1.5 MB · Views: 23
  • 06747768-36C3-4BA7-88A9-76ACF53A6D1D.jpeg
    06747768-36C3-4BA7-88A9-76ACF53A6D1D.jpeg
    1.3 MB · Views: 24
Last edited:

Meames1

Petty Officer 2nd Class
Joined
Dec 14, 2020
Messages
157
Wow, I don't know if that's a better way to build a transom but I'm sure it's going to be as strong as an Ox. Nice work.
 

Lectro88

Petty Officer 1st Class
Joined
Oct 24, 2020
Messages
302
Wow, I don't know if that's a better way to build a transom but I'm sure it's going to be as strong as an Ox. Nice work.
Strong as an Ox.... Was my plan.
my intent was to hang twins on there.

The Stringers will tab/tie into or knee into transom also.
that way any force or twist is distributed up to front of boat.. or displaced over a larger area rather than just hanging on the back.
that was my thought process. anyway.

And from a cheapskate standpoint. I have about $60.oo in lumber including dowels...
And $600.oo in labor.
satisfaction of being how I wanted... priceless.
 
Last edited:

gm280

Supreme Mariner
Joined
Jun 26, 2011
Messages
14,602
Not the typical way most others do their replacement transoms. But IF you can keep it dry and water tight, should be workable. Post your progress. I'd like to see how it all works out...
 

Lectro88

Petty Officer 1st Class
Joined
Oct 24, 2020
Messages
302
Made a little more progress on the transom.
Slowly piecing it together.
Ripped front side of boards to remove step back from staggering with slope or degree of transom.
I’m actually pretty pleased with how it’s turning out.
Went from 2-1/2” thick to 2” doing the ripping.
But it’s still way overkill.
Even rotted with this much mass it would still hold a lot.
1 major downfall would be. IF!!! It ever got saturated it would weigh 100 lbs.
however.. with epoxying between layers, I think that will barrier water to just that section, or board.
And I’m going to seal with penetrating epoxy and epoxy.
May leave under floor section unglassed in middle to be able to see wood and if water got in it should be detectable. Tab edges to hull and leave center exposed again under floor for inspection,
Will 24 oz glass back and sides and front along edges.
What are thoughts on that. ?

Have a few pics.
More to come later as progress continues.
 

Attachments

  • 9F327FF7-45E5-4DCB-A268-406E758E3EE3.jpeg
    9F327FF7-45E5-4DCB-A268-406E758E3EE3.jpeg
    2.1 MB · Views: 14
  • 91C7C53B-B0EA-4562-B8A1-C10F11F64A5D.jpeg
    91C7C53B-B0EA-4562-B8A1-C10F11F64A5D.jpeg
    2.5 MB · Views: 13
  • 522FC43B-D70E-4199-92C5-7D73F76AFFBD.jpeg
    522FC43B-D70E-4199-92C5-7D73F76AFFBD.jpeg
    1.9 MB · Views: 14
  • 6CAD0DA3-E6DC-4C15-A1B7-3AFEB94430F9.jpeg
    6CAD0DA3-E6DC-4C15-A1B7-3AFEB94430F9.jpeg
    2.1 MB · Views: 15
  • FD9D811A-448C-4359-B5B7-9692D65985F1.jpeg
    FD9D811A-448C-4359-B5B7-9692D65985F1.jpeg
    1.8 MB · Views: 16
  • 1DDD351B-E4A1-4AE0-AF49-DC06E0366263.jpeg
    1DDD351B-E4A1-4AE0-AF49-DC06E0366263.jpeg
    2 MB · Views: 14

Lectro88

Petty Officer 1st Class
Joined
Oct 24, 2020
Messages
302
Been a while but I have been making progress without any updates.
So things have evolved and started taking shape.
Several things have changed and better ideas have been adopted.
However I am not doing anything standard.
I’m building this for twin motors or that’s the plan. So things are heavier built than original.
Here’s a pic of transom just set in place.
The 2nd. Reinforcement boards are not shown but I will explain more on that later.
 

Attachments

  • 565BB588-5B03-4443-998B-2BE36B461479.jpeg
    565BB588-5B03-4443-998B-2BE36B461479.jpeg
    946.6 KB · Views: 7

Lectro88

Petty Officer 1st Class
Joined
Oct 24, 2020
Messages
302
This is an addition. (My twist)
It’s purpose is to displace the weight and bouncing of twin engines 800ish. Lbs. Across RR tracks, potholes and those lovely uneven bridges that lift the boat off trailer and it gently comes back to rest on the trailer. At 60mph going down the road.
This also really stiffened the flop of side of hull.
 

Attachments

  • 55E54EFA-3AFF-4092-8C63-D711B9BEBDAE.jpeg
    55E54EFA-3AFF-4092-8C63-D711B9BEBDAE.jpeg
    2.3 MB · Views: 13
  • 63EDCAF3-D90B-464F-BEF7-9A13C8F5F0E2.jpeg
    63EDCAF3-D90B-464F-BEF7-9A13C8F5F0E2.jpeg
    2.2 MB · Views: 11
  • 147898CE-ECD7-42EB-9E49-384BA02F3CFD.jpeg
    147898CE-ECD7-42EB-9E49-384BA02F3CFD.jpeg
    4 MB · Views: 13
  • 9786D6D0-B8EF-401C-8DE3-632AFD22E344.jpeg
    9786D6D0-B8EF-401C-8DE3-632AFD22E344.jpeg
    2 MB · Views: 13
  • 4543BFA0-F3FD-4AD2-AA39-3523223AC34A.jpeg
    4543BFA0-F3FD-4AD2-AA39-3523223AC34A.jpeg
    2 MB · Views: 13
Last edited:

Lectro88

Petty Officer 1st Class
Joined
Oct 24, 2020
Messages
302
There’s 3 layers 24 oz cloth here.
1 layer under, then a layer over each board.
Epoxy is poured solid behind and between.
It’s fun stopping the bleeding or weeping of epoxy if you missed a place with PB, or you didn’t give pb enough time to cure to stop flow.
This is really Meaty or stout.
It made everything Rock solid.
You really can’t see it but the 2nd. board overlaps the seam of the other boards. This is 20” tall and 16” wide.
These are 1x12’s x’s2 double thickness.
The transom is a solid 2” also.
 

Attachments

  • 2F8C41AB-0125-4C9D-B529-0886ACC2903D.jpeg
    2F8C41AB-0125-4C9D-B529-0886ACC2903D.jpeg
    2 MB · Views: 4
Top