1969 evinrude 25 horse 2 stroke won’t start

Noblo88

Seaman Apprentice
Joined
Jul 2, 2014
Messages
39
I can post more pictures of the engine today if that’ll help anyone
As to the kill wires, do you think that could be causing my engine to not fire?
ok more awake..this a.m.
yes 2 blacks going under the FW are kill wires to shut down the engine. they should go to a normally open push STOP switch !


both coils look decent. ..changing condensers may help and a good clean -up on points if you do not want to spend extra $$$ see timing video
 

Noblo88

Seaman Apprentice
Joined
Jul 2, 2014
Messages
39
starter aside.... running involve ignition, fuel delivery, compression
assuming compression is ok you will need to check fuel delivery from tank to cylinders. ....pump check , carb cleaning, filters etc...

start with a complete carb clean up

you will have to check each and do some reading from Leroy's as a guide

I pulled the carb the other day and everything looked clean, I just looked at a diagram and can’t seem to find jets on internals like other carbs I have worked on before? Am I missing something? How is the fuel being delivered and managed?
 

racerone

Supreme Mariner
Joined
Dec 28, 2013
Messages
37,835
There is a high speed jet ( AKA orifice plug ) INSIDE the float bowl.----Make sure it is clean.
 

lindy46

Captain
Joined
Nov 27, 2008
Messages
3,886
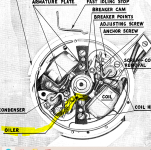
CLEAN those points and check gap. It almost looks like that open point (in your picture) is open too far. Set to. 020".
 

Crosbyman

Vice Admiral
Joined
Nov 5, 2006
Messages
5,446
if the kill wires are not grounded anywhere or touch themselves it will have no impact on ignition.

"clean looking carbs" are not enough. you must check , purge, blow all passages with carb cleaner and air . float should be level with the casing when upside down do not use carb cleaner on cork floats . a good carb job involves checking the top idle drip chamber by removing the dime size plug and cleaning out the idle passage from the LS needle and small drip holes. a small VERY shallow hole and a pick will pop it out. replace with a new one from the kit and tap it in place . seal it with clear fingernail polish

the carb has a side channel leading to te upper half. side channel must be checked, purge air blasted. etc..

lots of utubes on how to...
 

oldboat1

Fleet Admiral
Joined
Apr 3, 2002
Messages
9,612

Idle adjustment on top of carb (air/fuel) #30 -- initial setting 1 1/2 turns open from lightly closed. Try to start. Turn needle 1/8 turn clockwise (leaner) until engine pops from the exhaust port in the shaft -- lean sneeze. Then open 1/4 turn -- likely proper setting for starting and running.
 

Noblo88

Seaman Apprentice
Joined
Jul 2, 2014
Messages
39
if the kill wires are not grounded anywhere or touch themselves it will have no impact on ignition.

"clean looking carbs" are not enough. you must check , purge, blow all passages with carb cleaner and air . float should be level with the casing when upside down do not use carb cleaner on cork floats . a good carb job involves checking the top idle drip chamber by removing the dime size plug and cleaning out the idle passage from the LS needle and small drip holes. a small VERY shallow hole and a pick will pop it out. replace with a new one from the kit and tap it in place . seal it with clear fingernail polish

the carb has a side channel leading to te upper half. side channel must be checked, purge air blasted. etc..

lots of utubes on how to...
Thank you for the info I’ll get into the carb tonight and see what more I can find as well as some YouTube search on the carb cleaning
 

Noblo88

Seaman Apprentice
Joined
Jul 2, 2014
Messages
39
Just got the carb all cleaned up with carb cleaner and an air nozzle. Need to get the
CLEAN those points and check gap. It almost looks like that open point (in your picture) is open too far. Set to. 020".
just watched a video on how to fine tune the points, it will be my first thing to do tomorrow, tonight I got my carb all clean with carb cleaner and an air gun
 

Crosbyman

Vice Admiral
Joined
Nov 5, 2006
Messages
5,446
.020 adjustment is less critical as long as the points open up at exactly the markings shown on the video. .020 is the guideline for manual adjustments using the cams high point

when the points open up the plugs will fire at TDC (top dead center) of the piston travel.

while you do the points don't forget a drop o r2 of oil (no more) on the small felt pad used to oil the cam lobe and point's rub bar. replace it if worn. do not loose the small pad clip $$$$.
I use gear case oil (personnal choice)
 

Attachments

  • points adj..JPG
    points adj..JPG
    175.4 KB · Views: 4
Last edited:

Noblo88

Seaman Apprentice
Joined
Jul 2, 2014
Messages
39
.020 adjustment is less critical as long as the points open up at exactly the markings shown on the video. .020 is the guideline for manual adjustments using the cams high point

when the points open up the plugs will fire at TDC (top dead center) of the piston travel.

while you do the points don't forget a drop o r2 of oil (no more) on the small felt pad used to oil the cam lobe and point's rub bar. replace it if worn. do not loose the small pad clip $$$$.
I use gear case oil (personnal choice)
“Forget a drop o r2 of oil” can you clarify? And that small felt pad ( I believe I only have one) when is it “no longer good”?
 

Crosbyman

Vice Admiral
Joined
Nov 5, 2006
Messages
5,446
the small felt pad lubricates the cam to reduce wear on the point rub block

if it looks awfull or frayed... replace it and only one is used... kit provided pads may be already greased. if non available i used those sticky felt pads for furniture. cut it up and install with the felt side on the cam ...... add 2-3 drops oil on sticky pads


1686750070219.png
 
Last edited:

airshot

Vice Admiral
Joined
Jul 22, 2008
Messages
5,087
Did you run a compression check? Without good even compression, your wasting your time !! Get a spark gap tool, they are cheap, you need to be able to jump at least a 1/4" gap !! Spark should be blue, yellow indicates a weak spark ! These are quick, easy things to check to see if your motor is healthy to begin with. Once you know the motor is healthy, then a factory carb rebuild kit is needed...all new gaskets, needle and seat and the info needed to set the carb up properly to start. Generally people do much better when following a proceedure to get a motor running, when you jump from one idea to another you may never know what actually works...
 

Crosbyman

Vice Admiral
Joined
Nov 5, 2006
Messages
5,446
Airshot... all true except for some odd reason in all my refurbs (approx 20) I can't say I ever saw strong blue sparks mostly snappy yellows which allowed my refurbs to work quite well. I'll have to check closer on the next refurb.

Maybe I have been lucky the only time I ever had bad compression to stop an engine was on a 3hp blown head gasket (middle) .
 

oldboat1

Fleet Admiral
Joined
Apr 3, 2002
Messages
9,612
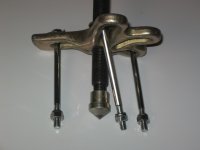
I think most guys substitute stainless steel bolts and nuts and washers of the same size, but that is the right puller. Keep everything level vertically, and turn down the center shaft. Loosen the crankshaft nut but leave it in place at the top of the shaft to prevent damage. Crank the puller down tight with a box wrench, and whack the puller shaft sharply with a two pound hammer. Repeat until the crankshaft pops loose -- and that can startle you, but the nut will keep the crankshaft from flying off.


[edit. reference is to flywheel, not crankshaft. Thanks for notes on that.]
 
Last edited:

racerone

Supreme Mariner
Joined
Dec 28, 2013
Messages
37,835
I have pulled many flywheels.-----Never leave the nut on.-----I doubt that the " crankshaft " will go flying off as per above post.
 
Top