1969 evinrude 25 horse 2 stroke won’t start

Noblo88

Seaman Apprentice
Joined
Jul 2, 2014
Messages
39
Update. Rechecked the points made sure everything was right about .02 for points and checked continuity and everything was solid, after a few minor adjustments. Still not running, I sprayed a little starter fluid In and it ran for about 3 seconds. I’ve played a lot with the carb Adjustment and I think there’s a possibility that I just need a new carb, everything was cleaned very well and also used an air gun. I’m just not sure what else to check, what do you guys think?
 

Crosbyman

Vice Admiral
Joined
Nov 5, 2006
Messages
5,440
so it runs with starter fluid ...then you have sparks ...good !

time to clean the carb again. did you remove the top plug to clean the LS circuit drip holes, passages leading to them etc....

starting is usually involves pulling fuel from the top LS circuit with the throttle plate closed.
the carb roller should be lined up with the cam marking

extra fuel pull is provided with the choke plate closed . that should provide you with enough vapaorized fuel to get it going. If not.... you still have a fuel restriction or you have very little crankcase vacum to suck the fuel from the carb. a new carb won't help. imho
 
Last edited:

Noblo88

Seaman Apprentice
Joined
Jul 2, 2014
Messages
39
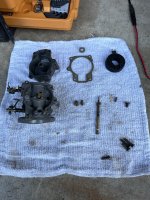
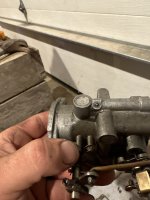
Everything is clean as can be..the jet on the right (center of picture) has a number “72” stamped on it and looks new to me. Both jets have big holes in them so I’m not sure how’d they would even get clogged, all ports on the carb have been blasted with air again.
 

Attachments

  • image.jpg
    image.jpg
    3 MB · Views: 1

Noblo88

Seaman Apprentice
Joined
Jul 2, 2014
Messages
39
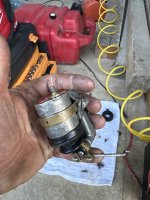
Anyone know what this is? Was on the left side of the carb attached to the choked lever. I’m assuming electric choke? But no wires were connected so I ain’t just ain’t sure
 

Attachments

  • image.jpg
    image.jpg
    1.9 MB · Views: 2

Crosbyman

Vice Admiral
Joined
Nov 5, 2006
Messages
5,440
electric choke solenoid to close the chke when starting

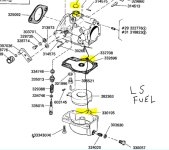
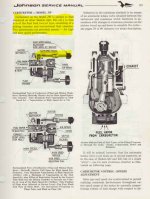
carb... did you remove the top plug and clean the LS cct.??? verify the side channel feeding fuel to the top idle needle... the side channel is very narrow if plugged no fuel will rise to the top idle needle .

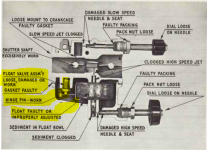
did you gently.... try to remove the central brass tube to clean any emulsifier holes on the side of the post. see diagrams of basic carb issues.... old carb new carb mostly work the same !! and plug up the same.
 

Attachments

  • CARB 48 HP LS side channel&gasket..JPG
    CARB 48 HP LS side channel&gasket..JPG
    96 KB · Views: 6
  • carb bugs.PNG
    carb bugs.PNG
    214.2 KB · Views: 6
  • carb flows.JPG
    carb flows.JPG
    87.4 KB · Views: 6
Last edited:

Noblo88

Seaman Apprentice
Joined
Jul 2, 2014
Messages
39
The round piece or the small pointy one for the LS cct? And the central brass tube won’t come out, but I can see on the sides the visible holes are clean through and through.
 

Attachments

  • image.jpg
    image.jpg
    1.4 MB · Views: 2

Crosbyman

Vice Admiral
Joined
Nov 5, 2006
Messages
5,440
dime size plug...!! do not remove the smaller lead plugs !
drill a small VERY shallow hole just to pierce it and pry it off with a nail or pick

clean all the inside, you should see the LS needle tip sticking out the side hole...remove the needle then carb clean and blow all passages incl the side channel. blow carb cleaner from the side channel ... if you block the LS needle threads with your finger the carb cleaner should exit the small side hole leading into the drip chamber

when all done install a new cover and tap the center with a punch (not to hard) just enought to squash it down a bit to seal the cavity rim . I apply clear finder nail polish to seal it 100%


see picture CARB FLOWS
 
Last edited:

Noblo88

Seaman Apprentice
Joined
Jul 2, 2014
Messages
39
dime size plug...!! do not remove the smaller lead plugs !
drill a small VERY shallow hole just o pierce it and pry it off with a nail or pick

clean all the inside, you should see the LS needle tip sticking out the side hole...remove the needle then carb clean and blow all passages incl the side channel. blow carb cleaner from the side channel ... if you block the LS needle threads the carb cleaner should exit the small side hole into thedrip chamber

when all done install a new cover and tap the center with a punch (not to hard) just enought to squash it down a bit to seal the cavity rim . I apply clear finder nail polish to seal it 100%


see picture CARB FLOWS
Sounds good I’ll see if any local auto parts stores carry the “Welch” plug. I was on YouTube last night and saw what you were talking about after I posted my reply.
 

Crosbyman

Vice Admiral
Joined
Nov 5, 2006
Messages
5,440
plugs come with the carb kits...dimensions are critical and "auto" shops are unlikely to have outboard stuff....
 

Noblo88

Seaman Apprentice
Joined
Jul 2, 2014
Messages
39
Got that Welch plug removed and it was clear and clean. Re cleaned everything and put it all back together and on the motor and same thing just kinda starts off of starter fluid but nothin more. Is there a way to test the suction from the motor/ reeds? I’m starting to wonder if maybe it doesn’t suck well enough/hard enough or somethin. Because even when I spray fuel into the carb I get nothin.
 

racerone

Supreme Mariner
Joined
Dec 28, 2013
Messages
37,819
4 things for motor to run.----Spark ( 1/4" gap ) at the right time.----Correct amount of fuel.----Compression.----And compression in the crankcase.------Simple inspection / testing needs to be done.-----We are at post #74 and counting.
 

Noblo88

Seaman Apprentice
Joined
Jul 2, 2014
Messages
39
4 things for motor to run.----Spark ( 1/4" gap ) at the right time.----Correct amount of fuel.----Compression.----And compression in the crankcase.------Simple inspection / testing needs to be done.-----We are at post #74 and counting.
I went and bought a nicer compression test kit since mine was older and pretty cheap, and I think that it was off since the original one was reading both in decent spots but this newer one I just tested and hit 65-70 on top and 60-65 on bottom cylinder. If I remember correctly I read I need to have both at 90. Looks like it’s time for a rebuild right?
 

racerone

Supreme Mariner
Joined
Dec 28, 2013
Messages
37,819
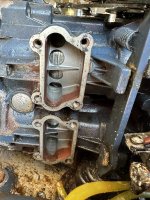
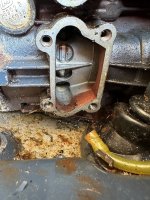
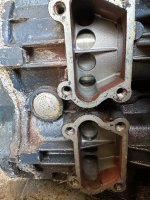
Remove bypass covers ( 4 screws each ) report what you see on pistons / rings.----Could be a blown head gasket as well.----As I say many times ---" it is so easy to trouble shoot " these simple reliable motors.
 

Noblo88

Seaman Apprentice
Joined
Jul 2, 2014
Messages
39
Remove bypass covers ( 4 screws each ) report what you see on pistons / rings.----Could be a blown head gasket as well.----As I say many times ---" it is so easy to trouble shoot " these simple reliable motors.
I’ve never gone this far into a motor,so I’m not sure exactly what I’m lookin for but this looks good to me?
 

Attachments

  • IMG_2297.jpeg
    IMG_2297.jpeg
    2.2 MB · Views: 6
  • IMG_2296.jpeg
    IMG_2296.jpeg
    2.2 MB · Views: 6
  • IMG_2295.jpeg
    IMG_2295.jpeg
    2.5 MB · Views: 6

Noblo88

Seaman Apprentice
Joined
Jul 2, 2014
Messages
39
I am going to be blunt as usual.-----They do not look good / pristine to me !!
I like blunt haha. So am I catching what you’re saying correctly? I need to get new pistons n rings and rehone out the cylinder walls and buy a new head gasket?
 
Top