1967 Starcraft 15' Jet Star Restoration

Status
Not open for further replies.

InMotion

Commander
Joined
Nov 3, 2011
Messages
2,080
Re: 1967 Starcraft 15' Jet Star Restoration

I like that as well... Gonna give it a try actually!

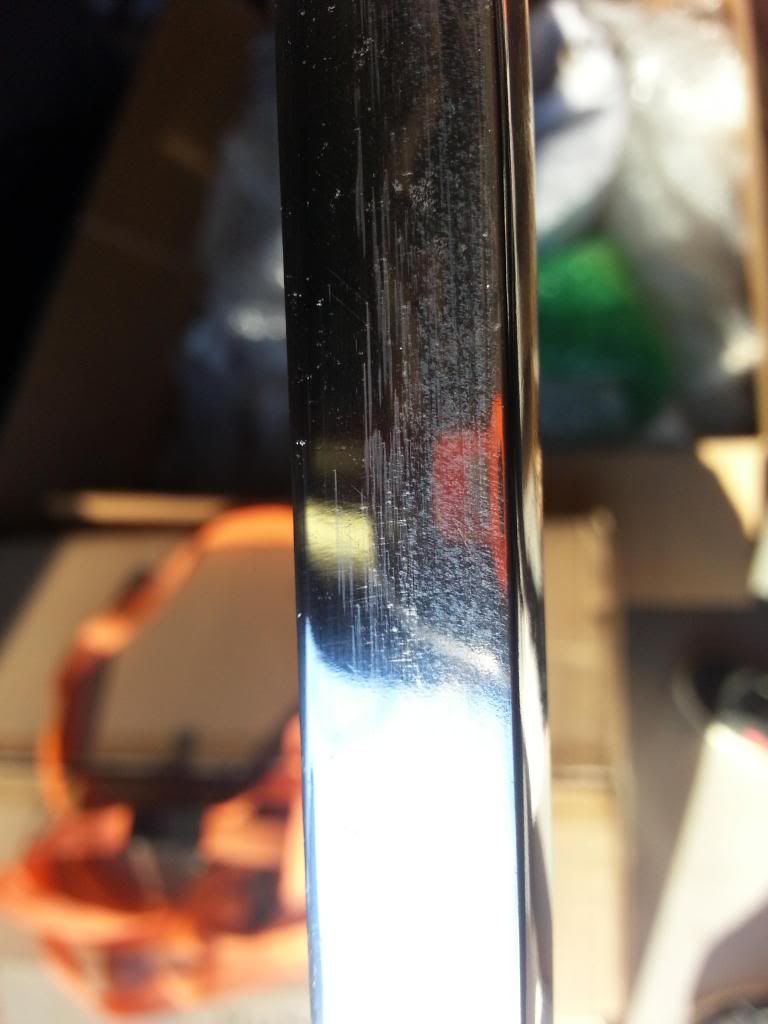
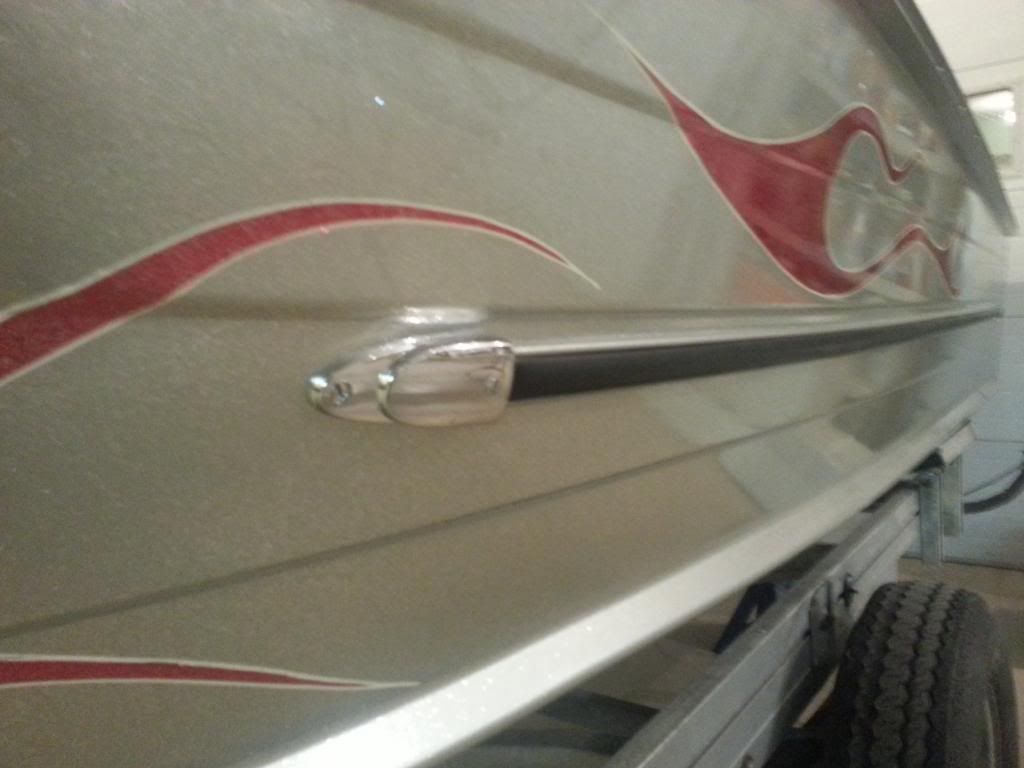
Sanding --- I have found that polishing sanded to a mirror finish is a lot tougher than unsanded. That said, I also go 600, 800 to 1500 grit as well --- and even that is still tougher. JII was sanded on the bottom and it came up pretty good. Dozer's Naked Lady --- can't remember if sanded or not... but both of us used Sonus Aluminum Polish. Takes a few coats and some elbow greese --- but it should come up pretty nice. Mirror finish --- no. But you can see your reflection --- it would just be tough to shave with it though! :)

J.
 

odyssey350kc

Petty Officer 2nd Class
Joined
Jun 5, 2012
Messages
144
Re: 1967 Starcraft 15' Jet Star Restoration

Just wanted to give everyone a little rundown of what I do.
I restore chandeliers for a living, its my father's company and we clean and restore chandeliers from all over the country, That being said, I have some connections in the metal refinishing business. Acu-Bright Chandelier Cleaning, Restoration and Repair Services featuring patented Aquasonics Touch-free Cleaning

Today I went down to the shop we take all of our metalwork to and talked for a little bit with the guy who buffs out the metal, after looking at the piece of aluminum I was working on it was easy to see I had simply not buffed it out enough.

I told him how i sanded it down with the different grits, but he told me all i had to do was 120 grit which would buff right out. That being said my buffing machine I am using is not just a little bench grinder its a floor model that would probably rip my arms off if I hold the piece i'm buffing wrong.

Long story short, I went back to my shop and really gave it a good going over with the buffing wheel, turns out I just wasn't buffing it enough.

Heres a pic of the piece before i went back over it with the buffer.
20130118_092635_zps8bcf3aca.jpg


I spent about 30 min buffing it out again with quite a bit more pressure. And heres the result
20130118_181916_zps291b4791.jpg

20130118_181936_zpsc6152b4d.jpg


Not the greatest pics, but you get the idea.

In response to Jay, I think If I was hand buffing it i would definitely need to sand down to at least 1500 grit, I was putting my weight into the piece and using a heavy cut compound on my buffer.
 

jasoutside

Supreme Mariner
Joined
Dec 20, 2009
Messages
13,269
Re: 1967 Starcraft 15' Jet Star Restoration

Sanding --- I have found that polishing sanded to a mirror finish is a lot tougher than unsanded.

Yup ^^^^

You know what would be awesome is if one of the "take to mirror finish" guys would push out some step by step how to type video action. I kinda think the polishing is a real art form eh. I sure haven't got it figured!
 

odyssey350kc

Petty Officer 2nd Class
Joined
Jun 5, 2012
Messages
144
Re: 1967 Starcraft 15' Jet Star Restoration

You know what would be awesome is if one of the "take to mirror finish" guys would push out some step by step how to type video action. I kinda think the polishing is a real art form eh. I sure haven't got it figured!

If I have some time on my next untouched piece i will do a step by step with pics of how I am polishing my pieces.
 

odyssey350kc

Petty Officer 2nd Class
Joined
Jun 5, 2012
Messages
144
Re: 1967 Starcraft 15' Jet Star Restoration

I spent the first full day working on the boat probably since I was in the painting process. It feels good to get some stuff done finally.

Today I got
-Throttle controls mounted
-Dash Tray on
-Seats cut down 2 " - now they are perfect height!
-Made mounting brackets for speakers and cup holders

Some obligatory pics

20130119_200410_zps13b274c9.jpg


Just Wanted to put this out there- Anyone that is thinking about restoring a starcraft NEEDS one of these tools. Its an air riveter, picked this one up yesterday at my local harbor freight store, $40 probably the best $40 I've spent on this project so far. There have to be over 200 rivets on this boat, I removed every one of them to take it apart and its a pain in the ***** to put that many rivets in by hand. It also has a handy little catcher on the back to catch the little aluminum rivet piece you throw away. Priceless.

20130119_200438_zpsc97f75e0.jpg


Tomorrow I hope to get my speakers mounted, do a little more polishing and make a footrest that will double as a barrier under the bow where i can keep my anchor / ropes and life jackets.
 

dozerII

Admiral
Joined
Oct 25, 2009
Messages
6,527
Re: 1967 Starcraft 15' Jet Star Restoration

Coming along real nice 350. I agree on the air riveter, I got mine 3 or 4 years ago and it has put in a lot of rivets.
 

jasoutside

Supreme Mariner
Joined
Dec 20, 2009
Messages
13,269
Re: 1967 Starcraft 15' Jet Star Restoration

Just Wanted to put this out there- Anyone that is thinking about restoring a starcraft NEEDS one of these tools. Its an air riveter, picked this one up yesterday at my local harbor freight store, $40 probably the best $40 I've spent on this project so far.


:thumb::thumb::thumb::thumb:

Totally agree!
 

odyssey350kc

Petty Officer 2nd Class
Joined
Jun 5, 2012
Messages
144
Re: 1967 Starcraft 15' Jet Star Restoration

I've got a question. What do you guys do with your old Id tags with the vin number on them?

Do you put them back on looking old and torn up?

Do you think there's any way to get a new one made?
 

GA_Boater

Honorary Moderator Emeritus
Joined
May 24, 2011
Messages
49,038
Re: 1967 Starcraft 15' Jet Star Restoration

I'm pretty sure North Beach had a source but I don't know if it's still active. About $35 if I recall. Don't see him around much any more.
 

odyssey350kc

Petty Officer 2nd Class
Joined
Jun 5, 2012
Messages
144
Re: 1967 Starcraft 15' Jet Star Restoration

Just a little update. Got my splashwell installed finally.
20130203_124849_zps6282a678.jpg

I ran a line of 5200 along the screw line which looks like its sealed well, but I decided to run another line along the top edge just to be safe, which turned out like crap, so I may have to just take a razor blade to it to scrape it all off but i'm undecided.

You can also see I got the new grommets I was looking for. They were supposed to snap in place but i guess the aluminum was a little to thin to hold it, so i drilled a couple holes for rivets in each one, and it turned out pretty nice.

Below is a pic of my custom made speaker mounts / cupholder brackets, they are just in front of the splashwell so the perfect location to slap some cupholders for my thirsty passengers. These were quite a bit more work than I had originally intended. Cutting the aluminum, polishing it, cutting and painting the wood was probably about a days work all together.
20130203_175230_zpsab27f999.jpg


I also had the entire stereo system installed but when i went to fire it up the screen would light up for a second then shut off. It did this several times until it wouldn't even flash on for the second, it was just completely dead, I checked all of the fuses nothing blown, getting electricity to the deck. Turns out I got a junk stereo, so I put it all back in the box and brought it back to walmart for a full refund at least. So i went and ordered another deck as well as a total of 4 speakers, i'm gonna tuck the other 2 up under the bow.

This is the stereo I ordered - Purchase the Dual MCP100 55W x 4 Marine Mechless Receiver for less at Walmart.com. Save money. Live better.

I also got all of my underglow installed beneath the gunnels, splashwell and dash, but I think i'm gonna hold off till the boat is done for the pics, it will add to the awe when it is finished. :D
 

lakelover

Rear Admiral
Joined
Mar 26, 2003
Messages
4,386
Re: 1967 Starcraft 15' Jet Star Restoration

You've been a busy guy! All looks great....that 5200 is a pain to work with and get a neat job, real time & labor intensive.
 

jasoutside

Supreme Mariner
Joined
Dec 20, 2009
Messages
13,269
Re: 1967 Starcraft 15' Jet Star Restoration

The key for 5200 is to lay the bead then smooth out using healthy amounts of Mineral Spirits and your fingers:thumb:
 

lakelover

Rear Admiral
Joined
Mar 26, 2003
Messages
4,386
Re: 1967 Starcraft 15' Jet Star Restoration

The key for 5200 is to lay the bead then smooth out using healthy amounts of Mineral Spirits and your fingers:thumb:

I also found that what helps on visible joints that matter is q-tips and lots and lots of paper towels.
 

odyssey350kc

Petty Officer 2nd Class
Joined
Jun 5, 2012
Messages
144
Re: 1967 Starcraft 15' Jet Star Restoration

Ah the mineral spirits would have been good to know about. I tried using water on my fingers to smooth it out, but it just made it worse.
 

wheeldriver

Seaman
Joined
May 29, 2012
Messages
50
Re: 1967 Starcraft 15' Jet Star Restoration

Someone here in the forum had a great tip for laying down a bead of 5200 in a corner. Place painters tape along each side of the corner, about 1/4" or less from the corner itself. Lay a bead of 5200 down and then run your finger down to smooth it out, then lift off the tapes. Made for nice clean edges.
 

odyssey350kc

Petty Officer 2nd Class
Joined
Jun 5, 2012
Messages
144
Re: 1967 Starcraft 15' Jet Star Restoration

Got a good day of work in on the boat.

Installed the cupholders and speakers.
20130217_101827_zps605306e5.jpg


Cleaned and installed my rubrails, along with shiny new endcaps.
20130216_194330_zps15381583.jpg


Fabbed up some speaker boxes for my front speakers. These were fun. I made these out of masonite board, but being me I kept screwing up and cut the wrong angles not once but twice. After cutting several pieces for the third time I got it. Problem was the masonite is smooth on one side but not on the other, makes it tricky when your not paying attention.
20130216_160639_zps428e14f4.jpg

20130216_161308_zpsbc0baa89.jpg


And last but not least, cut all new wood for the bow I was going to leave in the old stuff but I've already replaced everything else why not that too. Also upon closer inspection I realized the middle board was bowed down close to 2"

I also made brackets out of aluminum L stock for the piece of wood going across the bow from port to starboard. The only thing holding it there before was simply the shape of the hull.
20130217_190118_zps8841d8d2.jpg


I will be doing more work this week, and I will try and get the step by step procedure I use to polish my aluminum on here this week.
 

lakelover

Rear Admiral
Joined
Mar 26, 2003
Messages
4,386
Re: 1967 Starcraft 15' Jet Star Restoration

Great progress, things are really shaping up!
 
Status
Not open for further replies.
Top