1960 40hp Evinrude Mystery

Mohawkmtrs

Chief Petty Officer
Joined
Jan 13, 2010
Messages
562
The book (Johnson Repair Manual 1922-1964) says flywheel nut torque is 100-105 ft. lbs.
 

Crosbyman

Vice Admiral
Joined
Nov 5, 2006
Messages
5,446
don't know about the 40's but I have always adjusted my points by setting them at 20 at the high point of the cam lobe on the smaller HPs . never had problems ...

as to replacing parts... go for it change everything while you have the flywheel off. ...incl hoses ... never had issues with new parts either but this is only my experience at this hobby .

make certain coil wires do not rub against the shaft or flywheel otherwise your efforts will soon be waisted


nice to see you have bad coils...the engine probably did not get much use due to ..faulty coils.

for the price of an hour.... at the casino slots you'll have yourself a good engine :)

yes... do the carb over , lightly sand & recoat the float with crazy glue ...
 
Last edited:

lindy46

Captain
Joined
Nov 27, 2008
Messages
3,886
The book (Johnson Repair Manual 1922-1964) says flywheel nut torque is 100-105 ft. lbs.

You'll have to use a tool of some sort to keep the flywheel from turning when you torque down the nut. I use a ratchet strap on the smaller motors - you may need a friend to help with a piece of wood wedged between the flywheel teeth and a fixed point on the engine block. Those 40's REQUIRE 105 ft.lbs - and that is a lot of torque to hold with just a ratchet strap.
 

ssdale

Starmada Splash of the Year 2016
Joined
Nov 4, 2011
Messages
285
I bought a decent puller and have had the shaft soaking with wd-40 for a few days, so this evening I attempted to remove the flywheel. I used an impact and was taking it pretty easy so as to not strip out the threads as warned on this forum. It took about 5 sets of torquing it up and rapping before it popped!

The key is barely protruding from the tapered shaft. It is not broken, but has very smooth edges. I guess it is protruding enough that the flywheel could never have been spinning over it, or could it? The flywheel was pretty tight because it took quite a bit to get it to pop.

Steelespike mentioned to pay attention to this key way. My question is: Does the key have such smooth edges from new, or should I order a replacement. Would an aoto parts store have one? I did not remove it from the shaft because it is securely embedded and figure if I torque it back down to 105 lbs. it is in the right spot.
Any advice appreciated.

the coils are all cracked up for sure, but the condensers and points look like new. I know they should be replaced for the $30 it costs, but is there an easy way to test the condensers? It would save me from having to learn how to set the points. But you guys have me feeling a lot more confident about this motor stuff.
A big Thank you to this forum,
Dale
 

oldboat1

Fleet Admiral
Joined
Apr 3, 2002
Messages
9,612
I would replace the key with an OEM version -- don't think the factory version is chamfered, but no reason to mess with it. Same response to condensers (would just replace them). Don't use auto store or hardware store varieties of keys.

level of difficulty removing flywheel seems about right, actually pretty good. Think Steelespike may have referred to the keyway -- edges there should be clean and sharp. You probably had no issues.

edit....all IMO.
 
Last edited:

ssdale

Starmada Splash of the Year 2016
Joined
Nov 4, 2011
Messages
285
oldboat1: Edges of keyway are sharp, but key edges are very smooth. I will replace. You mentioned the thermostat in an earlier post, so i removed the screws just to see its condition. the thermostat was clean and would appear to be in good shape. Anyway no crud and plenty of movement

Anyone familiar with this water choke and what I may need to do to get it functioning is welcome to chime in. Or should I not mess with it unless there is a problem with it later? My next step is to remove the starter so I can get the carb off. I have never messed with a carb, not even an old lawnmower.

Dale
 

oldboat1

Fleet Admiral
Joined
Apr 3, 2002
Messages
9,612
well, carb is a lot bigger than a lawnmower's anyway. I would go back to the choke if it's not working, but try it first. On the t.stat -- should open around 140F, give or take. I heat up a cup of water in the microwave and test them when my wife isn't home. Carb rebuild? Need a kit, and recommend full disassembly and cleaning -- soaking everything metal, and going over every opening with some carb spray and very fine wire. Others may take a different approach. (Need to take off and replace the expansion fitting on the top, though, and clean out the passages under there.)

edit. I might not be understanding what you are describing with the key -- might not be an appropriate one though, whether damaged or not. I've reused them, but sheared a couple working on a similar motor, so take some special care there I guess.

edit2. When shopping for a carb kit, good to get one with a new float -- not mandatory, as the current one can be reused or sealed and reused (above), but the non-cork floats often recommended. [poss. you already have one, if PO did a rebuild]
 
Last edited:

HighTrim

Supreme Mariner
Joined
Jun 21, 2007
Messages
10,486
The key does not hold the flywheel from spinning on the crank, the torque does. Ensure tapers in flywheel and on crank are CLEAN. Clean with acetone before installing. All the key does is line it up. Im sure your key is fine. If you ever do replace it, NEVER buy a hardware store key, they will shear. Get an OEM one.

Do the condensors have black rubber caps, or the red paper caps? If black rubber, they have been changed. You can test them on a meter, we can walk you through that.
 

oldboat1

Fleet Admiral
Joined
Apr 3, 2002
Messages
9,612
Yes, clean taper, and torque to spec. Pretty sure when I had trouble, I hadn't torqued mine down tight enough, but then again I was also working off a mixed collection of keys.
 

boobie

Supreme Mariner
Joined
Nov 5, 2009
Messages
20,826
The proper gap for that motor to jump is 1/4" open air gap. Nothing else.
 

boobie

Supreme Mariner
Joined
Nov 5, 2009
Messages
20,826
The open air gap on the tester on that motor is set to .025 " . That's 1/4"in.
 

ssdale

Starmada Splash of the Year 2016
Joined
Nov 4, 2011
Messages
285
Here is a pic of the electrical after flywheel removal. The ends of the condensers appear to be red, does this mean they are original? the wire boot appears to be black. Can coils disintegrate like these appear from just sitting? I mean could someone actually have gone through this motor replacing the ignition components ,say 25 years ago, and the coils would still look like this, or is that impossible? It sure is clean.
Thanks,
Dale


1960 evinrude coils (2).jpg
 

oldboat1

Fleet Admiral
Joined
Apr 3, 2002
Messages
9,612
Wow. Will bet new coils would restore spark. That condition is really good. Might have to go back into it, but think I would try it with new coils and see what you have.

(ed. from a "just replace it all" guy....)
 
Last edited:

HighTrim

Supreme Mariner
Joined
Jun 21, 2007
Messages
10,486
That looks like a totally original ignition to me. Those condensors are hit or miss if they leak or not in my experience. Test them. The points would probably be fine with a dressing and cleaning, but if the condensors are bad, you may just as well buy a tune up kit.

yes, the potting for the coils can crack like that from just sitting. The material used on more modern coils is a little more resilient. Or, I guess in 60 years or so we will find out wont we.
 

racerone

Supreme Mariner
Joined
Dec 28, 2013
Messages
37,835
Bonus----This motor has not run for many years so it well could be in good shape internally.----This is very common to see the coils cracked from sitting.--Plastics deteriorate with time !!---The condensers also need to be replaced.
 

ssdale

Starmada Splash of the Year 2016
Joined
Nov 4, 2011
Messages
285
Well I finally got the new ignition parts and tackled the replacement of the coils, condensers and points. I have a couple of amateur questions:

1. Is there a simple way for me to see if I have a good connection between the new coil and the old spark plug wire? The new coil had a screw type pin that I tried to get inserted into the old spark plug wire without taking off the stater? plate. Would like to make sure I have good connection before I reinstall the flywheel.

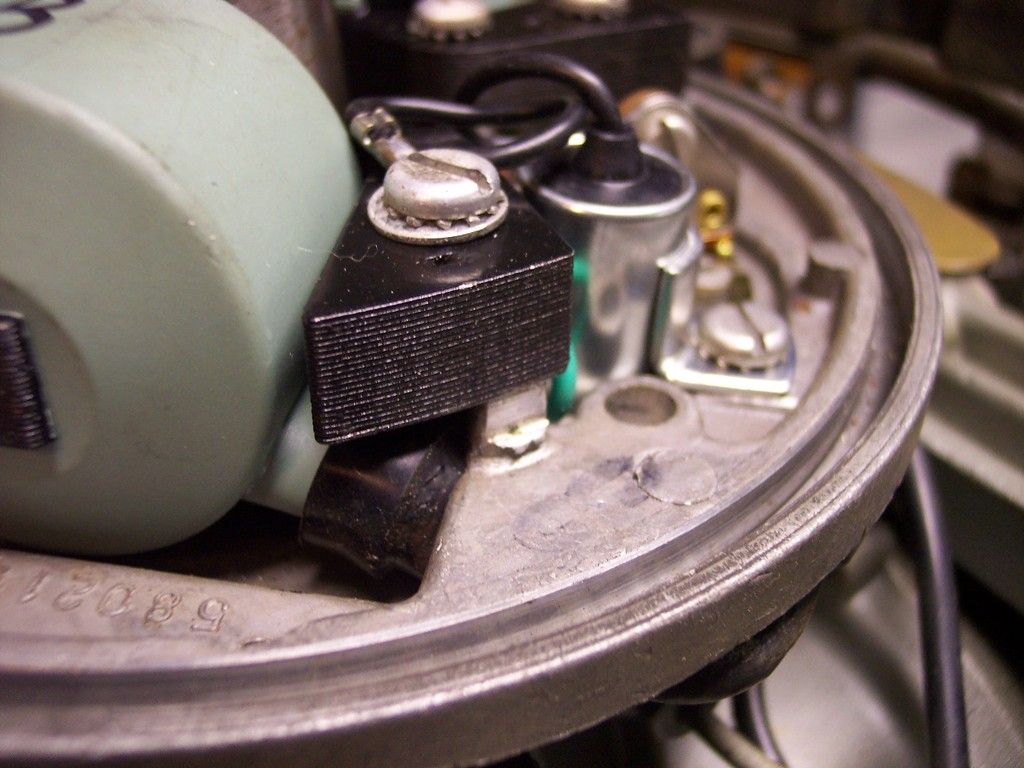
2. I have included a close up of the new coils and its relationship to the stater plate boss. The new coil bracket hangs over (protrudes) beyond the boss by about 1/32 inch. I have tried to re-position but the coil bracket will not let me adjust and still get the attaching screw threaded. Can adjust the new coil bracket by reaming slightly with a drill or am i ok about the flywheel clearing the coil. How can I tell if ok without torquing down the flywheel ?. (I know there is a ring tool for this that obviously I don't have)

Will tackle carburetor next.Thanks for everyone's help,
Dale

http://
 

oldboat1

Fleet Admiral
Joined
Apr 3, 2002
Messages
9,612
will be quick, but this gives a nice description for testing the coil's secondary winding (serves as a test for connectivity from the plug end to the plate -- a way of testing whether your contacts are good):http://www.penn.itgo.com/video-pages/coil-testing.html

on the coil fit, just need to adjust so the fit against the boss is perfectly flush -- loosen both screws and push in place (may be the spike and coil wire that makes it a little tight).
 

racerone

Supreme Mariner
Joined
Dec 28, 2013
Messages
37,835
The proper way is to remove the plate.----Screw the wire into the coil and install.---Not sure why anyone would look for a short cut on that !!----And you should be able to position the coils correctly without drilling / reaming.-----They make these coils by the hundreds and no need to modify them !
 

ssdale

Starmada Splash of the Year 2016
Joined
Nov 4, 2011
Messages
285
Thanks oldboat1, very helpful video. I get a small amount of resistance with my ohmmeter between the coil ground and the spark plug boot -so I guess I am good to go. I tried re-positioning the boot also as you suggested and it did allow me to just get the coil flush with the boss. Thank you.

Some folks on this forum might try drinking some soothing tea AND possibly pluck out their exclamation point key and run over it with their desk chair.:rant:

Dale
 

HighTrim

Supreme Mariner
Joined
Jun 21, 2007
Messages
10,486
Here are my thoughts on installing new coils.

I would not re use the old wire. If there is still continuity there, only a matter of time.

You cannot get a good connection without removing the mag plate to install coils. Reason is, you need to pull extra plug wire through the hole, thread the coil onto the plug wire, then pull it back through and attach coil, then re tighten the plug wire retaining clips underneath. If you tried to push the coil onto that little nub of wire sticking out of the mag plate, that will eventually fail. Might as well do it right, literally takes only seconds to do and about 5 bucks worth of plug wire.
 
Top