1960 40hp Evinrude Mystery

oldboat1

Fleet Admiral
Joined
Apr 3, 2002
Messages
9,612
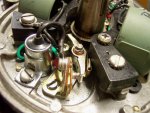
Compare to the original coil wiring in #32, which is assumed to be correct (and appears to be). I have difficulty completely following the wiring in the current pic -- may be fine. The coil wire coming from above the lamination should go to the mounting screw, and I think that's what you have. Is there an extra wire in there going to the mounting screw (i.e., two wires)? Thinking offhand you may have a cutoff wire there, which could a problem.

Assume plate is now snug. While you are at it, might turn the shaft 1/4 turn clockwise and make sure the points are clean and open, and set to .020. In forward gear, can just bump the prop clockwise a little to turn the shaft.
 

ssdale

Starmada Splash of the Year 2016
Joined
Nov 4, 2011
Messages
285
Only 1 black coil wire from above the lamination goes to coil mounting screw or ground, no extra wires . Bottom of post #60 gives the connections that I made. Hard to see as wire was longer than original and had to be looped behind condenser. Points are new, clean and properly gapped.

One of the coil heels was just not quite clearing causing the wobble. You can see by looking at the heel in last pic. Just want to concentrate on getting spark

But still no spark:confused:
Dale
 

oldboat1

Fleet Admiral
Joined
Apr 3, 2002
Messages
9,612
might pull off kill wires, just in case. Dangle a small screwdriver in front of the magnets to test them. Not seeing anything obvious....

[ed.: i.e., kill wires removed to test, or key switch in on position to test.]
 
Last edited:

lindy46

Captain
Joined
Nov 27, 2008
Messages
3,886
"Top" on the cam just means that is the top side of the cam, not necessarily the high point of the cam. Make sure you're adjusting the points at the proper position on the cam. Usually coincides with the key on the crank.
 
Last edited:

HighTrim

Supreme Mariner
Joined
Jun 21, 2007
Messages
10,486
^^^What he said. Align the flywheel key with the rubbing block on the points. Set the gap so that a 022 feeler gauge will NOT go through, a 020 will go through smooth with slight resistance, and an 018 goes through without any resistance at all.

Then, dip a business card, or paper stock in acetone, and run that through to clean. Then blow off with compressed air.

Set spark tester to 1/4", spark should jump gap with a bright blue ZAP!!

Ensure ground on spark tester is secure and good.

Ensure tapers on crank and flywheel are clean with acetone before installing flywheel.

You have no idea how many people on here we see with no spark, that THINK their points are clean, but they aren't. Fingerprints will limit spark.

Blowing on them, spraying contact cleaner at them, etc.... are NOT acceptable ways to clean the points. Not trying to be rude, but just sayin, as many before you have thought that would work.

I polish my points on a high speed polisher. Then clean with acetone after installed. I can see myself in them!
 

racerone

Supreme Mariner
Joined
Dec 28, 2013
Messages
36,670
Agreed points are not clean , or points are not opening at the correct time !
 

ssdale

Starmada Splash of the Year 2016
Joined
Nov 4, 2011
Messages
285
No Title

Agreed points are not clean , or points are not opening at the correct time !

Ok. So yesterday, before I read your responses. I tried one more time to get a spark.. In dim lighting, I could see a very weak spark from the top plug. Nothing from the bottom. Both show continuity from boot to ground terminal of coil. I thought, WOW, progress! So with your suggestions I was sooo optimistic!

So today, I did as suggested:
1. cleaned points (again) with the finest black silicon paper and then meticulously cleaned with acetone and business card (again). This time blew off with air.
2. made sure I had the points set at the high mark of "TOP" on the cam. My motor actually has a small arrow before the word "TOP". In any case, I am setting the points at the highest spot on the cam to a perfect .020.

3. disconnected the black "kill wires" from the points as suggested. Does this eliminate the possibility of bad mercury switch and cut-out? I know these components are ok because I had weak spark on both cylinders before I replaced all the ignition, but just wondering? Anything to eliminate potential problems.
4. made sure transmission in neutral as this effects the position of the mag plate vs. the cam.
5. I position the flywheel on the shaft with keyway in correct position and the snug down with socket and small ratchet that i use to crank the motor for this test.

Now Nothing! Not even the weak spark from the top cylinder that I had yesterday. Tried spark tester on both boots set very close and grounding to motor case ground bolt. Nothing. Tried usual grounding of plugs to block, Nothing.

I have reread all of the 'Top Secret" files and meticulously went through everything over and over. What am I missing?? This is driving me nuts, I was not a motor mechanic, but I am a tinkerer, thorough and can follow instructions. Need help as this is holding up my entire boat resto.
Any and ALL help IS appreciated,
Dale
 

Attachments

  • photo236654.jpg
    photo236654.jpg
    243.6 KB · Views: 0

racerone

Supreme Mariner
Joined
Dec 28, 2013
Messages
36,670
Easy to find the 2 vertical lines on the magplate.---Easy to find the 2 timing marks on the flywheel too.--Learn how to use those so that points open at the correct time.-----Lots of detailed info available on the subject if you look for it under---universal magneto.--Sorry I can not write a book on it as the info is already listed.
 

oldboat1

Fleet Admiral
Joined
Apr 3, 2002
Messages
9,612
Check the magnets (rare but happens -- had a dead one this Spring).

The vacuum switch will not affect starting (spark).

On the kill/stop switch -- If everything connected, there will be no spark if the key is in the off position (stops the engine -- shorts the magneto). The key would have to be in the run position or the magneto would be shorted. If the shorting/stop/kill wiring is disconnected, should be OK to test.

Use the tester, but make sure it is well grounded. The clip has to be well grounded on the block. Do a continuity test of the tester if you have to.

Wearing gloves to protect from sharp edges of the ring gear, spin the flywheel with both hands -- just give it a clockwise flip while watching the tester.
 
Last edited:

Tim Frank

Vice Admiral
Joined
Jul 29, 2008
Messages
5,333
Some folks on this forum might try drinking some soothing tea AND possibly pluck out their exclamation point key and run over it with their desk chair.:rant:

Dale

Wow. With the amount of time and effort that members are putting in to try and help you get this sorted out, you are upset at someone using a few extra punctuation marks?
Have you tried that soothing tea idea yourself? :)

When you get to testing the spark with your adjustable tester, with the old magneto ignition systems you are looking for 1/4" jump. The 7/16" figure is for the amplified spark in newer systems.
Speaking from personal experience, the first few times i did a R&R like this i had trouble with the boot ends. It's not very difficult, but I messed it up a few times and had zero spark until i got it right. Might be a good spot to recheck.
 
Last edited:

ssdale

Starmada Splash of the Year 2016
Joined
Nov 4, 2011
Messages
285
Tim,
You nailed me there. Point made and point taken. I do appreciate everything and truly Sorry about that.

The wire and boots are the only component that isn't new. They don't carry bulk wire at my little town autoparts and they said if they show continuity , you are good to go. I will recheck/replace as you suggest.

The magnet-under the flywheel?- is strong
Spark tester checks with good continuity.

Easy to find the 2 vertical lines on the magplate.---Easy to find the 2 timing marks on the flywheel too.--Learn how to use those so that points open at the correct time.-----Lots of detailed info available on the subject if you look for it under---universal magneto.--Sorry I can not write a book on it as the info is already listed.

Did not see this covered under Top Secret "universal magneto", but have found it elsewhere and will go through procedure and check continuity/timing using the marks as directed. Thanks racerone for your help and not giving me a smackdown!!!!:redface:

If still no success, I will have to get another set of experienced eyes to look at it in person.
Stay warm,
Dale
 

Tim Frank

Vice Admiral
Joined
Jul 29, 2008
Messages
5,333
IME, these magneto systems are fairly bullet-proof and when something does go wrong it is usually something simple.
I'd do two quick checks:
1) If you re-used the old HT wires and did not re-install the boot end spring clips, try trimming 1/2"-3/4" off the ends of the wires and re-install those spring clips and the boots. You can get corrosion on the open wire ends, which can be a show-stopper.

2) Make sure that the points are not somehow grounding out. Remove the two wires from the points and make sure that when each set of points is open, that there is no longer continuity across the two point faces. If there is, you need to find the cause and correct.

IMO, you explained that you had a problem with spark initially, but the root cause may not have been corrected just by replacing components....although that replacement was very much indicated by the pics you posted.
 

pro-crastinator

Chief Petty Officer
Joined
Dec 12, 2013
Messages
453
Perfect because of the molded - angled heads.
Solid copper, you cut to perfect length as needed. easy peasy.
I have had a busted (internal) wire that was a royal pain. - until it was replaced!
good luck
 

oldboat1

Fleet Admiral
Joined
Apr 3, 2002
Messages
9,612
I took another look at prior posts/pics. I think I'm used to seeing plug wires come out from the underside of the plate on the port side (throttle side -- opposite from the shift lever). Your wires seem to come out on the starboard/shift side. #32 appears to show it that way with the old coils, and #45 with the new coils. This may be correct on your motor, but it's also possible a P.O. had the installation wrong(?) Here is a vintage under-the-plate pic for comparison: http://www.leeroysramblings.com/OMC_6hp.htm (have to scroll down to see the bottom/top side by side pics). The magneto pictured is for a smaller motor.

That issue (or non-issue) aside, I think I would torque down the flywheel and test for spark with the starter. I think you might not be turning the wheel "smartly" enough -- might see spark when cranking with the starter. You can readjust points through the view port on top, and it's not hard to pull the flywheel again if you need to.
 

Tim Frank

Vice Admiral
Joined
Jul 29, 2008
Messages
5,333
The wire and boots are the only component that isn't new. They don't carry bulk wire at my little town autoparts and they said if they show continuity , you are good to go. I will recheck/replace as you suggest.

Did you remove a bit of wire at each end before reinstalling?
 

ssdale

Starmada Splash of the Year 2016
Joined
Nov 4, 2011
Messages
285
oldboat1, Thanks for sticking with me on this. The wires I think you are seeing on the starboard are the "kill" wires that head up from the harness through the plate to the points. These wire were part of my earlier reluctance to remove the plate because I had to deal with them. The plug wires indeed enter under the plate on the port side.
I hear you about just torqueing her down and trying it with the starter, might do that as you suggest, but hope to get someone to look at it for an obvious mistake before I do that. Also cranking pretty quickly using a short ratchet on the flywheel nut.

Tim, I disconnected everything from the points as you suggested and there is no continuity between the points, so they are not grounding out, but thanks for the suggestion.
The magnet in the flywheel (there is only 1, correct?) is super strong.

I did remove about .5 in of old wire and looked like good copper before I screwed into the coils. I did not mess with wires and boots as stated above, but i am going to just replace the wires and pre attached boots as pro-crastinator suggests, when I get to a town that has them. I will just disassemble everything, check coil continuity of primarys and secondarys, reclean and gap points, install new wires, leave the "kill' wires disconnected, etc... take all this knowledge to the next level and get this girl going!
I'll not post again until that happens. Too embarrassing.
Thanks to all for your patience, I have or will have tackled and tried every single suggestion.:frusty:
Dale
 

oldboat1

Fleet Admiral
Joined
Apr 3, 2002
Messages
9,612
Well, gotta believe you are close. One suggestion -- before disassembling the plate and replacing wires, tinker with the spring connectors in the boots, similar to what is mentioned above (Tim's post and others). Clean up the connector and reattach making sure the spike contacts the core -- good idea to fold back the stranded wire in contact with the clip, just to help insure continuity. I like to use electrical cleaner to ease reassembly and to combat corrosion. I routinely replace the wires, but just saying you might still find the problem at the spring connectors and easy to confirm first.
 

ssdale

Starmada Splash of the Year 2016
Joined
Nov 4, 2011
Messages
285
No Title

Disassembled and started from scratch today.
Replaced spark plug wires today with NEW pre-made set from tractor store as advised. Only component that had not already been replaced.
Checked out both NEW coils with ohm meter as instructed. Both good.
Re-cleaned and re-gaped NEW points. Inspected with magnifying glass and they look great. Made sure points are not grounded out with ohm meter.
Left "kill" wires disconnected.
Checked opening of points against flywheel marks as advised. both good.
Flywheel key is good, so no misalignment
Use short socket wrench on flywheel to smartly crank clockwise.

No Spark!
I am literally at the end of my rope as to what else to try.
Any other suggestions-I will never give up,
Dale
 

Attachments

  • photo236654.jpg
    photo236654.jpg
    243.6 KB · Views: 0

oldboat1

Fleet Admiral
Joined
Apr 3, 2002
Messages
9,612
Hook up the wiring the way it was initially, torque the flywheel, attach the spark tester, hook up the battery and crank it with the key switch.
 
Top