18' Starcraft Starchief Restoration

18' Starcraft Starchief Restoration

  • Aluminum ($$$)

    Votes: 3 25.0%
  • Marine Plywood

    Votes: 9 75.0%

  • Total voters
    12
  • Poll closed .

sschefer

Rear Admiral
Joined
Nov 13, 2008
Messages
4,530
Re: 18' Starcraft Starchief Restoration

That stuff is a bit of a scam, for a boat hull anyways the amount of heat you need to get this stuff to flow ruins the intergrity of aluminum, it turns brittle from being heated. Also they have to be using a special torch or preheating the metals on their videos. I tried with two mapp gas torches at the same time on some things and could barly get stuff to flow depending on how large the object was. Being made of aluminum the object is basically a giant heat sink and would cool faster than it could be heated.

It's not a scam but it's not for your boat either. Stay away from that stuff. Durafix or HTS2000 are not what you want to use on hardened aluminum like they use in these boats. Anything above 450 degrees and you're asking for cracks. Both products require 732 degrees to tin and flow.

However, if you must use it, then use Oxy/Acetylene and with only the Acetylene lit, fog your metal with the black carbon from the flame. Then add the oxygen for a medium flame (all colors near equal length) and heat the metal to the point where the carbon just begins disappear. Tin it and apply the stick solder. Do not heat it further to keep the flow, instead stop and repeat the process. This mehtod will keep you under the deadly tempering point and give you a reliable repair.
 

reelfishin

Captain
Joined
Mar 19, 2007
Messages
3,047
Re: 18' Starcraft Starchief Restoration

The above post on Durafix or what ever brand aluminum brazing rod you buy is correct, but I've had good luck using both propane and MAPP gas too. The key is to keep it clean and not get the work piece too hot. You want to heat the work piece just enough for the rod to flow and move on. Too hot an it runs all over and you risk damaging the hull. I fixed a jon boat that got dragged down the street off the back of a truck with it and it's been fine for several years. There was a 2" section missing from the transom to boat bottom seam. I cut a section of aluminum angle, laid it in place and welded it in. It's not bad once you get the hang of it.

But to be honest, most aluminum hull repairs shouldn't be welded.
Besides, if your dealing with badly pitted aluminum, chances are it will disintegrate when heated.

I fixed one hull which was pitted as bad as the OP's Starchief by simply cleaning the corrosion, neutralizing the area real well, priming with a self etching primer and filling the pits with marine tex aluminum putty and sanding it smooth. The end result was a solid, undetectable repair. On the inside I did the same and coated the entire inside with Gluvit to be extra safe. I sold that boat a year ago, the new owner has it sitting full time in the water at a lake, never leaks a drop.

Depending on how big of an area that is affected by the corrosion, its a bit of a time consuming repair but certainly doable and very sound.
 

brobrad

Petty Officer 1st Class
Joined
Jun 19, 2009
Messages
246
Re: 18' Starcraft Starchief Restoration

The above post on Durafix or what ever brand aluminum brazing rod you buy is correct, but I've had good luck using both propane and MAPP gas too. The key is to keep it clean and not get the work piece too hot. You want to heat the work piece just enough for the rod to flow and move on. Too hot an it runs all over and you risk damaging the hull. I fixed a jon boat that got dragged down the street off the back of a truck with it and it's been fine for several years. There was a 2" section missing from the transom to boat bottom seam. I cut a section of aluminum angle, laid it in place and welded it in. It's not bad once you get the hang of it.

But to be honest, most aluminum hull repairs shouldn't be welded.
Besides, if your dealing with badly pitted aluminum, chances are it will disintegrate when heated.

I fixed one hull which was pitted as bad as the OP's Starchief by simply cleaning the corrosion, neutralizing the area real well, priming with a self etching primer and filling the pits with marine tex aluminum putty and sanding it smooth. The end result was a solid, undetectable repair. On the inside I did the same and coated the entire inside with Gluvit to be extra safe. I sold that boat a year ago, the new owner has it sitting full time in the water at a lake, never leaks a drop.

Depending on how big of an area that is affected by the corrosion, its a bit of a time consuming repair but certainly doable and very sound.

I ditched the boat with the widespread pitting. I have another one that has a hole from knee flex and the transom. I'm going to clean it well and try the marine tex and gluvit. I might rivet a small piece from the inside for extra measure.

Does anyone have any suggestions on whether or not to add another knee. I don't have to take the transom apart just yet. I finished linking up my 115 today and plan to splash her (gently) tomorrow to make sure i want to move forward with the resto.

Thanks the Advice Guys!!!!:cool:
 

brobrad

Petty Officer 1st Class
Joined
Jun 19, 2009
Messages
246
Re: 18' Starcraft Starchief Restoration

Does anyone know of someone needing the two side windows for the SC cuddy off of my older boat. Scrap Aluminum around here is .32/lbs right now. It would only be .10/lbs with the glass in. I'd like to see someone get the upper windshield (i'll keep it around for and extra if no one can use it) and the two side windows.

there's pics on my profile pics if anyone is interested.
 

ezmobee

Supreme Mariner
Joined
Mar 26, 2007
Messages
23,767
Re: 18' Starcraft Starchief Restoration

make sure you take some pics of your trial run!
 

reelfishin

Captain
Joined
Mar 19, 2007
Messages
3,047
Re: 18' Starcraft Starchief Restoration

I ditched the boat with the widespread pitting. I have another one that has a hole from knee flex and the transom. I'm going to clean it well and try the marine tex and gluvit. I might rivet a small piece from the inside for extra measure.

Does anyone have any suggestions on whether or not to add another knee. I don't have to take the transom apart just yet. I finished linking up my 115 today and plan to splash her (gently) tomorrow to make sure i want to move forward with the resto.

Thanks the Advice Guys!!!!:cool:

Got any pics? Cracks can be a tougher fix, you first have to be sure to stop the movement that caused them. If the movement was a bad transom panel, then all should be fine other than fixing the old damage. I like to use OEM style rivets, they can be had from various suppliers, I believe McMaster_Carr is one of them.

As far as adding the other knee braces, it would depend on whether you have two good factory style braces to use, and second, do they fit in place and attach the same as they did on the old boat?

There's no sense in adding braces if they don't attach to anything but the outer skin with no real function. My 1967 Starchief has only one knee brace and it's been fine with the original transom for 42 years. The only boats that I've seen that used three knee braces have been I/O powered hulls and a few older Holiday and Jupiter hulls. Becareful about retro fitting parts, there were angle changes in these hulls over the years, as the years went on, the degree of deadrise increased.

In the case of stress cracks, I'd be inclined to break out the tig welder and seal them up, then re-rivet as needed. I don't think I've seen any with stress cracks, I'd be interested in a few pics to see what happened to yours.
 

brobrad

Petty Officer 1st Class
Joined
Jun 19, 2009
Messages
246
Re: 18' Starcraft Starchief Restoration

Got any pics? Cracks can be a tougher fix, you first have to be sure to stop the movement that caused them. If the movement was a bad transom panel, then all should be fine other than fixing the old damage. I like to use OEM style rivets, they can be had from various suppliers, I believe McMaster_Carr is one of them.

As far as adding the other knee braces, it would depend on whether you have two good factory style braces to use, and second, do they fit in place and attach the same as they did on the old boat?

There's no sense in adding braces if they don't attach to anything but the outer skin with no real function. My 1967 Starchief has only one knee brace and it's been fine with the original transom for 42 years. The only boats that I've seen that used three knee braces have been I/O powered hulls and a few older Holiday and Jupiter hulls. Becareful about retro fitting parts, there were angle changes in these hulls over the years, as the years went on, the degree of deadrise increased.

In the case of stress cracks, I'd be inclined to break out the tig welder and seal them up, then re-rivet as needed. I don't think I've seen any with stress cracks, I'd be interested in a few pics to see what happened to yours.

The cracks are in the aluminum trim down the tops side of the transom. I put the new bolts thru the knee brace and it really decreased the flexing. Keep in mind i weight about 225 and i was standing on the foot of the 115 bouncing. I'm sure it has a heavier load than that in saltwater. As i got under the transom piece in the boat a corner of the knee brace had broken off. They had replaced the rivets with bolts, but took it off when they took the OB off. I also put an aluminum plate inside the transom for the top bolts. After i run her out and am satisfied with that, i'll tear the whole transom out and redo it all. The part of the transom that is nearest the bow is also loose. The rivets are gone. Once that is properly fastened it will decrease flexion as well.

I'll try to remember the camera for tomorrows journey.
Brad
 

brobrad

Petty Officer 1st Class
Joined
Jun 19, 2009
Messages
246
Re: 18' Starcraft Starchief Restoration

What a dope!!!!!! I left the camera at home. Several frustrations this morning in getting away with the boat. It wound up being a late night fixing the runners on the trailer. It was only a temporary fix until i get new hardware.

She ran great after it cranked! My battery was dead when i got to the lake. It cranked at home before i left. I tied into the circuit board already on the boat, must be under a load somewhere. I borrowed a batter from someone i know who happened to be launching at the same time. I ran around 10 or so times to charge her up, anchored, fished 30 min (no luck) His battery was then dead. I had jumpers and a nice gentleman jumped me off. Made two more laps (very smooth at 25mph i must say- loaded with 5 people and two batteries) and called it at day due to a noon engagement. Loaded very easy.

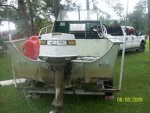
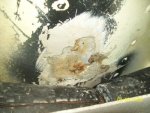
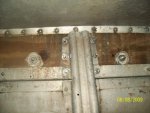
Problem, i had about 8-10 gallons of water in the hull all said and done. I came home ran her full to floor level- patched hole leaks slowly and 7 rivets dripped slowly. Don't know where all the water came from. I noticed that the two piece plexi windshield was moving around in the frame terribly. Shoulding there be screws through the frame and plexi to stabilize. I need to work on the trailer and tear out the floor, but can't until i sell my 16 foot glass boat. It was the donar for the 115. I have attached a photo of the Knee, Bottom Patch (looks like someone welded then JB Weld) and the 115. ON the left side of the knee you can see the broken flange.
 

Attachments

  • 115Mounted.jpg
    115Mounted.jpg
    37.7 KB · Views: 2
  • BottomPatch.jpg
    BottomPatch.jpg
    41 KB · Views: 2
  • TransomKnee.jpg
    TransomKnee.jpg
    35.7 KB · Views: 2

reelfishin

Captain
Joined
Mar 19, 2007
Messages
3,047
Re: 18' Starcraft Starchief Restoration

It sounds like you have some serious leaks. If the windshield is moving around, there may be other issues to deal with as well. I've not seen any movement in any of my boats. My 18' Starchief will take on about a half gallon of water over the course of a day's fishing, but a lot of that is from fish coming on board, the rest I contribute to either the drain plug or back wash into the splashwell in rough water. My boat has no sealer in the splashwell area so I don't doubt some water can get into the hull that way.

If you have that much water getting in, you have a real issue to deal with. Look at areas like transom mounted accessories, the drain plug, any through hull fittings, or the keel area itself. I've seen a few where the aluminum was corroded away inside of the keel strip itself and at the rear transom seem. These were all saltwater used boats.

Filling the hull with water should show the leaks but be careful of soaking the flotation foam.
 

wrfalpacas

Chief Petty Officer
Joined
May 1, 2009
Messages
486
Re: 18' Starcraft Starchief Restoration

Brad,

The trim is bolted to the cabin, the bolts donot go thru the plexiglass however, the one peice windshild does not move aroundlike you describe. Still it sounds like a pretty good shakedown, despite the probs and no pics!!
 

brobrad

Petty Officer 1st Class
Joined
Jun 19, 2009
Messages
246
Re: 18' Starcraft Starchief Restoration

Brad,

The trim is bolted to the cabin, the bolts donot go thru the plexiglass however, the one peice windshild does not move aroundlike you describe. Still it sounds like a pretty good shakedown, despite the probs and no pics!!

Yes, it was good. I just need to get the floor out and the enourmous side boxes someone built so i can see where it is coming in at. I may leave as is for a fishing trip or two just to save the funds.

One other question. I think i had a carb malfunction for a minute. I throttled her up and it was moving at half speed. I came half way down and on the way back up the second carb kicked in and she jumped up on plain. I might need to go ahead and tear down the carbs for a rebuild.
 

wrfalpacas

Chief Petty Officer
Joined
May 1, 2009
Messages
486
Re: 18' Starcraft Starchief Restoration

Brad,

I agree on the carb rebuild, given the age of the motor It wouldn't be a bad idea, I am sure there is some buildup in there;)
 

brobrad

Petty Officer 1st Class
Joined
Jun 19, 2009
Messages
246
Re: 18' Starcraft Starchief Restoration

I ordered two premium carb kits (w/ floats) today. I'll hopefully get to put them in over the weekend. I guess my next move will be to get all of the awful fuzzy-green carpet out of the boat. Whoever glued it in did a great job. Its stuck to the side walls verrrryyyy well. Any pointers on getting the glue off of the aluminum sides. Seems like i read someones post on successfully doing that.

After the carbs, i'm gonna get the power trim working. It will run, i've just got to get some hoses and straigthen one of the SS lines.

Brad
 

Rickairmedic

Commander
Joined
Apr 24, 2009
Messages
2,576
Re: 18' Starcraft Starchief Restoration

Brad best Idea I have heard on glue removal was good old zippo lighter fluid and a scraper.


Rick
 

wrfalpacas

Chief Petty Officer
Joined
May 1, 2009
Messages
486
Re: 18' Starcraft Starchief Restoration

Brad,

I used a prodict called BIX paint stripper and it worked well.
 

sschefer

Rear Admiral
Joined
Nov 13, 2008
Messages
4,530
Re: 18' Starcraft Starchief Restoration

The absolute best for carpet glue removal is MEK. Despite it's bad smell it is actually less volatile than many other solvents you'll surely try. Use normal precautions, wear a filter style mask and nitril gloves then an old or inexpensive pair of leather or heavy canvas gloves. Make sure you have good moving air ventilating you work area or do it outside.

I put the MEK in a 2 quart metal stainless mixing bowl I stole from the house and then soaked small terry towels that I got in the paint dept at HD. I took the soaked rag and wiped generous amounts of MEK on the glue doing about a 3 foot section at a times. After it set for around 5 minutes I wiped the glue off rinsing the rag out in the MEK. The rags will become saturated with glue so you need to change them fairly often. When it's time for a change, spread the old rag out flat on the driveway or similar area and let them dry. When they are dry they can be disposed of as household garbage. Or you can trim the edges and make them into frisbie's. The gloves can also be formed to any shape you like with all the glue that they will absorb. They might make good christmas tree ornaments if you decide to get creative. I have one on my shop wall that points the way to the head.

Trust me on this, I went through the agony a couple of time before I found this and when I did, I finished my 18' in a single day and I never broke a sweat.

MEK is perfectly safe if you use a little common sense and follow precautions. Anyone that say's differently doesn't know and is just blowing smoke.
 

brobrad

Petty Officer 1st Class
Joined
Jun 19, 2009
Messages
246
Re: 18' Starcraft Starchief Restoration

Thanks for the info guys.

I have stripped down the old boat. I had to get all of he "non-aluminum" componets off of it to take it to the scrap yard. I have one good stern corner piece. The bumber guards are good except for the arrow shaped end pieces. I have the aluminum railing and a few cleats. I need to take the side windows out, but having figured out how they come out yet. If anyone needs these components (corner guard, railing, upper windshield, side windows, aluminum housing for from (rounded( windshield) let me know and we'll work something out. The old hatch lid seems to be in pretty good shape as well.
 

brobrad

Petty Officer 1st Class
Joined
Jun 19, 2009
Messages
246
Re: 18' Starcraft Starchief Restoration

Okay,

I need help wiring my power trim. I found a thread that dealt with a 1979 115 Johnson trim. The diagram shows all 12ga wires. My control and solenoid harness are 12 ga, but the pig tail coming from the PT&T motor is 10ga. It wouldn't make sense to tie a 10 ga wire to a 12 ga to me. I know the down side is a low load and the 10ga from the pump on the up side would go to the solenoid, so maybe it will work. The motor is very dirty. IS there a cleaner i should use to clean all the grim out. The brushes look good. Any help is appreciated.

Brad
 

Rickairmedic

Commander
Joined
Apr 24, 2009
Messages
2,576
Re: 18' Starcraft Starchief Restoration

Braad for an electrical motor use contact cleaner available at most auto parts stores . I used to like GUNK for regular motors but its not what it used to be . For greasy nasty dirt look for Castrol purple power at Wally world or an auto parts store it comes in gallon jugs and works great on grease . Spray it down with the purple power scrub a little and wash it off.


Rick
 

sschefer

Rear Admiral
Joined
Nov 13, 2008
Messages
4,530
Re: 18' Starcraft Starchief Restoration

Braad for an electrical motor use contact cleaner available at most auto parts stores . I used to like GUNK for regular motors but its not what it used to be . For greasy nasty dirt look for Castrol purple power at Wally world or an auto parts store it comes in gallon jugs and works great on grease . Spray it down with the purple power scrub a little and wash it off.


Rick
Good advice Rick, I might add that you should not use a metalic brush on or near any of the windings or on the commutator. Use a soft bristle brush only. The windings are coated to provide insulation and if you clean that coating off could create a power robbing short. You can, and should clean the commutator sufaces with emerycloth to knock the glaze off. If it's grooved or pitted you may want to consider taking it to a shop and having it turned. That will help restore the motor to it's original power.
 
Top