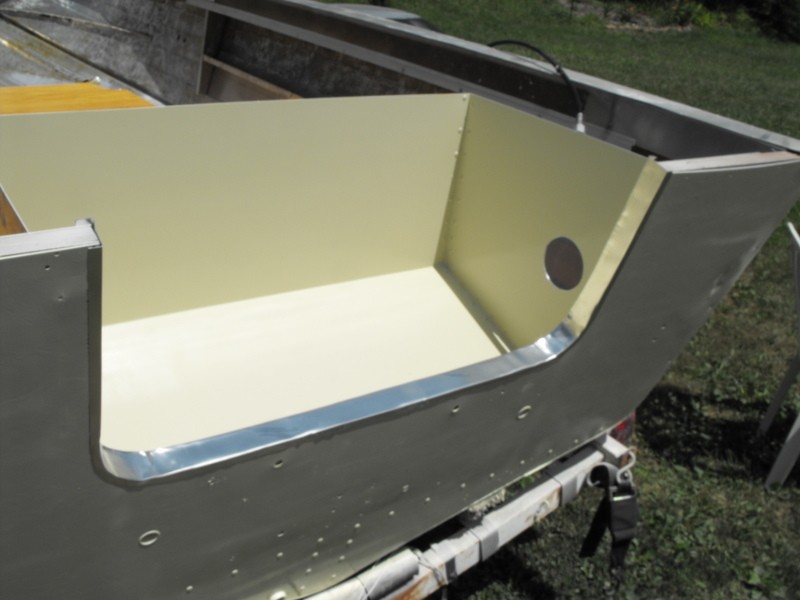
18' 84 Sylvan rebuild

Woodonglass

Supreme Mariner
Joined
Dec 29, 2009
Messages
25,927
Uhmm, I'm really havin a hard time tellin which side is factory on those tubes!!! Dude!!! That installation tool works Fantastic!!! I GOTS to have me one of Doz!!!!!! Oh, the Splash well is DA BOMB!!!!!:D
 

REdington

Petty Officer 3rd Class
Joined
Apr 22, 2014
Messages
97
Thanks WOG,
One question for ya, will the 5200 hold paint when dry?? I tried to clean it up with acetone but was making a worse mess than if I would have just left it be.

Rodney
 

REdington

Petty Officer 3rd Class
Joined
Apr 22, 2014
Messages
97
I did get the splashwell mounted before I went back out last week.
Yesterday was a wash as I was too tiered to work on the boat.
Today I plugged the drains on the splashwell and filled it with water. No leaks anywhere.
Next up will be the floor.

Rodney
 

jondevos

Cadet
Joined
Apr 2, 2011
Messages
22
Very nicely done. I'm just getting ready to do the floors in my Star craft, I purchased 3/4" over the factory 1/2". Hopefully that won't cause problems for me.

Excellent job on the foam. I purchased some today and will be installing as per your recommendations.
 

REdington

Petty Officer 3rd Class
Joined
Apr 22, 2014
Messages
97
Thanks Jon.

Took the cut out of the inner skin that I made and ripped it on the tablesaw to make the pieces to join the floor.


Primed


Using 5200 on the rivets and coating the holes well, I riveted them on the wood floor.


One thing I do have to say about working with anything metal is " DEBUR all of it" as soon as you are done cutting. It is a habit for me cause I work with my mill and lathe a lot and the first thing I do, is debur parts as I take them out of the machines. It nothing more than running a file on all the edges on both sides and slightly rounding the corners.


Rodney
 
Last edited:

REdington

Petty Officer 3rd Class
Joined
Apr 22, 2014
Messages
97
This is all I got done before going back out today.


Plan for next week is to finish the floor and hang the engine back on.


Rodney
 

REdington

Petty Officer 3rd Class
Joined
Apr 22, 2014
Messages
97
I did a quick paint job on the splashwell and the back of the boat. This fall or next spring, I'll repaint when I do the whole boat.

The original transom cap (I think that is what it is called) was trashed so I needed to make a new one. Never tried anything like this before, but how hard can it be???


I took a piece of .025 thick aluminum (5003 I think) about a inch wider than the thickness of the new transom. Using my old mill vise, I bent a 90 degree 1/2" lip in on the 2 ends and the middle.


Clamped to the outside of the transom and using a dead blow hammer, formed the lip on the outside curves and then moved to the inside. Using scrap wood and clamps, finished the forming.


Finished it off with clamps and wood.


REdington

Petty Officer 3rd Class
Joined
Apr 22, 2014
Messages
97
With the plastic film removed.


I don't think it looks too bad for the first try.
 

REdington

Petty Officer 3rd Class
Joined
Apr 22, 2014
Messages
97
I mounted a piece of 1/4" plate aluminum, then added a 1/4" piece of plywood. I know some of the forum did away with the plywood on their boat, but I remember as a kid that the marine dealer we lived next to, always added plywood as a vibration dampener on their engine installs.


I notched out the plywood around the bolts that are on the brace. Engine is mounted.


GT1000000

Rear Admiral
Joined
Jul 13, 2011
Messages
4,916
Wow! just WOW!:eek:
Rodney, you sir are a true craftsman of the highest order!
I have finally had a chance to go through your build and to say that I am impressed with your workmanship and skills is a complete understatement...
You may have missed your vacation deadline, but it looks like you are on track [a little MRR pun intended...;)] for a Labor Day wetting.
Absolutely outstanding work!
Safe travels and best regards,
Gus
 

Woodonglass

Supreme Mariner
Joined
Dec 29, 2009
Messages
25,927
OK, Rodney, It's been almost a Month...What's going on?? Work or Laziness??? Give us the scoop. Boating Minds want to KNOW!!!:eek::D;)
 

REdington

Petty Officer 3rd Class
Joined
Apr 22, 2014
Messages
97
I'm back!!!
Long story short, back then (August 2014), we bought a '88 Sylvan 18' just like this one, and so we took this one (we call "moms boat" as my mother had bought it new and we got it when she passed) to the in-laws farm and stored it in a lean to on their old barn. Now the '88 (we call "new boat") needs some major attention with the floor and leaks (that's another story I'll tell when work starts on it). So Wednesday we dove to the farm to get it. It had been 2 or 3 years since the last time I checked on it and everything looked good then. Well since then, some of the roofing had blown off the lean to part of the barn and the boat was a disaster. The new deep pile marine carpet that I had just laid in it, but hadn't been glue it in yet before storing was soaking wet, and some spots of the floor was rotten form the the wet carpet. The transom looks good, so I won't have to mess with it again. So over the last two days, I got the floor and foam back out of it.

How it sits now


REdington

Petty Officer 3rd Class
Joined
Apr 22, 2014
Messages
97
If you look at the center of the opening, you'll see where I added plywood to the bottom to from a lip to hold the door to the pole storage. Water had set in this area and soaked through the varnish coating and the wood turned to mush


here is some close ups of the rotten wood


I could just replace this one piece, but everybody is out of 1/2" around here right now. So I bought 2 pcs of 3/4" to do all but the very front, where I'll try to use what I have.
 

REdington

Petty Officer 3rd Class
Joined
Apr 22, 2014
Messages
97
2 years ago, I got the rotten back 2 pieces of plywood out and put new 3/4 marine plywood back in. I glued carpet in and under the the tarp it went.

Long story short, we have a '93 Bounder diesel pusher motor home that has problems, last spring, the roof started leaking, the master cylinder went out, the mice had a hayday in the winter. As a kid we had a school bus that my dad converted to a camper (about 1966). BTW that old bus ('56 Dodge with wide block 318, 5 speed overdrive and 2 speed rear axle) took the family through 38 states and many years of camping. So, I guess I've been a motor home type of person all my life. The wife has been after me for years to get a 5th wheel so she didn't have to drive the truck to the lake evey time we went camping. Sooo we bought a 5th wheel a month ago and I got a Chevy Duramax to pull it with. Just got back from the 2nd outing and the Duramax pulled the camper and the '88 Sylvan great. But did discover this week, the '88 will need a total rebuild before long, so I need to get this boat done soon. I've decided no more lake till it ready to splash. Not going worry about the outside paint and just get the inside done.

Now, here it is 2 years later and I pulled the tarp off a couple of weeks ago and put it under a canopy to get it finished this year.

BTW, I've been using imageshack to host my pictures for about 20 years now.

Anyways, this is what it looks like after I vacuumed it and setting the extra carpet out of the way


Last edited:

REdington

Petty Officer 3rd Class
Joined
Apr 22, 2014
Messages
97
Also got the wife a new toy. She does a lot of embroidery and crafts work in vinyl and I needed it to finish the inside of the boat.

It's Juki 1541S


My first work with it was this. Sews vinyl like butter.


REdington

Petty Officer 3rd Class
Joined
Apr 22, 2014
Messages
97
I went and got the consoles out of storage yesterday. Made a replacement piece for the bottom and added a piece for the gauges to mount to for the starboard side out of some red oak that I had on hand. The original dash is acrylic I think and doesn't look so good. So I think I'll just mount the gauges on the dash and call it good. I'll have to cut the holes in the wood and then when covered in vinyl, it should look OK.

Ugly dash


REdington

Petty Officer 3rd Class
Joined
Apr 22, 2014
Messages
97
Last night I did some sewing on the vinyl cover for the starboard side. First time sewing anything with corners. 1/4" foam will go on the console first. then the vinyl gets stretched out and stapled, I hope it'll look OK.


Last edited:
Top