14' Larivee restore

friderday

Chief Petty Officer
Joined
Apr 1, 2012
Messages
463
Re: 14' Larivee restore

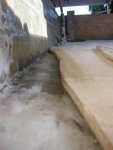
006.jpgAs if I couldn't feel more accomplished. I'm not completely computer illiterate(thanks for the tip Wood). Now off to bed. These are the areas in question. Just quite a drop off the edge in this area..just thought I'd try to fill it...or hey, just had an idea...these could be my live wells!!!lol!! Tomorrow's another day!
 

jbcurt00

Moderator
Staff member
Joined
Oct 25, 2011
Messages
25,030
Re: 14' Larivee restore

You'll probably want to fill those divits w/ PB filler, and make a slight cove.

Then you can roll the deck glass tabbing up over them & up onto the side of the hull.

You need to do that anyway, and make a cove anyway, so why not fill the gap 1st

Just be careful cutting plywood scraps to stick in 1st. You'll need to cut them to fit, coat them w/ resin, once tacky coat w/ resin again & wrap them w/ CSM prior to installation. Installing them w/ PB to 'glue' them in. Once installed the ply also needs to be 1/4" +/- away from the hull to prevent the creation of a hard point (just like stringers & the rest of the deck). Once their installed & secured, you'll have to make some PB coves.

That sounds like a lot of work compared to mixing some hairy PB & applying it to fill the gap, and making the cove all at once....

BTW: My 1960 FireFlite seems to have a similar divit running the length of the deck/hull joint. Since it doesn't have a bilge well, I always suspected it was to give any water on deck a channel to follow back to the drain plug...... But that may not be correct. Since I haven't replaced the deck yet, I may too eliminate the divit....
 

friderday

Chief Petty Officer
Joined
Apr 1, 2012
Messages
463
Re: 14' Larivee restore

Yeah, jb, was thinking like that this morning. Just thought I'd play around with the idea of an "insert" of some sort, but you are right, lot of work there. I may just have a case of the "let me see if I can fabricate something to fit here", rather than "let me take the easy way & just make a whole bunch of PB". Sometimes I think too much. And I 200% agree with you...many of these boats have that area & I think it is a channel to get any water to the back for drainage. The kids would probably benefit from some clean clothes & a little help with their homework. Since woke up with a bad case of cuttin', grindin', glassin', & floorin' back, I just might stay indoors today & do some chores. I appreciate your sage advice & will figure it all out in the next couple of days. Enjoy the last day of the wknd!!
 

Woodonglass

Supreme Mariner
Joined
Dec 29, 2009
Messages
25,927
Re: 14' Larivee restore

Ok, So are you saying that if the plywood was cut correctly it could extend out further to the sides of the hull at those circled locations and you want to cut some pieces to fit those areas? Please excuse this dumb okie being so slow on the uptake.
 

friderday

Chief Petty Officer
Joined
Apr 1, 2012
Messages
463
Re: 14' Larivee restore

Yes, wood, I am. But, I know what you're thinking...why didn't she just leave the deck cut to that size anyway & not cut off what she's considering putting back in. Couple things; as I said before, I cut the deck where it met the hull(or really just above it to allow for PL/PB/or a slight spacer just as under the stringers). The back 50" or so of that 8' piece of deck went perfectly from side to side, about 48". But as the boat changes from more of a flat bottom to a deep v in the forward portion, the wood had to be cut. There is this maybe 10"-15" area that there is about a half inch drop off down to hull, but as it comes over to sides it flares up. If I would have attempted to leave this on the plywood, it would have meant a lot of flapping, test fitting, flapping, etc. to achieve. As sphelps mentioned, it would require either this idea or lots of PB to avoid having a recessed channel on each side as a duck pond. I think this might be one of those six one way half dozen the other situations as both will require some finesse & PB, but neither will be difficult. Actually wouldn't mind them angling up a bit just like the fillet will be in that area-only slightly as that will direct any water in the boat toward the center, eventually to bilge. I'll try to take another pic to maybe communicate better.
 

jbcurt00

Moderator
Staff member
Joined
Oct 25, 2011
Messages
25,030
Re: 14' Larivee restore

Ok, So are you saying that if the plywood was cut correctly it could extend out further to the sides of the hull at those circled locations
I think the deck is intersecting the hull below where the 'vertical' side of the hull starts. It's against the curve of the hull as it rises to the bow & rises from the deep V at the keel up to the hull sides:
attachment.php


Except cutting it at a bevel, I'm not sure the deck could have been cut much more accurately.
 

friderday

Chief Petty Officer
Joined
Apr 1, 2012
Messages
463
Re: 14' Larivee restore

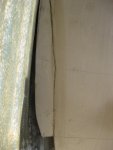
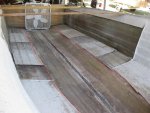
002.jpg003.jpg004.jpgSo in the first pic, you can see where the edge of deck drops off about 1/2". Now as you look further to the left(or toward the side of the boat, because of the contour of the hull, it comes up more level to the actual deck. The farther forward you look, the more exaggerated the contour & the deck meets the hull lower. Therefore, a little PB up forward & 2 layers of tabbing & I'm golden. Just "overthinking" a bit about the drop-off. Just thought if I could flap the underside of the piece of deck that I cut off, making it sit more level or even angled a touch, then PB & tab it to the deck & sides as I would normally. Notice in the second pic the mock piece is angled slightly. 3rd pic just gives you an idea looking down into the boat at this area. Hope this gives you a better idea.
 

friderday

Chief Petty Officer
Joined
Apr 1, 2012
Messages
463
Re: 14' Larivee restore

exactly jb. The deck would not have rested on the stringers, & instead rested on the outer hull due to the deep v/contours. I cut to fit the stringers. The more forward you go, this won't be an issue. I'll just PB & tab as per normal. Just this one little area I'm contemplating other options. Thanks for your insight.
 

sphelps

Supreme Mariner
Joined
Nov 16, 2011
Messages
11,462
Re: 14' Larivee restore

Except cutting it at a bevel, I'm not sure the deck could have been cut much more accurately.

My thoughts exactly .. I know it's a little late but if the stringers were a bit higher it would have worked a much better .
No biggy just fill it in and keep on truckin !:)
 

Woodonglass

Supreme Mariner
Joined
Dec 29, 2009
Messages
25,927
Re: 14' Larivee restore

Ok, I'm a Glutton for verbal punishment!!!! Where was the original deck line on this puppy!!!!! I understand now that if the deck was where it appears it should have been it would have been to high to sit on the stringers so evidently the original deck must have followed a similar line the the one you have installed. Is this correct? If so, then based on what I am now seeing, I'd just do this... the Blue is PB to buildup a cove for the thickness of the plywood and then 2-3 layers of CSM tabbing and it'll blend in and look like factory. And now you have the final advice from an..
OldDumbOkie.jpg


deckfix.jpg
 
Last edited:

friderday

Chief Petty Officer
Joined
Apr 1, 2012
Messages
463
Re: 14' Larivee restore

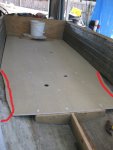
Thanks wood, & I hope I'm not verbally punishing you(although the ex from centuries ago may side with you!). Actually, the original deck was from outside stringer to outside stringer. Only about 22" wide. Never even came near the sides of the boat. Think one of the original pics shows what was left of it. True, sp, I could have raised the stringers a bit higher, and eventually avoided some of this. The deck would have been better in front but a couple of inches higher in the back. Give n take I reckon. No reason to fret. I think I can fill 'er in a bit & nobody will no the difference. Sorry I was confusing on this. Back when I was a little league umpire, I used to tell my students, "be clearly ambiguous" when explaining a rule that you didn't understand. (also known as baffle them with BS). Apparently I suffer from selective ambiguity. Another great wknd done...Can't wait to see the progress the week has in store, including but not limited to resin, csm, 1708, & FOAM!!!!!
 

Woodonglass

Supreme Mariner
Joined
Dec 29, 2009
Messages
25,927
Re: 14' Larivee restore

Hey, when you're as Dumb as I am, and hard headed to boot, you get abused alot!!!! It comes with the territory!!!!:eek: It's all Good!! I'm just sorry it takes me so long to understand something that should be sooooooo simple.:facepalm:
 

friderday

Chief Petty Officer
Joined
Apr 1, 2012
Messages
463
Re: 14' Larivee restore

Dumb? I have hundreds of character witnesses on here that would highly debate that, myself included...and hard headed? well, I knew I liked you...sounds a lot like somebody I see in the mirror each day!(again-my ex could 'splain that one to ya). Thanks for being patient with me..ya'll are good, real good to put up with all our silly questions. Tomorrow's another day...(& probably another 5 gal. of resin...didn't like the way that Benjamin looked in my pocket anyways!!)
 

friderday

Chief Petty Officer
Joined
Apr 1, 2012
Messages
463
Re: 14' Larivee restore

005.jpgThought I'd play with the paint feature you taught me wood...the red outlines where the previous deck was. As you can see, not much of a deck.
 

GT1000000

Rear Admiral
Joined
Jul 13, 2011
Messages
4,916
Re: 14' Larivee restore

Good Day friderday,
Just been reading and getting caught up on your restore...
I must have missed the restore you did with/for your son's boat...
Looks like you learned your lessons well in that endeavor as it seems you are doing a really nice job on this Larivee.
As to your most recent issue with the deck...even though it will take a pretty good amount of PB to fill in the edges, it would be a perfectly acceptable way, along with a couple of layers of CSM, to create a smooth transition to the hull...
Just like Woody showed in his sketch.
I still have to finish mine off this way...to eliminate the trough along the edges and a couple of water holding divits near the front...
Anyhow, I thought I would come aboard and watch, cheer, and help if I can, as you bring this boat back to better than new condition.
Happy Monday,
GT1M:D
 

friderday

Chief Petty Officer
Joined
Apr 1, 2012
Messages
463
Re: 14' Larivee restore

Great to have you aboard.. yeah, seems like that's the easiest method. And you are right. It is amazing how things change from one boat to the other. He & I took what seemed like an eternity to do his, yet this one, me working alone, seems to be going quick. The hesitation is no longer there...it has been replaced with a lot of confidence & knowledge that when I make a mistake, it's not anything I can't fix. Welcome aboard & hopefully, more progress this wk. Dang work stuff gonna get in the way a bit. Have a gr8 day!
 

friderday

Chief Petty Officer
Joined
Apr 1, 2012
Messages
463
Re: 14' Larivee restore

I cannot believe it has been 2 wks since my last update! Seems I cursed myself about how quick progress was going along....well.....It's not that I haven't been working on it, just not been diligent about the updates. And the progress seems to have slowed a bit, at least for me. I'm sure you all have hit a few walls along the way. So here is where I'm at (and I'm sorry, I can't post new pics as camera is with son-you'll just have to trust me). First, regarding those areas I wanted to fill, I split the difference of everybody's input, including my own. As you remember, couldn't decide on filling with PB, or my wood pieces from trimming the deck. Compromised-did a little of both. I will post pics asap, but believe me when I tell you both sides came out beautiful. I was able to actually angle them a bit with the angle of the hull (slightly sloping toward center). Tabbing went in perfect & once it's gelcoated, only a few of us will know that wasn't the original design of the boat. In addition, foam went in without incident. As expected, had to drill a couple more relief holes as I went along, but what a cool experience to now be able to say I have done. Put all the pucks back in with PB & filled relief holes as well. Although the deck has been tabbed in for about 10 days, I have not laid the glass on it because I have some work on the sides(sanding & fillets on top rail I put in). Pictures of this will help explain this chore. These are the 1" x 2" 's I put along the top of each side(see post #33's pictures). It is a slow, gravity challenging process, but once that is done, I can glass the deck & flip her. Also, replaced the wood on the bow eye. Believe it or not it was in half decent shape. Still, silly not to re-do while I'm at it. Very strong now, glassed in like a tank. So, pictures for you guys in next couple days, top rail fillets & glassed, & a little more time on the grinder this week & glassing the deck. Just didn't want you to think I threw in the towel or was ignoring ya'.
 

sphelps

Supreme Mariner
Joined
Nov 16, 2011
Messages
11,462
Re: 14' Larivee restore

Sounds like ya got a good bit done to me ! Things just take time sometimes ...
Looking forward to the pics.. :)
 

Woodonglass

Supreme Mariner
Joined
Dec 29, 2009
Messages
25,927
Re: 14' Larivee restore

Are you taking measurements of the top of the hull sides to ensure they are back to where they should be so the cap will fit back on? This should be done prior to tabbing the deck to the sides. You can use nylon straps to pull em in to where they need to be and then tab them in. Just checkin!!!!:D
 

friderday

Chief Petty Officer
Joined
Apr 1, 2012
Messages
463
Re: 14' Larivee restore

Good morning wood....yes sir, as a matter of fact I did & braced it up a bit to keep it as it was. I just have that small front cap that comes back about 40" & I test fit the other day to see if I was still on the right track. Looks good. I'll get some pics up as soon as I get the camera back. It's hotter than blazes here today(as cool front approaches later in wk). Gonna do some school work with the boy & stay cool at least for today.
 
Top