New Journey

MNhunter1

Ensign
Joined
May 12, 2014
Messages
987
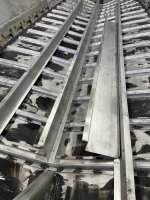
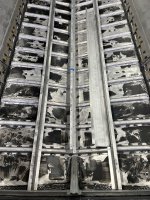
Coat-it or Gluvit - is it worth it to hit the rivets on the ribs, or a waste of time/material? I'll have plenty of material, just curious on everyone's perspective. One would think any potential benefit would exist under the rib at the hull rather than on top of the ribs at the tails.
 

renns

Petty Officer 1st Class
Joined
Dec 20, 2017
Messages
316
Coat-it or Gluvit - is it worth it to hit the rivets on the ribs, or a waste of time/material? I'll have plenty of material, just curious on everyone's perspective. One would think any potential benefit would exist under the rib at the hull rather than on top of the ribs at the tails.
I wondered the same thing. Seems like a stretch to hope that stuff will flow under the rib, and find its way into the potential leakage site at the hull penetration. Maybe there's some other benefit I'm not thinking of?
 

SHSU

Lieutenant Junior+Starmada Splash Of The Year 2019
Joined
Mar 8, 2017
Messages
1,668
Coat-it or Gluvit - is it worth it to hit the rivets on the ribs, or a waste of time/material? I'll have plenty of material, just curious on everyone's perspective. One would think any potential benefit would exist under the rib at the hull rather than on top of the ribs at the tails.

You will find different suggestions, but general consensus is its a waste of time, as you are not actually covering the area where the rivet comes through the hull. That being said, I did have extra material as well and still hit them. It helped me sleep better at night. lol

SHSU
 

Moserkr

Chief Officer + Starmada Splash Of The Year 2021
Joined
Nov 23, 2020
Messages
837
I wasted a half hour throwing a splotch on each rivet, even did most of them above the waterline. Dont know if it helped, but it cant hurt, and a half can of coat-it lying around the garage certainly wont help. Figure it was time worth wasting. Also have them covered from the outside below waterline but thats another story.
 

MNhunter1

Ensign
Joined
May 12, 2014
Messages
987
I ended up hitting about half of the rib rivets before the can started to heat up and it was going on too thick to want to play with it any more. I think the Gluvit goes down a bit easier and I probably could have finished the remaining ribs, but the Coat-it lays down a bit thicker and seems to take a bit longer. Nonetheless, all the seams and bottom rivets have a healthy dose and the transom is now fully coated with 3 coats of epoxy per side. Placing an order today for some more LF rivets for the deck and the 316 fasteners for the transom. New deck has already been cut, so once I get the stringers installed I can starting getting the final fitting done. It'll be a bit before I actually install the deck, but it'll be nice to have a dance floor to start getting everything mocked up and determining console placement, steering cable length, livewell plumbing, etc.
 

MNhunter1

Ensign
Joined
May 12, 2014
Messages
987
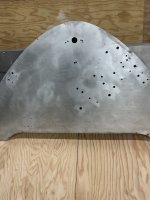
Fabing up my aluminum transom plate/motor pad/sheet for the outside skin of the transom. Is 5200 still the preferred adhesive, or some sort of epoxy? I was assuming I'd just back butter it with a health dose of 5200, but there tends to be some schools of thought out there that water will still eventually find its way between the two sheets of aluminum, get trapped, and result in corrosion down the line. Any other suggestions/recommendations, or should I proceed with the 5200? I filled a bunch of old holes in the transom skin with Marine-tex and the plate will serve as added reinforcement, so I don't necessarily want to just eliminate it.
 

classiccat

"Captain" + Starmada Splash Of The Year 2020
Joined
Dec 20, 2010
Messages
3,405
Fabing up my aluminum transom plate/motor pad/sheet for the outside skin of the transom. Is 5200 still the preferred adhesive, or some sort of epoxy? I was assuming I'd just back butter it with a health dose of 5200, but there tends to be some schools of thought out there that water will still eventually find its way between the two sheets of aluminum, get trapped, and result in corrosion down the line. Any other suggestions/recommendations, or should I proceed with the 5200? I filled a bunch of old holes in the transom skin with Marine-tex and the plate will serve as added reinforcement, so I don't necessarily want to just eliminate it.
i'm in the less-is-more crowd. fill all of the pits prior to painting but when it comes to putting down the metal plate, I only used 5200 around the through-holes.
 

MNhunter1

Ensign
Joined
May 12, 2014
Messages
987
i'm in the less-is-more crowd. fill all of the pits prior to painting but when it comes to putting down the metal plate, I only used 5200 around the through-holes.
Would you paint the transom skin prior to installing the plate, or install bare aluminum to bare aluminum and just paint over the exterior? I always figure you want the 5200 against the aluminum and not on top of the paint, the the paint coat between the sheets would give a better layer of protection if not completely sealed.
 

classiccat

"Captain" + Starmada Splash Of The Year 2020
Joined
Dec 20, 2010
Messages
3,405
Would you paint the transom skin prior to installing the plate, or install bare aluminum to bare aluminum and just paint over the exterior? I always figure you want the 5200 against the aluminum and not on top of the paint, the the paint coat between the sheets would give a better layer of protection if not completely sealed.
i kept my motor pad bare & polished. It's mostly decorative and hiding some of the imperfections from the pitting that occurred under the old wooden motor pad. I like paint 1st; I believe that the 5200 will adhere better to properly applied primer/topcoat.
 

MNhunter1

Ensign
Joined
May 12, 2014
Messages
987
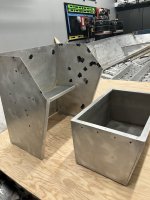
Started fitting the deck and a little more hole patching with the MT on the bow cap, console, and livewell. I tape over each hole on the clean side with a piece of wax paper, fill from the back, then go back and slap on another piece of wax paper on the back. Keeps the MT from running out, reduces sanding, and ensures I get enough push through at each hole. The wax paper on the back holds without tape, and it’s all easily removed the next morning for the rest of the curing process.
EAC3D8F3-C01F-42C7-B49E-B6E3EDB414B1.jpeg0FCF308A-E145-412E-85DD-F8265A8C17B8.jpeg
 

Mikesta

Petty Officer 3rd Class
Joined
Mar 15, 2018
Messages
86
Are you planning on sanding down the marine tex on the hull? the previous owner of my boat did a few patch jobs with what looks like bondo and never sanded it down, water crept under it at the edges of his "feathering" and caused a good bit of corrosion
 

MNhunter1

Ensign
Joined
May 12, 2014
Messages
987
Are you planning on sanding down the marine tex on the hull? the previous owner of my boat did a few patch jobs with what looks like bondo and never sanded it down, water crept under it at the edges of his "feathering" and caused a good bit of corrosion
Yes, will all be sanded smooth before paint.
 

MNhunter1

Ensign
Joined
May 12, 2014
Messages
987
Just a quick update and sorry for the lack of pictures. Nothing much interesting at the moment.

Got my steering measured up and ordered, sticking with the same NFB 4.2 system I used on my SS.

After a little sticker shock on some of the shipping charges for the Shields 149 livewell/bilge hose, I was able to source some by the foot at a local marina. 3/4" for the livewell fill and bilge pump, 1-1/8" for the livewell drain.

Splurged on the marelon 1-1/8" thru hull fitting for below the water line, although I probably would have been just fine with the standard nylon/plastic ones. I skipped on the seacock or ball valve, recognizing I won't likely be on any big water and the marelon fitting and quality hose are much less likely to present any issues.

Seats/cushions have been all stripped down and maintained for templates for the new seat covers. New plywood bases cut, along with all new bow supports, dash, etc.

Decking all cut and fit into place with the Nautolex on hand and standing by. Leaning toward a continuous run with the countersunk/hidden deck rivets rather than individual wrapped deck sections. Plan to strategically place 6-8" pry out deck plates under the console, helm seat, etc. to provide future access to any underdeck fittings, cable runs, etc.

Transom all fit into place and all thru holes drilled out. Was a bit more complex than my previous builds with the way this MR splashwell also skins/covers the inside of the transom and wraps over the top. Pretty happy with how all the holes lined up. Used some left over chunks of the glued up transom ply (1-1/2") to make a drill template for different bit sizes and keep everything at a nice 90 degree angle against the transom. Also got the exterior aluminum transom skin/motor pad all fitted and drilled. Still debating on best method for attachment - before or after paint, 5200 vs other epoxy, etc. Plenty of thru bolts to hold the final product in place, just overthinking what the best attachment method would be to prevent any water entrapment between the two sheets of aluminum and potential corrosion issues.

Weather looks to be warming here in MN next week, so hoping for some opportunity to get the hose back out, do a quick leak test, and maybe even lay down some paint.

Slowly, but surely...
 

MNhunter1

Ensign
Joined
May 12, 2014
Messages
987
With the warmer weather, I was able to get the hose back out and conduct a leak check. Only leak I have is a slow drip from the bow seam. Inside seam and rivets already have Coat-it applied. Not sure if I should just try to apply some Gluvit (seems to flow a bit better than the Coat-it) with a syringe into the seam as an additional layer, or get out the rivet gun and hit the rivets before adding the Gluvit. Assuming any hammering on the rivets now will likely break any bond/seal of the existing Coat-it.

Would have been nice to not have any leaks, but the drip is pretty minor and unsure of what the results will be once in the water with the pressure pushing on the outside of the hull vs the inside with the leak test. Also though about running a bead of 5200 up the seam from the outside.

Any suggestions on best attack?
 

Moserkr

Chief Officer + Starmada Splash Of The Year 2021
Joined
Nov 23, 2020
Messages
837
I would assume hammering rivets would not be good for the existing coatit. Not sure if covering up 5200 with gluvit would work, but seems redundant. A good coat of gluvit or coatit should stop the leak, especially if you can target exactly where it leaks inside. Id much rather hit the outside of the hull with coat-it - the manufacturer literally had it written on the can that its recommended on the outside of the hull. My whole hull below the waterline is covered in coatit so i can attest to its durability - PO went a little nuts with it cause it wasnt just rivets or seems he hit. But no leaks is nice. I continued what he did to include above the water line up the bow seams with coat it, and so it didnt look too ugly i just taped along the seams before applying.
 

MNhunter1

Ensign
Joined
May 12, 2014
Messages
987
I would assume hammering rivets would not be good for the existing coatit. Not sure if covering up 5200 with gluvit would work, but seems redundant. A good coat of gluvit or coatit should stop the leak, especially if you can target exactly where it leaks inside. Id much rather hit the outside of the hull with coat-it - the manufacturer literally had it written on the can that its recommended on the outside of the hull. My whole hull below the waterline is covered in coatit so i can attest to its durability - PO went a little nuts with it cause it wasnt just rivets or seems he hit. But no leaks is nice. I continued what he did to include above the water line up the bow seams with coat it, and so it didnt look too ugly i just taped along the seams before applying.
My though was to apply the Gluvit on the inside, hoping it creeps into the seams more than the Coat-it did, then run a bead of 5200 along the bow seam on the outside of the hull. My hull is unpainted below the strakes and where the leak is occurring, so any Coat-it on the outside would be very visible.
 

Moserkr

Chief Officer + Starmada Splash Of The Year 2021
Joined
Nov 23, 2020
Messages
837
Yes the coat-it would look horrid on an unpainted hull. A small bit of 5200 couldnt hurt then, I just wouldnt expect it to be permanent. On the seams inside, a few I hit more than once where I could see it had seeped in. Id just keep hitting it with gluvit inside until you feel comfortable with it.
 
Top