How I made my boat seats.....(guide)

mrdjflores

Lieutenant Junior Grade
Joined
Apr 1, 2009
Messages
1,169
I'm creating this thread to document how i created my boat seats....

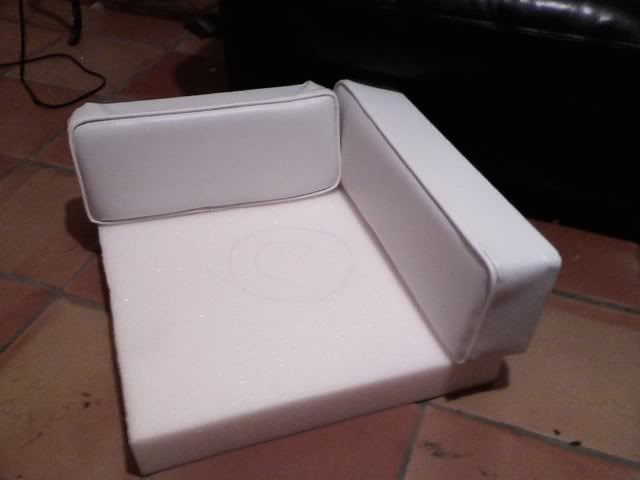
First, i sketched how up i wanted to have my seating arranged in the boat
100_4971.jpg


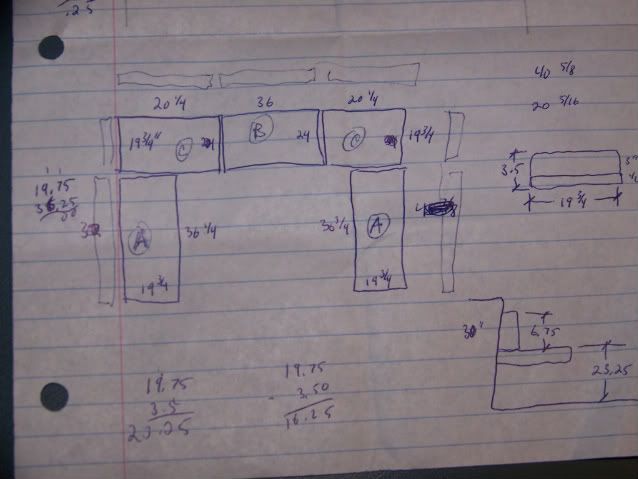
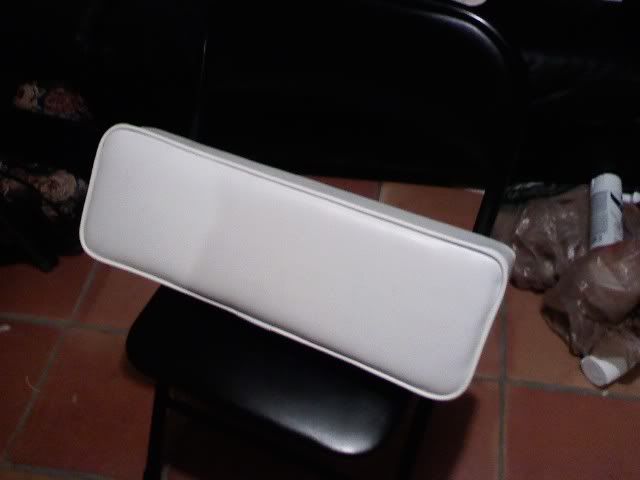
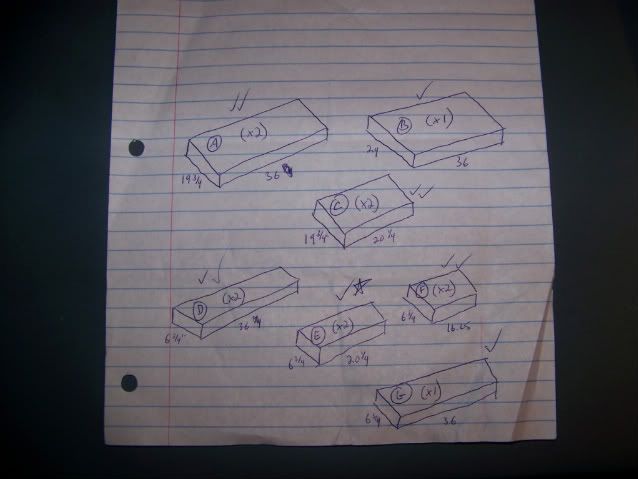
Next, I figured out the sizes for each cushion....

100_4973.jpg


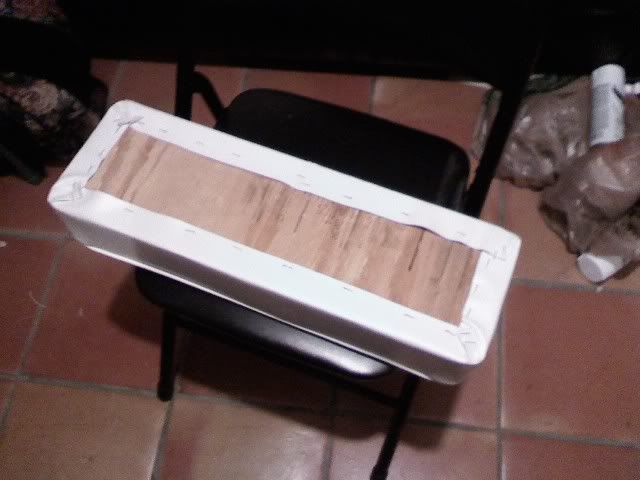
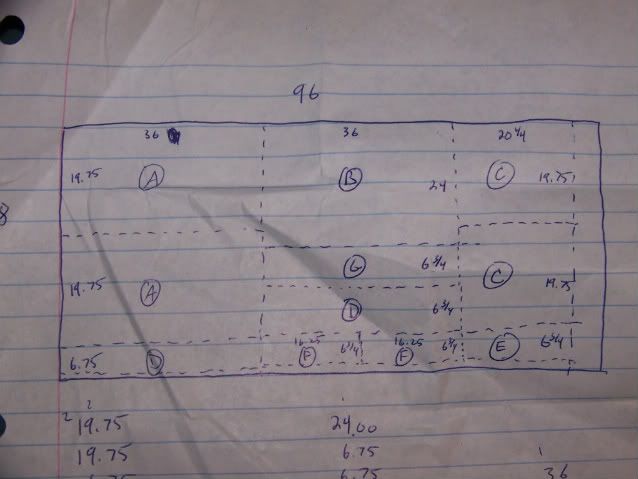
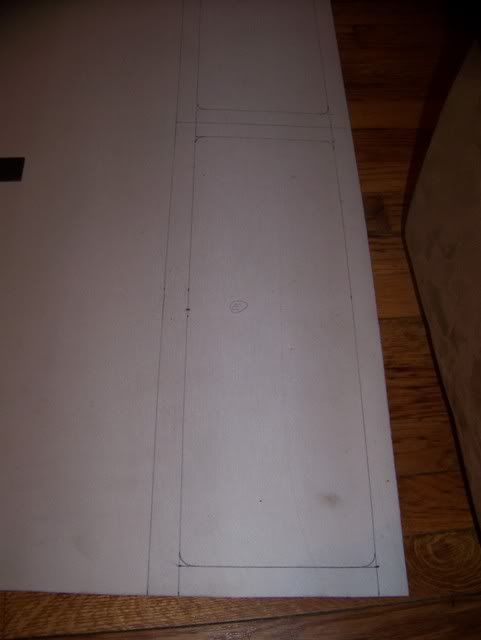
Then i figured out how to lay out the pattern on a sheet of ply. I decided to use 5/8" ply instead of 1/2", like most people use...i have a reason for that, but it is a surprise....

100_4972.jpg


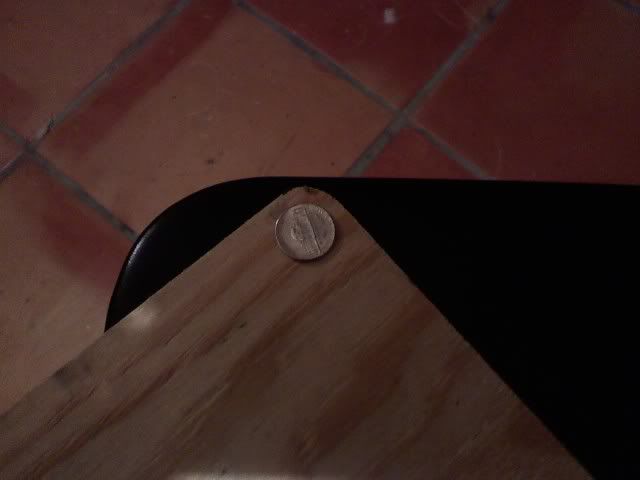
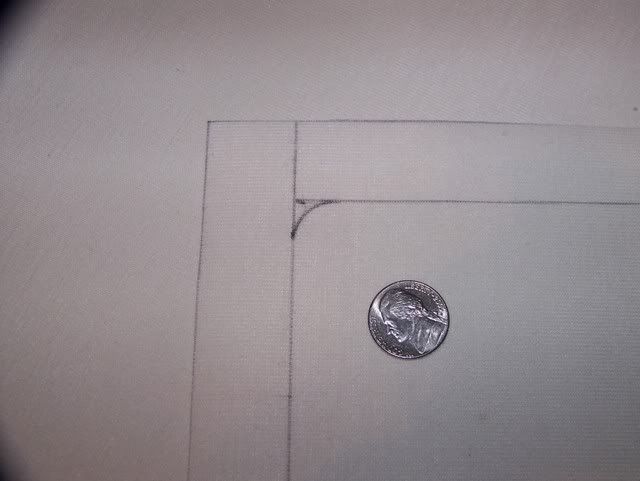
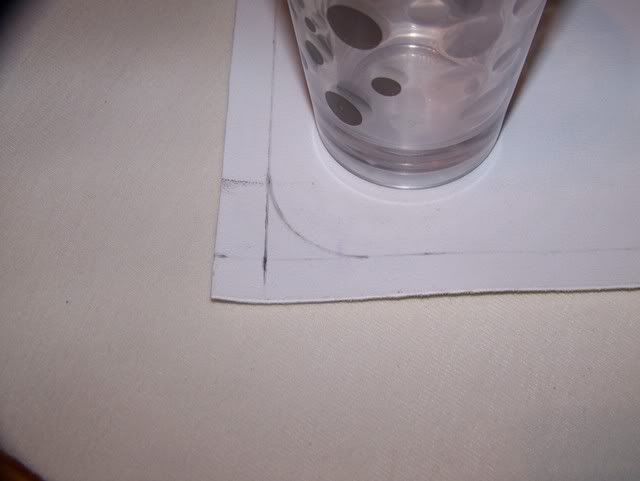
From there, each base was cut out and the edge rounded ( a nickle makes a great size guide for the corners)

0317002232.jpg


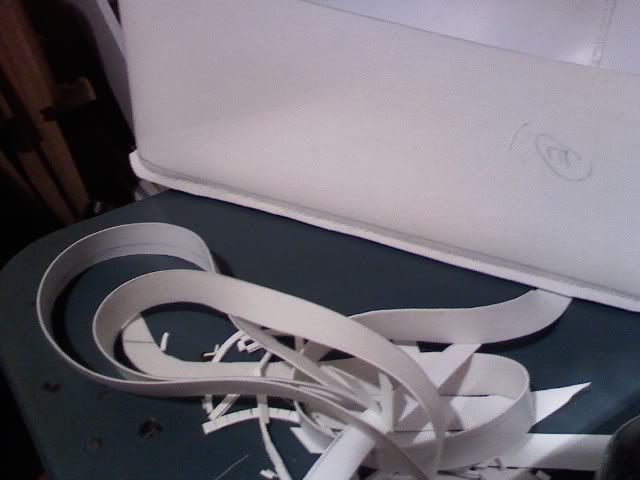
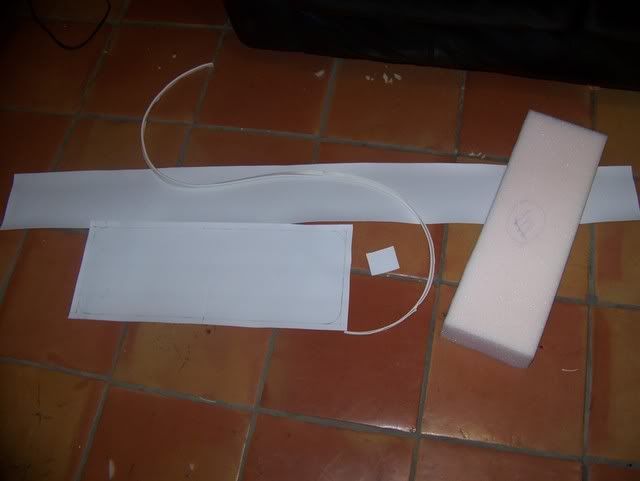
next step....laying out the vinyl patterns....
 

mrdjflores

Lieutenant Junior Grade
Joined
Apr 1, 2009
Messages
1,169
Re: How I made my boat seats.....(guide)

a few things i did when laying out the vinyl patterns. For starters, on the face piece, you need to add 5/8" to 1" extra along the width and length for a seam allowance, you can mark these allowances on the back side of the vinyl...

100_4975.jpg


I decide to go with a 1" seam allowance as my welting is 1/2" from the center of the cord to the edge, this made laying out the vinyl easier for me, and also laid out a matching radius in the corner (matches to the ply corners)

100_4976.jpg


Then, on the appearance side of the vinyl, i laid out a guide line 1/2" from the edge of the cut pattern, this guide line is used to help keep the welting where i want it (you may even staple the edge of the welting, cause this edge will get trimmed later) I also put in a larger radius to match, in this case, it was a 2" circle, which i happen to have a glass that has that size bottom

100_4977.jpg


For the vinyl that wraps around for the sides, I also added 1" to the length and the width, 3 sides is for the seam allowance, the other side is to wrap around the ply base.

The last piece of vinyl you will need is to couple the ends of the welting together, i used a small piece about 1-1/2" square.

For each seat, you should now have the face piece, the side piece, the welting and the welting coupling. Also the foam and the ply base

100_4978.jpg
 

mrdjflores

Lieutenant Junior Grade
Joined
Apr 1, 2009
Messages
1,169
Re: How I made my boat seats.....(guide)

for now, let's switch gears and move onto the sewing machine itself and some basic sewing.

I purchased the cheapest Singer machine that wal-mart had, model# 1507. I made 2 cushions with this so far. At one part of the process, this little machine sewed through 7 layers of vinyl with ease. most machines have and adjustable needle that can move to the right or left, or both. This machine could only offset the needle to the right, so i also had to buy a zipper foot that is also offset to the right so you can get right up to the edge of the hump/pipe of the welting. I ended up getting a better machine for free (gotta love family) so i sold the 1507.

One of the trickiest things is actually getting the thread tension set properly, both the thread through the needle and the thread from the bobbin. Read your machine's manually carefully on when and how to set these tensions.
 

mrdjflores

Lieutenant Junior Grade
Joined
Apr 1, 2009
Messages
1,169
Re: How I made my boat seats.....(guide)

okay, back to the cushions..

First thing you want to do is grab your welting and the small square.
take the small square and wrap it around the end of the welting, but only insert the welting half the way in...the other end of the welt will fill up the rest of the pocket that is formed....

100_4979.jpg


100_4980.jpg


0317002110.jpg


Now we are ready to begin attaching the welting to the face vinyl. Start with the appearance side of the face vinyl facing up. Align the pocketed end of the welting half way along the length of the face vinyl (you can place this joint anywhere you want actually, i like to have it at the back of seat cushions, and at the bottom of back cushions) Align the thin edge of the welting to the guide line on the appearance side of the face vinyl (the line we made 1/2" from the edge of the material) position these 2 pieces into the sewing machine and begin the needle just off the edge of the pocket end of the welting, we'll sew that section later....

0317002115.jpg


as you begin to sew down this piece, go nice and slow to make sure you keep the stitching right up against the hump in the welting.
 

mrdjflores

Lieutenant Junior Grade
Joined
Apr 1, 2009
Messages
1,169
Re: How I made my boat seats.....(guide)

to be continued in the morning....
 

oops!

Supreme Mariner
Joined
Oct 18, 2007
Messages
12,932
Re: How I made my boat seats.....(guide)

Arrrrrrgh !.........
A Cliff Hanger ! :d
 

mrdjflores

Lieutenant Junior Grade
Joined
Apr 1, 2009
Messages
1,169
Re: How I made my boat seats.....(guide)

ok...where were we??? oh yeah....
continue sewing down this straight side until you get to the first corner and slow down or stop to get ready to make the turn.
When you get to the turn, slowly bend the welting to follow your guide line. i found it easiest to only sew a few stitches at a time when going around the curve....

0317002117.jpg


continue this process all the way around. When yo get to the other end, and if your measurements were right, you should have to only trim the last bit of the welting just about a 1/4" or so. The end of the welting should slip right into the pocket you made on the first end of the welting. after inserting the end into the pocket, continue to sew across the pocket....

0317002136.jpg


once this is completed, you should have the face vinyl and the welting fully stitched together....

0317002136a.jpg


next step, adding the sides....
 

mrdjflores

Lieutenant Junior Grade
Joined
Apr 1, 2009
Messages
1,169
Re: How I made my boat seats.....(guide)

now for the side...
the sides can be tricky keeping them lined up, because you will be sewing blind...that is, you lay the side vinyl with the non appearance side facing up, with the vinyl covering up the welting, so you will have to 'feel' for the edge of the hump in the welting. you want to keep that needle right against the edge of the hump. You want to start the side in the same position where we started the welting, but let the side overlap the center of the welting pocket you sewed, this is so you will have extra material to sew the two ends of the sides together....( i didn't take a picture of this starting point, but i will for the next cusion)....

becareful during this sewing process, as you will need to keep your fingers close to the needle to make sure you stay right up against the hump of the welting (again, you may be able to use a few staples on the outer edge to help keep things lined up)

As before, once you approach the corner, STOP.
you need to cut some slits in the side vinyl so you can turn/bend it around the corner radius....

0317002140.jpg


continue this process all the way around, when you reach the other end, stop short of the welting pocket, as you need to sew the two ends of the vinyl sides together. I've seen some people sew the ends together, and i've seen some that just glue the ends together. this seam does not have to be real pretty as this seam would typically be in the back or bottom of the cusion and would not be visible.

you should now have something that resembles....

0317002158.jpg


now you can turn your new masterpiece inside out and check that you do not have any gaps up against the welting (pay close attention to the corners) If you find any gaps, turn the vinyl inside out and resew this section, starting and stopping at least 1" on each side of your gap.

once you are happy with that, you can trim off the excess viny, making suer you don't cut through the threads you just had sewn....

0317002200.jpg


now you are ready to attach the foam and the base...
 

mrdjflores

Lieutenant Junior Grade
Joined
Apr 1, 2009
Messages
1,169
Re: How I made my boat seats.....(guide)

a couple things to note before final assembly:

1. your seat base: you may want to round off or bevel all the edges so you don't have a sharp corner that the vinyl lays across. or possibly use some thin dense foam around the edges, or scrap vinyl.

2. your foam: you've probably have noticed that your vinyl has rounded corners, but you foam does not. I did this on purpose, i wanted a little extra room in the corners so the foam will have a place to expand into when someone sits on the cushions.

3. attaching foam to seat base: i use a general purpose spray adhesive, this helps to keep the foam from shift around on the ply.

4. foam again: depending on the type of vinyl you have (vinyl with cushion backing, coarse 'feeling' backing or sealed backing) some people will wrap the foam with a protective coating. I will be doing this with the cushions that you sit on (not the backrests) I am using heavy leaf/yard waste garbage bags and wrapping the foam/ply assembly like a x-mas package (but with staples not scotch tape :) )
 

mrdjflores

Lieutenant Junior Grade
Joined
Apr 1, 2009
Messages
1,169
Re: How I made my boat seats.....(guide)

final assembly...

set your foam/ply assembly into the vinyl making sure that the edge of the foam is sitting inside the welting (so you don't get a hump showing in the face of the vinyl from the appearance side) you'll want to compress the foam/ply assembly to give you the amount of 'pillowing' that you like (the amount of puffiness that you want on the face of the cushion).
starting with the long side of the cushion, pull the side vinyl flap over the ply base and staple. then do this to the opposite side. do this to all the sides, leaving the corners for last. you can stretch and full the vinyl to remove and pleats or folds that may appear in the sides as you staple. When doing the corners, you will have to play around with what appearances you like. It may try to pucker or fold, all depending on how well the ply is sized to match. for mine, i have just pulled the vinyl side's corner over the ply and then fold over the vinyl to one side or the other to get the best appearance i can....

0317002237.jpg


************************
oh, also just remembered another final thought...make sure you add any t-nuts, screws, snaps or whatever you are going to use to attach the cushion to the boat BEFORE you put the foam and ply together.
************************

once all the staples are in, turn the cushion over and check it's appearance, if you have any waviness or wrinkles, pull a few of the staples out and pull or stretch the vinyl some more to smooth the face out, then re-staple....

and...tada...a cushion....

0317002238.jpg


final thoughts....
i have never sewn like this before, i have only seen a few short videos on youtube. There maybe be better ways to sew a cushion, this just happens to be the way i decided to do it.

I hope this information has been helpful
please feel free to add any comments or make suggestions.
I just finished my 3rd cushion...the more i make, the better they get, i may even go back and redo my first 2 cushions, because i think i have my process worked out.

enjoy,

Daniel

link to full photobucket album:
http://s726.photobucket.com/albums/ww264/mrdjflores/sea ray/cushions/
 

mrdjflores

Lieutenant Junior Grade
Joined
Apr 1, 2009
Messages
1,169
Re: How I made my boat seats.....(guide)

Thank you..

Here is a picture of the beginning of one of the corner seat sections...
the seats will form an overall U shape (down one side, across the back and up the other side)

0317002240.jpg
 

Alpheus

Lieutenant Commander
Joined
Aug 3, 2009
Messages
1,757
Re: How I made my boat seats.....(guide)

You need to make a video. Your pictures speak a thousand words but a video would speak a million. I am in the process of making some cushions (still practicing) and I couldn't find any vids either. I have seen some courses around but they cost over 1000 bucks...


Thanks for the write up...
 

erikgreen

Captain
Joined
Jan 8, 2007
Messages
3,105
Re: How I made my boat seats.....(guide)

Yes, excellent write up. Next time I make cushions I'll be making them look better than shapeless lumps of vinyl :)
 

mrdjflores

Lieutenant Junior Grade
Joined
Apr 1, 2009
Messages
1,169
Re: How I made my boat seats.....(guide)

i actually started playing with the vid cam last night, and am planning on doing a video walkthrough when i make the cushion seats, since there is a few more steps and a couple of them may also have a colored vinyl stripe through them
 

blairjbyrd

Petty Officer 2nd Class
Joined
Jul 11, 2009
Messages
109
Re: How I made my boat seats.....(guide)

very nice. It looks great
 

mrdjflores

Lieutenant Junior Grade
Joined
Apr 1, 2009
Messages
1,169
Re: How I made my boat seats.....(guide)

one more suggestion:

when your bobbin runs out of thread and you refill it, run a few passes on some scrap vinyl. you may have to adjust the bobbin thread tension
 

Isaacm1986

Lieutenant Junior Grade
Joined
May 20, 2009
Messages
1,086
Re: How I made my boat seats.....(guide)

very nice work! This is very helpful!
 

mrdjflores

Lieutenant Junior Grade
Joined
Apr 1, 2009
Messages
1,169
Re: How I made my boat seats.....(guide)

weight? don't know yet, there are a total of 18 cushions in 11 different sizes.

i only have 3 made so far
 
Top