1987 Larson DC-215 restoration

chevymaher

Commander
Joined
Mar 29, 2017
Messages
2,915
If you don't get the marine tube. You can't change the oil by sucking it out the dipstick tube. Then you got a huge mess every time you do it.

I went through major changes making the oil change set up. I don't want oil all over in the bilge.
 

sms986

Petty Officer 1st Class
Joined
Sep 18, 2017
Messages
334
Surprisingly, I have a very simple method for changing the oil. I have a small flat "funnel" thing that has a 1/2" tube exiting through the drain to a 5 gallon chemical pail. It was all free since I had the supplies in my garage and it took me 20 minutes to change the oil. I honestly didn't even know you were supposed to suck it out...
 

dezmond

Senior Chief Petty Officer
Joined
Jul 21, 2010
Messages
760
Wow 10 sheets of plywood? That sounds overkill. I have used maybe 2 1/2 sheets so far on my restore. Transom, deck, strings, bulkheads. I may be wrong but I think your a little high on the ply. Fir is great to use.

West system is is a good one to use. That’s what I’m using myself.

Gonna tag along and see how ya do.
 

chevymaher

Commander
Joined
Mar 29, 2017
Messages
2,915
Sweet you got it covered then.

Yea sucking it out though the dipstick tube is the way it is supposed to be done. They got little hand pumps for it.

I got all mad scientist about it. Used the HVAC vacuum pump and suck it out into a X Helium container for balloons. It works takes only a few minutes.
 

sms986

Petty Officer 1st Class
Joined
Sep 18, 2017
Messages
334
Any suggestion on where to get fir? I haven't had any luck. Went to Lowe's and home Depot today and neither could get it in for me. I just took a shot at the estimation. Haven't looked yet to see how they can all be arranged onto a 4x8 sheet. Plus, I'm including all of the cabinets and such in the cabin as well as the deck.

I think I went redneck scientist on the oil changes. I saw that they make a filter relocation kit, saw the price tag, and passed. It was easy as dirt to change, and it worked well. So I'm not concerned with having to suck the oil back out through the dipstick tube. I did bend the tube at some point and now I can't get that bracket on the starter that connects to the block. Just my luck!
 

dezmond

Senior Chief Petty Officer
Joined
Jul 21, 2010
Messages
760
They call it exterior plywood Good One side.... I went in as well and asked for ACX grade ply and the guy cocked his head and said huh?? You got to get down to their level and use simple words.. Make sure it is exterior and you will be good since you are coating it and resin and laying glass on it...
 

sms986

Petty Officer 1st Class
Joined
Sep 18, 2017
Messages
334
As it turned out, my Lowe's doesn't stock fir. They get it secondhand from a local distributor and Mark up the price 20%. For anyone in the Erie PA area, there are two places to get fir, Kraft lumber and Frontier lumber. Both sell it for $80 for a 4*8*3/4" sheet.

I'll be headed up to pa for a long weekend on Thursday, and I already feel like a little kid on Christmas Eve. Why is it that completely gutting and rebuilding a boat is exciting to me? The answer is unknown.

I have one question I'd like to figure out before I get home: should I remove the cap? I really, really don't want to, and from my understanding people only do it to have more space. From my experience in engineering, the cap would provide some good lateral support of the hull when it is all gutted out. I also don't want to go through the headache of figuring out how to wrestle it off in the tight area I have to work in. I can access my transom just fine, and everything else is uncovered (other than the cabin, which has more than enough room to squirm around in). So, are there any other good reasons, other than more working space, to remove the cap?
 

tpenfield

Moderator
Staff member
Joined
Jul 18, 2011
Messages
17,711
You may not have to remove the cap, but . . . we could use a few more pictures along the way to see what you are seeing. It will certainly help with replies.
 

sms986

Petty Officer 1st Class
Joined
Sep 18, 2017
Messages
334
The wooden cradle. What I did here was build a cradle around the trailer because as you can see, I have no room to move this thing around. I slid a few 2x6's in-between the roller from (close to) front to back and made supports for them. I supported the transom from end to end with a 2x6. All of these sat flush and snug with the hull. I then lowered the trailer jack and deflated the tires until the rollers were off the hull .I made a few supports for the outer chines and put them in place. I then inflated the tires until the supports fit snug.
 

Attachments

  • photo307150.jpg
    photo307150.jpg
    673.5 KB · Views: 15
  • photo307151.jpg
    photo307151.jpg
    592.9 KB · Views: 16
  • photo307152.jpg
    photo307152.jpg
    649.6 KB · Views: 14
  • photo307153.jpg
    photo307153.jpg
    793.7 KB · Views: 14
  • photo307153.jpg
    photo307153.jpg
    793.7 KB · Views: 16

sms986

Petty Officer 1st Class
Joined
Sep 18, 2017
Messages
334
The transom support
 

Attachments

  • photo307153.jpg
    photo307153.jpg
    793.7 KB · Views: 2

sms986

Petty Officer 1st Class
Joined
Sep 18, 2017
Messages
334
Last, the inside of the boat. Let me know if you want more pictures/what you want them of.
 

Attachments

  • photo307154.jpg
    photo307154.jpg
    705.7 KB · Views: 15
  • photo307155.jpg
    photo307155.jpg
    700.7 KB · Views: 15
  • photo307156.jpg
    photo307156.jpg
    742.8 KB · Views: 15

sms986

Petty Officer 1st Class
Joined
Sep 18, 2017
Messages
334
A little bit of advice from my initial go of things:
1. Build a tent for grinding. I covered the entire cap with 5mil throw over plastic and duct taped it the whole way around. I put a small fan in the sunroof and duct taped the shop vac hose to the transom cutout. Every so often I'll cut on the air and the vac to "change the oil" and it's been great. I left the corner open to get in/out and throw it over the side of the boat once I'm in. I've got all of the stringers and bulkheads out, and there isn't even the smell of glass outside the boat. I took some pictures to show you what I mean.

2. To avoid the itch, I doubled up on everything. I put on a pair of hip waders and 5 mil gloves first, followed by one painting suit, followed by a pair of elbow high chemical gloves and a face skin (kind of like a thin ski mask), then another suit, respirator, and goggles. No itch!
 

Attachments

  • photo307157.jpg
    photo307157.jpg
    736.8 KB · Views: 5
  • photo307158.jpg
    photo307158.jpg
    752.4 KB · Views: 5
  • photo307159.jpg
    photo307159.jpg
    685.4 KB · Views: 5

kcassells

Fleet Admiral
Joined
Oct 16, 2012
Messages
8,600
Oh the fun of it! Love those rotted stringers and bulkheads. Looking good.
you may want to raise the exterior cradle a little higher to cover the upper top sides. Once all is out and grinded those areas can flex.
 

sms986

Petty Officer 1st Class
Joined
Sep 18, 2017
Messages
334
I thought about that, but rather than waste more wood what I did was buy 32 3m wall hangers and stuck then in 8 spots across from each other bow to stern. One row of 8 at deck height and one row of 8 about halfway up. I measured them across and recorded. When I go to put the new wood in I can remeasure and adjust if necessary. Going to clean out the hull tonight, then I'll post an update with pictures .
 

sms986

Petty Officer 1st Class
Joined
Sep 18, 2017
Messages
334
Day 2 of digging out foam. Today I decided to work smarter, not harder. How to remove huge sections of foam? An auger. Hand auger, not powered, might I add.
 

chevymaher

Commander
Joined
Mar 29, 2017
Messages
2,915
I used a drywal keyhole saw and a crowbar for the big chunks. Then a wire wheel on a drill. vacuumed it out. If i had it to do over i would do it all with the wire wheel. Alot less work. Yes it is a big mess but your getting that any way you go.
 

sms986

Petty Officer 1st Class
Joined
Sep 18, 2017
Messages
334
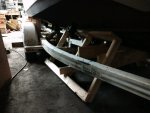
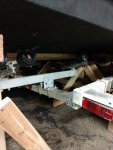
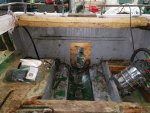
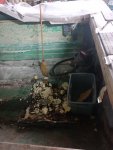
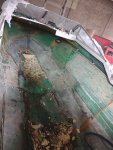
So the end of the long weekend is here, and the hull, minus part of the transom and a little bit of foam, is all gutted. They next opportunity I'll have to work on the boat is in February. I have a few things to figure out before then. First, the outside of the transom is about 1/4" fiberglass, followed by a later of CSM, then the wood. The CSM layer is attached to the wood but not the fiberglass on the other side. My plan for the transom is to rough up the fiberglass on the outside of the transom, then lay down a layer of CSM. I'll coat the mat with resin and sandwich it in with the wood while it's still wet. Next, I'll put in a PB fillet all around the perimeter, tab it in, and encase it in one layer of 1708. Will this be okay? I'm wondering if there's a reason the fiberglass mat on the wood isn't attached to the outside part of the transom.
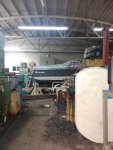
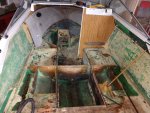
Second, the boat only had a little bit of foam in it .there was a big chunk up front under the lower deck which you can see in the picture. Other than that, there was only foam under the engine kickouts, which are about 1/2 cubic foot each. Will it hurt to foam in a few other sections for more floatation?
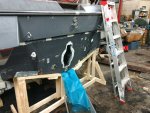
Last, about how long does it generally take to grind out the remaining fiberglass in the hull? I need to figure out whether I need to make a second trip up in February.
​​​​
 

Attachments

  • photo307233.jpg
    photo307233.jpg
    689.1 KB · Views: 9
  • photo307234.jpg
    photo307234.jpg
    900.3 KB · Views: 9
Top