Volvo Penta 5.0 GXI-E - Won't roll over

Donald0039

Chief Petty Officer
Joined
Jun 11, 2022
Messages
402
Look for a 5 part video that discusses in great detail rebuilding a VP 290 drive. The guy that did the videos has "cave" in the name.
 

Scott Danforth

Grumpy Vintage Moderator still playing with boats
Staff member
Joined
Jul 23, 2011
Messages
49,569
I know from firsthand experience, the 290 is easy to rebuild if you have the factory service tools and factory manual. No need for any facetube video nothing
 

jlsmith1000

Seaman
Joined
Jul 23, 2021
Messages
67
Ok, I've picked up a new complete outdrive, going to replace the gimbal bearing, thinking I should do the seal behind the bearing?

Also, can't find 18-9200-4 Sierra grease anywhere even on amazon, is there an equivalent that would work as well?
 

alldodge

Moderator
Staff member
Joined
Mar 8, 2009
Messages
42,064
Ok, I've picked up a new complete outdrive, going to replace the gimbal bearing, thinking I should do the seal behind the bearing?
No, it's there to keep excess grease out or bilge and help keep dust out, can be reused

Also, can't find 18-9200-4 Sierra grease anywhere even on amazon, is there an equivalent that would work as well?
Most all the new gimbal bearings are sealed and no longer greased. Check to make sure your bearing has a hole in the race so it can be greased
 

jlsmith1000

Seaman
Joined
Jul 23, 2021
Messages
67
The more I look at this somebody had this apart these baffles look brand new and the bearing is tight tight tight and there's lots of fresh grease in there. They fixed a bunch of this up before the RTVd the heck out of it. I'm going to replace the hydraulic lines since one of them is leaking for the trim, should that fitting have Teflon tape or no?
 

jlsmith1000

Seaman
Joined
Jul 23, 2021
Messages
67
When I took the lines out of the trim cylinders, there wasn't a small rubber o-ring, looking at the parts diagram on the VP website, there is a small o-ring at the end of the tube.

Also, I would like to replace all four of those lines, and I see videos of folks who do it without removing much of the surrounding stuff, even one that removed the baffles/bellows, which I did. I can still only get enough leverage on 1 of 4 to get them out. Modified a couple of box end wrenches, but not enough leverage to get them to turn. Might be that I have to take that area (can't recall what it's called) apart.
 

Scott Danforth

Grumpy Vintage Moderator still playing with boats
Staff member
Joined
Jul 23, 2011
Messages
49,569
You sure the lines are not SAE inverted flare?
 

ESGWheel

Chief Petty Officer
Joined
Aug 29, 2015
Messages
469
Not sure what that is, so can't say.
its is a 7/16"
For better access that can reach around the solid lines, check these out link
they worked great for me to replace my lines without pulling anything off.
 

Attachments

  • Difficult Access Socket Pic.png
    Difficult Access Socket Pic.png
    213.2 KB · Views: 5

jlsmith1000

Seaman
Joined
Jul 23, 2021
Messages
67
its is a 7/16"
For better access that can reach around the solid lines, check these out link
they worked great for me to replace my lines without pulling anything of
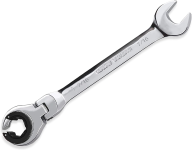
I ordered a set of those, but they won't be in for a few days. I also ordered this, which I'm thinking will do the trick nicely and be in tomorrow.

1688946728463.png
 

jlsmith1000

Seaman
Joined
Jul 23, 2021
Messages
67
Well, I can get all but one of the lines back in the rear. I'm going to have to remove from both sides to pull that out of the middle so I can get to the last flare. Anybody know what size tool that is, and type? Looks like a splined or torx type but a big one.

1689297186118.png
 

jlsmith1000

Seaman
Joined
Jul 23, 2021
Messages
67
Well, might have all the lines on, gave it a go again and no leaks. I think the system needs to be filled with fluid again, then run up and down to bleed air from the system I'm guessing. Now to figure out what type of hydraulic fluid that will use and if it's the same as the fluid in the hydraulic trim tabs, I'm good. Tomorrow we put the outdrive back in.
 

jlsmith1000

Seaman
Joined
Jul 23, 2021
Messages
67
O.M.G. I hate those trim lines. What a total PIA. Finally thought I had them just right, excercised the rams, and leak right side top. Snug it down a bit more, excercise the rams, leak left side bottom, which of course means I have to remove the top first to snug down the bottom cleanly. Excercise again, leak inside at the back of the transom bottom left... Rinse repeat, and finally they don't seem to be leaking. I wonder if that will hold true when it's lifting the weight of the outdrive.

I have the outdrive up there and ready to go in when I get a buddy to stop by in the morning to help me fit it, then finish everything up, and test it out.

Guy at the fiberglass shop that "painted my outdrive" and jacked up all those lines agreed to pay for them and new cylinders as they really were stripped out a bit, so it's nice to see him pony up. They did a phenomenal job on the gelcoat/fiberglass refresh, looks like a new boat, but I regret having them paint the outdrive. I can't see how their painting it would have caused the whole drive to fail and I'll chalk it up to coincidence (maybe?), but they definitely jacked up the trim cylinders.
 

alldodge

Moderator
Staff member
Joined
Mar 8, 2009
Messages
42,064
A friend that works on aircraft at UPS and said Rolls Royce requires triple torque method. Torque loosen, torque ... 3 times. This heats up the fitting slightly for a more secure fit.
 

jlsmith1000

Seaman
Joined
Jul 23, 2021
Messages
67
Well, she's all back together, trim seems to work fine. Had to use a turkey baster to get all of the water/fluid mix from the pump.

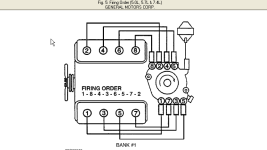
engine starts, but it's rough, I'm thinking I have the (thought I was being careful) plug/firing order screwed up, least that how it seems to be running.

Found this diagram, can anybody confirm that this is correct by chance?
1689443673947.png
 
Top