Transom replacement

i_like_boats

Cadet
Joined
Jun 20, 2021
Messages
7
good morning all. i am in the process of replacing my transom in a 1985 Crestliner Muskie Pro 16'. i got it out already. now im the point to where im almost ready to start on the wood, but got a couple questions.
im going tb be using TB3 and the old timer's mix. not how do i glue wood togeather? screws or weight? i am leaning towards weight. so i do not have to screw screws into the wood. how much glue to use. how to apply? squeeze it on the wood squggly lines and put'em togeaterher, or layer it like sandwich, nice smooth layer then put em togeather?
do i cut out the shape first or cut out the shape of the transom after its all glued togeather... im thinking waiting till the glue dries then cut it out. thank you for all the help.
 

Jeff Fro

Petty Officer 1st Class
Joined
Nov 17, 2017
Messages
202
Welcome to iboats!

Might want to take a bit and do some reading. There is a lot of great info on this site. Take a look at this link to start with.

Linky
 

Scott Danforth

Grumpy Vintage Moderator still playing with boats
Staff member
Joined
Jul 23, 2011
Messages
49,578
use tite-bond 3 to glue the wood together
use drywall screws to clamp - insert on the aluminum side of the piece
once dry, remove the screws
 

JASinIL2006

Vice Admiral
Joined
Feb 10, 2012
Messages
5,674
If you're really worried about water intrusion through the screw holes, you could always fill them with 3M 5200 (or something similar) before installation.
 

Woodonglass

Supreme Mariner
Joined
Dec 29, 2009
Messages
25,927
TB - III. Use screws. Take screws out. Apply 2 liberal coats of Old Timers. The 2 coats of spar varnish. With proper maintenance and care your grandkids will be using that transom
 

i_like_boats

Cadet
Joined
Jun 20, 2021
Messages
7
Screwing together it is. Now when I apply the glue. Do I spread it out like peanut butter or jelly on bread, a nice even coat , or ...?
Also.. do I cut the transoms out first and then glue the together, or glut the two boards together first and then cut the transom out Afterwards?
Is a gallon of O.T. mix going to be enough to coat twice. Rough estimate of the precut board is 6'×2' then I will cut transom out of that.

Thank you for all the help.
 

todhunter

Canoeist
Joined
Sep 15, 2020
Messages
1,311
I cut my pieces out separately and then glued together. Hit the edges with a belt sander after curing to even up the minor differences. You can use a notched trowel to help get an even spread of adhesive. I bought a plastic one on Amazon for about $5 and it worked great.
 

Scott Danforth

Grumpy Vintage Moderator still playing with boats
Staff member
Joined
Jul 23, 2011
Messages
49,578
I usually cut the transom oversized before gluing and trim after. But I have done it both ways

I pour the glu on and use a v-notch trowel to spread the glue, I start clamping in the middle. Most oozes out
 

i_like_boats

Cadet
Joined
Jun 20, 2021
Messages
7
hello all... well start off with. i got a new to me 1985 Crestliner muskie pro 16' last Friday. boat motor runs good. floats. lol. but transom was was shot. and sort of knew it had to be replaced. and here we are. ran to local lumber yard and got all that i think i will need to get the job done. well, all eXcept the plywood. lol. couldn't cut it in half for me till tomorrow.
sort of got another question. anybody got any ideals on how to reach in between the metal of the transom to clean it out?
thank you all for the help and advice and to come...
 
Last edited:

i_like_boats

Cadet
Joined
Jun 20, 2021
Messages
7
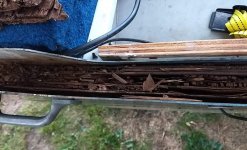
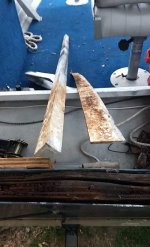
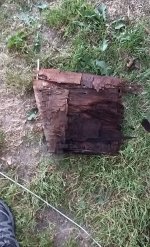
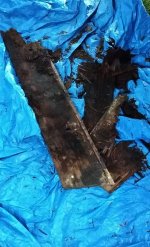
Here it be... Wood still in. And had pieces of angle iron and help support/brace it. Came out in chunks. But hopefully it'll be a little better in the end, with help from this community.received_323968652522375~2.jpegreceived_344982310365868.jpegreceived_819591898995849.jpegreceived_1238083546648197.jpegreceived_888656775056248.jpeg
 

Drivewayboater2

Petty Officer 1st Class
Joined
Aug 21, 2019
Messages
334
Looks like you have your work cutout for you. I’ve heard people use a chain saw or use a long pry bars to remove the rot from the transom. From the pics it looks like the wood should come out pretty easy. Good luck. Take lots a pics.
 

Jeff Fro

Petty Officer 1st Class
Joined
Nov 17, 2017
Messages
202
How does the inside skin attach to the hull? Welded? screwed? Riveted?

Any of them, I would still go with cutting the inside skin. That way you could make sure you got all of the rotten wood out. Then make a splice for re-attaching the inside skin back to the hull.
 

i_like_boats

Cadet
Joined
Jun 20, 2021
Messages
7
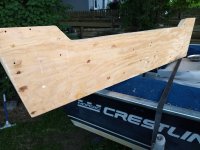
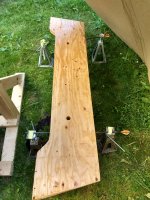
Hi. Not sure if my pics are showing up, or not. I got the transom out. Ended up just using a shop vac for the chunks that didn't come out nicely. Made my template. Got it all cut out and stained yesterday. Made sure that the new transom dry-fitted before staining. And now it's a waiting game. Thanks for all the tips. IMG_20210628_211948541.jpgIMG_20210630_092200798_HDR.jpgIMG_20210630_092200798_HDR.jpg
 

gm280

Supreme Mariner
Joined
Jun 26, 2011
Messages
14,604
Looks like someone is well on their way with this project. Nice layout. And I do believe this someone is into archery as well. But he used to have two straight arrows, but maybe not anymore... Just make sure you are using Titebond III only. It is waterproof after it dries... I will follow your build along if that is okay.
 

i_like_boats

Cadet
Joined
Jun 20, 2021
Messages
7
I Do have a couple extra questions.
* Do I wait the whole 72 hours before putting the 2nd coat of stain on?
* and I seen a post about putting on spar varnish like woodonglass said. But what if it's going in the transom and getting capped, do I still put on the varnish?
 

i_like_boats

Cadet
Joined
Jun 20, 2021
Messages
7
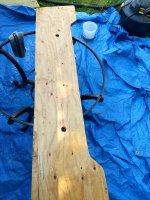
Hey everyone. Thought I'd give an update. Got the Second coat of OT on yesterday. And Monday is spar varnish time. Waiting game kind of stinks. Lol. IMG_20210702_165401941.jpg
 

gm280

Supreme Mariner
Joined
Jun 26, 2011
Messages
14,604
Oh yes the "waiting game" is synonymous with watching paint dry...oh...wait....that is exactly what you are doing... lol Take the needed time and enjoy your efforts after the fact. Thumbs Up!
 
Top