Transom Repair, Caribbean Jaguar.

Wildey81

Recruit
Joined
Dec 25, 2023
Messages
5
Hi All,
Merry Christmas!!!

I’m hoping to get some advice, tips or tricks regarding transom replacement.

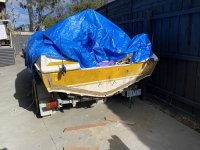
I recently purchased a 1978 Caribbean Jaguar which requires a transom repair, I’ve done some research and confident it’s something I can tackle at home though I’m hoping for some tips and tricks from those with first hand experience.

I’m new to the boating scene so anything would be of valve.

Cheers

NathanIMG_3636.jpeg
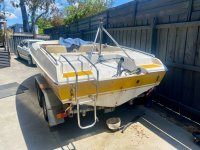
 

airshot

Vice Admiral
Joined
Jul 22, 2008
Messages
5,085
If the transom is bad, the stringers will be worse ! Gonna need to remove floor and get down into the skeleton of the structure. You have your work cutout, time, work and money, it will take a lot of each !! Be sure you have good safety gear, breathing fiberglass dust and fumes can be deadly..
 

Scott Danforth

Grumpy Vintage Moderator still playing with boats
Staff member
Joined
Jul 23, 2011
Messages
49,574
Welcome aboard

All the information and guidance you will need is in the stickies at the top of the forum

4th sticky down has all the DIY links. Read thru links 14, 15, 18, 2, 3, 4a, and 4b in their entirety. Watch every video, look at every picture. It will guide you thru the restoration

Step 1 on your boat was to remove the motor

Step 2 is to derig the boat
 

88 Capri (2022 SOTY)

Master Chief Petty Officer
Joined
Aug 25, 2019
Messages
819
Throughout an endeavor such as this take your time and take lots of pictures and measurements, things can shift during the demolition process.
It just makes things alot easier when putting her back together.
 

stresspoint

Lieutenant Junior Grade
Joined
Sep 19, 2022
Messages
1,045
have you got the screen ? very hard part to come by if its not there as Carrebean boats no longer exist , not sure why as the built a damn good boat for a mass production hull ..
the jaguar was a good boat and was a solid ski boat , not many left on the water these days (guessing you may be in Australia ?).

:) build that transom for a 250 4 stroke and that boat will be as good " if not better " than any modern boat in its class .
 

Wildey81

Recruit
Joined
Dec 25, 2023
Messages
5
have you got the screen ? very hard part to come by if its not there as Carrebean boats no longer exist , not sure why as the built a damn good boat for a mass production hull ..
the jaguar was a good boat and was a solid ski boat , not many left on the water these days (guessing you may be in Australia ?).

:) build that transom for a 250 4 stroke and that boat will be as good " if not better " than any modern boat in its class .

Welcome aboard

All the information and guidance you will need is in the stickies at the top of the forum

4th sticky down has all the DIY links. Read thru links 14, 15, 18, 2, 3, 4a, and 4b in their entirety. Watch every video, look at every picture. It will guide you thru the restoration

Step 1 on your boat was to remove the motor

Step 2 is to derig the boat
Hey Scott, not sure what you mean by stickies?
I’m new to the forum and currently using on the phone.
Will that make a difference?
 

88 Capri (2022 SOTY)

Master Chief Petty Officer
Joined
Aug 25, 2019
Messages
819
In the restoration forum at the top where it says "How tos...."
 

Attachments

  • Screenshot_20231226_073359_Samsung Internet.jpg
    Screenshot_20231226_073359_Samsung Internet.jpg
    805.9 KB · Views: 2

Scott Danforth

Grumpy Vintage Moderator still playing with boats
Staff member
Joined
Jul 23, 2011
Messages
49,574
Hey Scott, not sure what you mean by stickies?
I’m new to the forum and currently using on the phone.
Will that make a difference?
Put your phone on desktop mode.

Every forum has threads stuck at the top like post-it notes. Hence the term "sticky"
 

Wildey81

Recruit
Joined
Dec 25, 2023
Messages
5
Thanks All, I figured that one out.

Next question, my bevel line sits between the 2 bung holes in the rear with a small space in between.

Should I cut and bevel between the 2 bung holes or above both?
 

Scott Danforth

Grumpy Vintage Moderator still playing with boats
Staff member
Joined
Jul 23, 2011
Messages
49,574
I would pull the rub rail and pull the cap. Minimizing the cutting
 

Wildey81

Recruit
Joined
Dec 25, 2023
Messages
5
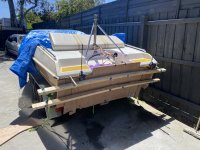
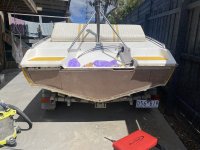
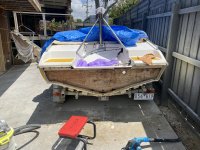
Well, I bit the bullet and went for the external method.

Thank you all for the advise, it certainly made it a little less scary.


just the external patching and flow coat to go, oh and assembly.IMG_3676.jpeg
 

Attachments

  • IMG_3677.jpeg
    IMG_3677.jpeg
    2.8 MB · Views: 18
  • IMG_3667.jpeg
    IMG_3667.jpeg
    2.5 MB · Views: 18
  • IMG_3663.jpeg
    IMG_3663.jpeg
    3 MB · Views: 18

jbcurt00

Moderator
Staff member
Joined
Oct 25, 2011
Messages
25,034
Was the transom you took out 3pcs?

Multiple piece transoms, esp for OBs, is typically less then ideal.

Plywood looks untreated/sealed?

Was transom ply bedded into inner fiberglass transom skin before installation?
 

Drivewayboater2

Petty Officer 1st Class
Joined
Aug 21, 2019
Messages
334
Wow you took the plunge.
I’m with jbcurt….. hope you sealed the wood before installing.

Is the transom flat? Picture with the 2x4’s looks like they are bowed in the center. You might have trouble mounting your engine if it’s not flat.
 

Scott Danforth

Grumpy Vintage Moderator still playing with boats
Staff member
Joined
Jul 23, 2011
Messages
49,574
If the transom is rotten, most likely the stringers are also rotten

Did you drill test them?
 

Wildey81

Recruit
Joined
Dec 25, 2023
Messages
5
Was the transom you took out 3pcs?

Multiple piece transoms, esp for OBs, is typically less then ideal.

Plywood looks untreated/sealed?

Was transom ply bedded into inner fiberglass transom skin before installation?
The transom I took out was one piece.

The new transom support is in 6 pieces, 3 inner and 3 outer with offset joints.

The new inner core consists of:
•2 layers of fiberglass matting and resin.
•15mm treated marine ply(sealed ends) in 3 pieces.
•wood laminating glue.
•15mm treated marine ply(sealed ends) in 3 pieces with offset joints to lower board, laminated to inner layer.
•2 layers of fibreglass Mat and resin with the original outer skin laminate on.

All bolt, bung and drain holes resined after cuting to seal.

Yes the end of the stringer was soft. 1-2inch back in. (I assume this is due the upper tub drain being the source of the leak) I managed to dig out the soft bits and resin the tips with the first coat, not ideal. But it’s summer here and I’m keen to put her in the water.
 
Top