Transom issue

SHSU

Lieutenant Junior+Starmada Splash Of The Year 2019
Joined
Mar 8, 2017
Messages
1,725
Will a quart be enough to seal the transom? I don't want to spend too much and get more than I need.

I have seen people say they have just used a quart but got 1/2 gallon to be sure they had enough. Not sure how long it will keep, but if you have extra may be able to use it during your winter restore. Where you getting the epoxy? Sourcing it locally?
 

ezmobee

Supreme Mariner
Joined
Mar 26, 2007
Messages
23,767
A quart would be pushing it (at least with the thick Clark Craft epoxy I used).
 

EchoNovember

Petty Officer 1st Class
Joined
May 25, 2017
Messages
315
I have seen people say they have just used a quart but got 1/2 gallon to be sure they had enough. Not sure how long it will keep, but if you have extra may be able to use it during your winter restore. Where you getting the epoxy? Sourcing it locally?

I'm trying to find it anywhere. I can't get faster shipping on iBoats than standard value shipping, I can't get it off Amazon before the 27-29th, with leaves me 1-3 days to seal the wood and put it all back together, and I am trying to source it locally without breaking the bank. West Marine has it, but for $50/quart of the resin, and $50/quart of the hardener...

Why can't I use Gluvit to seal the transom? Heck, at this point I am getting ready to use Thompson's Water Seal and calling it good...
 

SHSU

Lieutenant Junior+Starmada Splash Of The Year 2019
Joined
Mar 8, 2017
Messages
1,725
I'm trying to find it anywhere. I can't get faster shipping on iBoats than standard value shipping, I can't get it off Amazon before the 27-29th, with leaves me 1-3 days to seal the wood and put it all back together, and I am trying to source it locally without breaking the bank. West Marine has it, but for $50/quart of the resin, and $50/quart of the hardener...

Why can't I use Gluvit to seal the transom? Heck, at this point I am getting ready to use Thompson's Water Seal and calling it good...


Many people have sealed their wood with paint or other means. It will last you a couple years. Just need to decide on what you plan on doing...

With that said, going out on a limb here... You could just cut to size and use it for the trip and then dry out and reseal when you get back. I know many people will say not advisable and I would tend to agree; however, the amount of time it will have water and the ability for it to dry before final sealing is something you can think about. In the end, I think you might be pushing it and $30 bucks for CDX from a big box store for a weekend with a new transom and then doing a new one in the winter would be fine for me.
 

EchoNovember

Petty Officer 1st Class
Joined
May 25, 2017
Messages
315
We just picked up West System epoxy from our local West Marine store...at full price. We're picking up the plywood tomorrow night and then pulling the motor off to get this party started.
 

SHSU

Lieutenant Junior+Starmada Splash Of The Year 2019
Joined
Mar 8, 2017
Messages
1,725
We just picked up West System epoxy from our local West Marine store...at full price. We're picking up the plywood tomorrow night and then pulling the motor off to get this party started.


Don't forget lots of Pics!!!!!

You decide on how you are going to secure the two peices together? Tightbond III with a lot of screws?
 

EchoNovember

Petty Officer 1st Class
Joined
May 25, 2017
Messages
315
Well, we picked up two 10 oz tubes of 5200. $20/each. Damn... Oh, and then I read the label when I got home. "Must use within 24 hours of breaking the inner seal." We were going to use it to glue the pieces together, now I am thinking not. Looking back, not sure why I thought about using 5200 to glue them together... I think the idea was using a tube and a half to glue them together, and then later use the rest to seal the splashwell to the transom. Can't do that if the stuff is done in 24 hours in the tube.

Going to tuck the tubes away and use them during restoration and pick up a smaller 3oz tube to use on the splashwell. Probably going to us the Tightbond III as I have nothing else in mind and I'll go with your idea on that. Also going to pick up a couple of plastic spreaders. One to spread the glue out somewhat evenly, and the other to smooth any runs or sags in the epoxy.

Definitely doing screws. Going to do them from both sides, too. Going to using 1 inch or 1 1/4 inch screws to get a nice bite. Debating stainless steel or aluminum. Or, since they will be sealed in epoxy, just going with cheap wood screws to save cost as they aren't doing much more than holding the pieces together until the glue sets up.

Maybe use this stuff?


EchoNovember

Petty Officer 1st Class
Joined
May 25, 2017
Messages
315
I'm kidding of course, I was just reminded of the commercial while thinking about adhesive. I'll be picking up titebond III. I will be drilling all of the needed holes before I coat with epoxy, and I will be using 5200 on every single bolt and screw going through or into the transom.
 

EchoNovember

Petty Officer 1st Class
Joined
May 25, 2017
Messages
315
Now to continue spamming my own thread...

Looking at getting these to replace the existing transom eyes and to use for towing skiiers and a tube. Or a disabled bolt.

https://www.amazon.com/SeaSense-Bowith-Stern-Stainless-2-Inch/

The shanks are 3 - 9/16" long, so I am planning on using scrap leftover from the transom to double up the thickness of the transom behind the eyes in as large as I have room for. Aiming for 4 inches around the holes, but we'll see what kind of room I have to work with. I was hoping to use a 1/4'" to 3/8" thick steel plate for added strength and use less depth into the boat, but I can't think of where to find that off the top of my head. Not worried too much about corrosion of it as it would also be epoxy coated and 5200 sealed.
 

ezmobee

Supreme Mariner
Joined
Mar 26, 2007
Messages
23,767
Lowes may have smallish pieces of diamond plate with their other metal stock
 

SHSU

Lieutenant Junior+Starmada Splash Of The Year 2019
Joined
Mar 8, 2017
Messages
1,725
Well, we picked up two 10 oz tubes of 5200. $20/each. Damn... Oh, and then I read the label when I got home. "Must use within 24 hours of breaking the inner seal." We were going to use it to glue the pieces together, now I am thinking not. Looking back, not sure why I thought about using 5200 to glue them together... I think the idea was using a tube and a half to glue them together, and then later use the rest to seal the splashwell to the transom. Can't do that if the stuff is done in 24 hours in the tube.

5200 isn't designed for this kind of application. I can't speak to the PL Loctite for this kind of work. I have used similar products (Liquid nail) for making outdoor grills and such. Tightbond III is how I would lean as I have used and know whats its capable of. Also, you can find where other people have used it as well. Don't forget you only have about 10 minute working time. I always find it shorter than what it says on the bottle

Also going to pick up a couple of plastic spreaders. One to spread the glue out somewhat evenly, and the other to smooth any runs or sags in the epoxy.

I use an ink roller to smooth out my Tightbond on projects. Don't forget to add it to both sides liberally and roll/smooth it out.

Good link below from Woodonglass on how he does stuff
http://forums.iboats.com/forum/boat-...-w-pics/page42


Definitely doing screws. Going to do them from both sides, too. Going to using 1 inch or 1 1/4 inch screws to get a nice bite. Debating stainless steel or aluminum. Or, since they will be sealed in epoxy, just going with cheap wood screws to save cost as they aren't doing much more than holding the pieces together until the glue sets up.

I am thinking of using some standard wood screws. Just make sure not to put them anywhere you need to drill holes later if you don't remove them.


Maybe use this stuff?


LOL, if I had a neighbor do that I think someone would have their hand and mouth glued shut

The shanks are 3 - 9/16" long, so I am planning on using scrap leftover from the transom to double up the thickness of the transom behind the eyes in as large as I have room for. Aiming for 4 inches around the holes, but we'll see what kind of room I have to work with. I was hoping to use a 1/4'" to 3/8" thick steel plate for added strength and use less depth into the boat, but I can't think of where to find that off the top of my head.

Agree with EZ on this one, you can find some aluminum plates at the big box store. I wouldn't use steel. Also you can use bigger washers to disperse the distribution
 
Last edited:

ezmobee

Supreme Mariner
Joined
Mar 26, 2007
Messages
23,767
Yeah don't laminate with 5200. Used either Titebond III or just use the epoxy you're sealing with.
 

EchoNovember

Petty Officer 1st Class
Joined
May 25, 2017
Messages
315
5200 isn't designed for this kind of application. I can't speak to the PL Loctite for this kind of work. I have used similar products (Liquid nail) for making outdoor grills and such. Tightbond III is how I would lean as I have used and know whats its capable of. Also, you can find where other people have used it as well.

Yeah, that's why I am going to squirrel away the tubes to use later on the restore. $20 locally was $5 cheaper than Amazon, and $10 cheaper than Home Depot... I did more research and I am going to stick with Titebond III unless someone tells me PL Premium is better.

I use an ink roller to smooth out my Tightbond on projects. Don't forget to add it to both sides liberally and roll/smooth it out.

I'm planning on using a trowel like what is used for grout on tile floor jobs. Should be able to get a nice even spread edge to edge.

Like this guy (also where I got the idea for the PL Premium):


I'll have to look into that one a little later.

I am thinking of using some standard wood screws. Just make sure not to put them anywhere you need to drill holes later if you don't remove them.

Why? We have drill bits meant for metal. :p

Agree with EZ on this one, you can find some aluminum plates at the big box store. I wouldn't use steel. Also you can use bigger washers to disperse the distribution

I was starting to lean toward bigger washers to keep things easier, if I can't find anything else.
 

EchoNovember

Petty Officer 1st Class
Joined
May 25, 2017
Messages
315
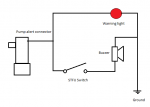
While the transom is off I am thinking of putting in an automatic bilge pump and being lazy and leaving the manual one in. Problem is I want to be really lazy and just use a T connect with a check valve to hook it into the existing output hose. I am going to go ahead and call myself out on that one and say it's not a good idea as the hose can only handle so much water flow and pressure, and if both were running I wouldn't get the max output, and could even burn one out.

Sooo... I'll be putting in the automatic one and wiring in the manual override as well. I'll also be putting in the light and buzzer circuit below. My Paint skills are legend in some circles... :p

Warning wiring.png

If there is no alert connector, I'll have to come up with something...

Part of the restore I think will involved an added circuit hooked to a float switch higher up then the pump. Like a catastrophic hull failure indicator alerting me that the water level in the bilge is higher than the main pump and it's probably overwhelmed so I should probably prepare to abandon ship. Oh, and of course wire it to a crash pump that can also be manually activated. We'd love to take it out on Lake Superior, but we need everything in place to ensure our safety and to buy us maximum time in an emergency. I like being over-prepared. I see it as a few extra bucks to buy a little more peace of mind about my family's safety.

For now, the automatic bilge pump, the above circuit, and call it good.
 

EchoNovember

Petty Officer 1st Class
Joined
May 25, 2017
Messages
315
Okay, so I looked at the automatic bilge pumps and after reading many reviews that they are just a bit risky. I'll grab my existing pump and see what flow rate it has, and if its less than 700 I'll pick up a bigger one. Either way, I'll be installing a float switch if I have the time to and wiring up a warning light and buzzer. At this time, I'll be wiring those up at the stern instead of the console so I am not spending a lot of time running new wires to the helm.
 

JASinIL2006

Vice Admiral
Joined
Feb 10, 2012
Messages
5,674
Yeah, that's why I am going to squirrel away the tubes to use later on the restore. $20 locally was $5 cheaper than Amazon, and $10 cheaper than Home Depot... I did more research and I am going to stick with Titebond III unless someone tells me PL Premium is better.


I'm planning on using a trowel like what is used for grout on tile floor jobs. Should be able to get a nice even spread edge to edge.

Titebond III is as waterproof as the glue used in the exterior plywood, which makes it good enough, in my book. It is not terribly viscous, so spreading with a trowel might be overkill. Using a chipbrush to coat both sides is plenty good.

I used deck screws to hold my transom boards together, but I removed them and filled the holes after the Titebond had set. I didn't want a bunch of screws in the transom in case I needed to drill a hole or something later; I didn't want to worry about hitting a screw or having them rust. I filled the holes with thickened poly resin (because I was glassing my transom in, and I had poly resin on hand). If you're coating with epoxy before installing in the boat, I'd just make sure all the screw holes get saturated really well. That should remove any concern about water intrusion. (You could even shoot some epoxy in there with a syringe, if you were worried about it.)

Good luck!
 

Woodonglass

Supreme Mariner
Joined
Dec 29, 2009
Messages
25,927
IMHO you don't have to fill the screw holes on the backside of the transom. During installation you'll be applying a liberal coat of PB which will fill the holes when you clamp it down. The front side you WILL need to apply some PB to the holes to avoid air pockets. This is easy enuf cuz you'll have some squeeze out around the edges and you can use it to fill the holes.
 

EchoNovember

Petty Officer 1st Class
Joined
May 25, 2017
Messages
315
IMHO you don't have to fill the screw holes on the backside of the transom. During installation you'll be applying a liberal coat of PB which will fill the holes when you clamp it down. The front side you WILL need to apply some PB to the holes to avoid air pockets. This is easy enuf cuz you'll have some squeeze out around the edges and you can use it to fill the holes.

This is an aluminum boat, I thought I didn't need PB for the install...
 
Top