Time to re-upholster - Formula 330 SS

tpenfield

Moderator
Staff member
Joined
Jul 18, 2011
Messages
17,730
Done . . .

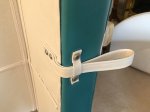
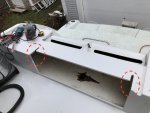
Here is the helm seat base. Took all day to stitch it together, but it is done.
.
IMG_4222.JPG
.
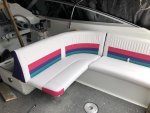
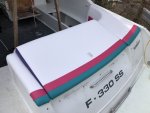
I went the the additional green.
.
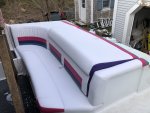
Here are the 3 helm seat pieces all put together.
.
IMG_4230.JPG
.
IMG_4232.JPG
.
I might make a few tweaks on some of the seats, but that is it for the cutting and sewing. Next weekend The Admiral and I will be takings the seats to the summer house in preparation for installing them. The Admiral also gets her dining room back after we clean up the huge mess that was made throughout the project.

:thumb:
 

tpenfield

Moderator
Staff member
Joined
Jul 18, 2011
Messages
17,730
Thanks guys. :thumb:

I'll post some installation pics over the next few weeks. Not sure when the weather will be right for installation :noidea:
 

gm280

Supreme Mariner
Joined
Jun 26, 2011
Messages
14,597
All I can say is, you are a master in my opinion. I don't think I will be anywhere close to your abilities doing my little live well cushion. Like I said before, I have great professional ideas with a totally newbie skill set. Don't think they will mix well together. But you did an amazing job!!!
 

tpenfield

Moderator
Staff member
Joined
Jul 18, 2011
Messages
17,730
Quick Update -

I'll be installing the boat seats over the next few days. Not sure how long it will take, but I have Wed - Fri off from work. So, hopefully 3 days will be enough. I'll post some pictures as I make progress.
 

tpenfield

Moderator
Staff member
Joined
Jul 18, 2011
Messages
17,730
Slow going today as I was taking care of fastener details.

I added a belt loop to hold the pull strap for the aft hatch in place. . .
.
Click image for larger version  Name:	IMG_4264.JPG Views:	1 Size:	113.2 KB ID:	10848876
.
In general, this helm seat is a PITA to assemble . . . and it weights a couple hundred pounds all said and done :facepalm:

I did manage to get one of the seats in though . . . here is the port side settee.
.
Click image for larger version  Name:	IMG_4267.JPG Views:	1 Size:	107.3 KB ID:	10848877
.
I'll be at it tomorrow with a few more seat installations. It looks like I'm going to need to do some fiberglass cutting & re-glassing on the aft seat, because the support brackets that I added do not have enough clearance when installed.

It looks like installing the seats is going to take some time, but should be done next week.
 

Attachments

  • IMG_4264.JPG
    IMG_4264.JPG
    113.2 KB · Views: 3

Scott Danforth

Grumpy Vintage Moderator still playing with boats
Staff member
Joined
Jul 23, 2011
Messages
47,612
Looking great

sorry to hear about the mods at installation....... Im currently in the middle of that myself. mainly because i tried to force the port and starboard side to be the same exact dimensions.....

either way, it looks great Ted.
 

tpenfield

Moderator
Staff member
Joined
Jul 18, 2011
Messages
17,730
Progress Update . . .

It has been slow going, more so than I had anticipated.

I had to make some cuts in the engine hatch/rear seat to accommodate the brackets that I installed on the rear seat backrest/hatch.
.
IMG_4273.JPG
.
The area of the hatch lift support has broken through the plywood at some point in the boat's previous ownership. I'll take some time and fix it better than it is currently.
IMG_4276.JPG

.
That's all for now. Next steps are to secure the U-shaped seating pieces and then onto the helm seat.
 

Attachments

  • IMG_4270.JPG
    IMG_4270.JPG
    104.3 KB · Views: 9
  • IMG_4271.JPG
    IMG_4271.JPG
    127 KB · Views: 9
  • IMG_4272.JPG
    IMG_4272.JPG
    185.9 KB · Views: 9
  • IMG_4269.JPG
    IMG_4269.JPG
    175.2 KB · Views: 8
  • IMG_4268B.jpg
    IMG_4268B.jpg
    168.7 KB · Views: 9
  • IMG_4275.JPG
    IMG_4275.JPG
    185.1 KB · Views: 9
  • IMG_4274.JPG
    IMG_4274.JPG
    151.1 KB · Views: 9

MRS

Commander
Joined
Jul 10, 2005
Messages
2,555
Tpenfield, Nice work I have a question for you I do my own also but not near as nice as yours only do single colour material.
The staple gun I use is a electric arrow stapler with arrow staples seems to bend more staple than it puts in correctly.
What staple gun are you using or maybe I need better staples. I just did my quad. seat yesterday and it bent more staples than it put in straight.
 

Scott Danforth

Grumpy Vintage Moderator still playing with boats
Staff member
Joined
Jul 23, 2011
Messages
47,612
Tpenfield, Nice work I have a question for you I do my own also but not near as nice as yours only do single colour material.
The staple gun I use is a electric arrow stapler with arrow staples seems to bend more staple than it puts in correctly.
What staple gun are you using or maybe I need better staples. I just did my quad. seat yesterday and it bent more staples than it put in straight.

use monel staples, and make sure you have pressure over 80 psi
 

tpenfield

Moderator
Staff member
Joined
Jul 18, 2011
Messages
17,730
MRS I have a sailrite pneumatic staple gun - 80 psi air supply. Using 1/2" Stainless steel staples (monel is fine too) :)
 
Last edited:

MRS

Commander
Joined
Jul 10, 2005
Messages
2,555
MRS I have a sailrite pneumatic staple gun - 80 psi air supply. Using 1/2" Stainless steel staples (monel is fine too) :)

Thank you looks like I will dump the electric an go with a pneumatic gun. Working on a cover for my outboard now no staples needed for this.:) Thanks again.
 

Scott Danforth

Grumpy Vintage Moderator still playing with boats
Staff member
Joined
Jul 23, 2011
Messages
47,612
FWIW......I have been using a pneumatic Arrow gun, and monel staples. on my side consoles I did a layer of CSM and 1708 over the wood. that was the only panels I had issues with a few staples not wanting to shoot thru the fiberglass.
 

MRS

Commander
Joined
Jul 10, 2005
Messages
2,555
FWIW......I have been using a pneumatic Arrow gun, and monel staples. on my side consoles I did a layer of CSM and 1708 over the wood. that was the only panels I had issues with a few staples not wanting to shoot thru the fiberglass.

Scott, other than that it works good for you? I just go thru vinyl and into the plywood or plastic Thanks for the reply.
 
Top