Time for Riser & Manifold > VP or Barr?

ESGWheel

Petty Officer 1st Class
Joined
Aug 29, 2015
Messages
206
2005 VP 5.0 GXi-E with about 750 hrs. First 5 years a salt boat but stored on a rack, not dock. Last 10 years I have owned it and all freshwater lakes. Manifold and risers never done and was making me anxious. So, this year I got a set of gaskets to pull the risers and check them out. If all good, reinstall. If not, get new.

Pics below of the port riser and manifold. While no ‘breakouts’ that I could see, there certainty is a lot of material clogging up the passages so I assume the walls are getting thin. Thus, I am going with getting new.

I have read that either Barr or VP are the way to go, with Barr being able to save some coin. Is the general opinion that either are still acceptable? Maybe better asked: anyone with bad experiences with Barr?

Thanks for your feedback.
 

Attachments

  • Manifold Pic 1.png
    Manifold Pic 1.png
    407 KB · Views: 17
  • Riser Pic 3.png
    Riser Pic 3.png
    233.3 KB · Views: 17
  • Riser Pic 2.png
    Riser Pic 2.png
    385.4 KB · Views: 16
  • Riser Pic 1.png
    Riser Pic 1.png
    195.5 KB · Views: 17

cyclops222

Petty Officer 1st Class
Joined
Mar 21, 2024
Messages
331
You have exceeded the time & hours of the items. Places you can not see ? Could be holes started already. You are right to change them now.
 

Scott Danforth

Grumpy Vintage Moderator still playing with boats
Staff member
Joined
Jul 23, 2011
Messages
47,843
Barr is the casting house that VP uses
 

Scott06

Vice Admiral
Joined
Apr 20, 2014
Messages
5,783
Barr is generally regarded as on par with OEM, as mentioned they do castings for some OEMs
 

Lou C

Supreme Mariner
Joined
Nov 10, 2002
Messages
12,009
Agreed I’d at least replace the elbows. You can test the manifolds off the engine on a bench by filling with Acetone (careful, flammable) and see if any wet spots appear at the exhaust ports that mate up to the cyl head. If you see a lot of flaking in the water passages in the manifolds probable best to replace even if there are no leaks. I used Barr on my 4.3 when I did the top end overhaul some years back I’ll going to take them apart this fall and at least replace the elbows. Over the years I have changed the exhaust on this engine 3 times averaging 5/6 years between replacements. Never had a leak and 100% salt water.
 

ESGWheel

Petty Officer 1st Class
Joined
Aug 29, 2015
Messages
206
Lou, thanks and will be doing both the risers and manifolds. Got off the other riser today but one of the bolts snapped off so that confirmed by choice. Will do the test on the new as suggested.

My current decision is around the rubber boots. They seem in good condition but at 20 years old, I am thinking of replacing. Same cost dilemma with OEM vs. After Market parts > there is a huge difference. Any thoughts on the boots?

Also saw a trick on utube of using 2 threaded studs to act as support rods for the manifolds so going to cut off the heads of a couple of the old riser bolts since they are the same thread. Fortunately, all the manifold bolts came loose without issue.
 

Lou C

Supreme Mariner
Joined
Nov 10, 2002
Messages
12,009
If your rubber hoses are cracking I’d replace them if not, you can keep using them. The headless bolt trick works great for installing manifolds.
 

cyclops222

Petty Officer 1st Class
Joined
Mar 21, 2024
Messages
331
2 headless studs are great when removing or installing a starter motor or a transmission.
 

ESGWheel

Petty Officer 1st Class
Joined
Aug 29, 2015
Messages
206
Barr Risers and Manifolds came today. Sweet! While I will check for both porosity and flatness, I am looking for best practice on the mounting face. Each of the items has it mounting face painted and each face as some of it flaking off. See pic for an example. I am inclined to have an unpainted mounting surface as that just makes sense to me.

What is the best practice out there: remove the paint, touch up the paint or leave as is? Note the process of paint removal will be followed by still ensuring a flat surface.

Barr Manifold with paint flaking off.png
 

Scott Danforth

Grumpy Vintage Moderator still playing with boats
Staff member
Joined
Jul 23, 2011
Messages
47,843
I would leave as is. The paint will become one with the gasket in a harmonious union for the life of the gasket or riser, which ever one dies first.

If it bothers you remove the paint or grab a can of krylon

Seriously..... It doesn't matter on that surface
 

Lou C

Supreme Mariner
Joined
Nov 10, 2002
Messages
12,009
When I did mine I carefully used a razor scraper to get the paint off.
 

dubs283

Vice Admiral
Joined
Jul 27, 2005
Messages
5,283
Lacquer thinner on a terry towel, wipe paint off

Or leave it, makes no difference on the sealing surface with the gasket in place
 

ESGWheel

Petty Officer 1st Class
Joined
Aug 29, 2015
Messages
206
Thanks all. Any thoughts on using some sort of gasket sealer between the riser and manifold? I have seen that some use Permatex 80019 Aviation Form-A-Gasket No. 3 Sealant. Thanks again.
 

Lou C

Supreme Mariner
Joined
Nov 10, 2002
Messages
12,009
I used that Permatex on mine when I installed them back in ‘17.
 

Jmunk

Petty Officer 1st Class
Joined
Jan 31, 2007
Messages
264
When I purchased new Barr manifolds I asked them about the paint on the gasket surface, they said to remove with razor blade. I have a carbon gasket scraper, I used that.
 

ESGWheel

Petty Officer 1st Class
Joined
Aug 29, 2015
Messages
206
Due to a knee injury that has kept me grounded, I have been delayed in getting back to this until today. Normally we would be putting the boat in the water tomorrow, but that is not happening. Perhaps next weekend if all goes well.

And so far, it has > I was able to pressure test the Barr Manifolds with no issues. I used a plate I made at work and then applied ~ 30 PSI for over 10 minutes > no bubbles whatsoever. Pics below of the set up.

For the Risers there does not appear to be an easy way to pressure test them. And while I guess I could fill them with acetone by putting on a plate and filling in the outer area of the outlet (i.e. fill the water jacket with acetone and watch its level over an hour or so), I am thinking just install.

Any need to test the new Barr Risers and if so, how?
Thanks.

Manifold Pressure Test.pngManifold Pressure Test Plate.png
 

ESGWheel

Petty Officer 1st Class
Joined
Aug 29, 2015
Messages
206
Finally!
I was able to get back to the boat toady to finish off the Manifold and Riser job. While all ended up well, great in fact, there were a few lessons learned. So, posting here for others if they undertake this job. Overall, it’s a straightforward job with no special tools needed but they are helpful.

Special Tools I used (1) thread chasers / cleaners. Not a tap but like a tap, these chasers are meant to clean up threads not cut new ones. I chased all the holes > the bolt holes in the heads as well as the new manifold where the riser bolts go. Even though its new, I wanted to make sure no issues in manufacturing as well as pull out any paint that is in there and will throw off the torque values. (2) hose removal tools, see link. I got these some time ago and love them. Instead of jamming a screwdriver under the hose to break the seal, these tools are made for this and much easier to use. (3) NPT taps. I do not have NPT chasers so I used my taps to check the various NPT holes being careful to not go deeper. (4) Threaded rods. This is a MUST IMO. I made mine from the old Riser bolts which are the same thread as the Manifold bolts. I just cut off the head and beveled it some. Was a perfect length. Need 2. You thread these into a couple of removed Manifold bolt holes both to remove and install the manifolds. NO WAY I could have done this job by myself without these. (5) Low value torque wrench. The torque values are 26 Ft-Lbs for the Manifold and 18 Ft-Lbs for the riser. Using a 200 Ft-Lb torque wrench is not going to cut it. Need one is the 0 to 50 Ft-Lb range.

Tips: to clean up the heads, I stuffed a paper towel in each exhaust port to keep out the crap. I left in the spark plugs. I also put a rag over the exposed Y=Pipe to keep stuff out. Cleaning out the bilge of all the scrapping debris was an absolute necessity. I also put painters’ tape on the new Manifolds with the word: RAG! to highlight that I needed to pull out the towels before installing the Manifolds. It’s also easy to forget that there are some clips and components that go under the Manifold and Riser bolts. You get it all installed and then realize you need to take out a bolt to put a clip on it. So, a hand drawn mock up of what goes where was used to keep track of that and referred to during install.

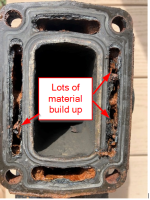
I used the Barr supplied gaskets and bolts except the Manifold bolts. I cleaned up (including chasing the threads) the original ones because I preferred the flange head style vs what was supplied (bolt with a lock washer). The Riser bolts have both a flat and lock washer. The Barr gaskets were of good quality, the Manifold gasket was of the Composite type > two layers of fiber material and a metal center layer. After cleaning the heads, I had about a 2 to 3 thou gap due to rust corrosion. See pic. The Manifold gasket has no external leaks. I assume it also filled this gap so no cylinder-to-cylinder leakage.

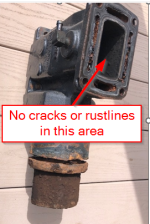
I did remove all paint on the Barr Risers and Manifolds mounting areas. I then checked the flatness of the Manifold (the face that bolts to the head) on a calibrated granite block and could not get under any area with a 2 tenths (0.0002”) feeler. Sweet!

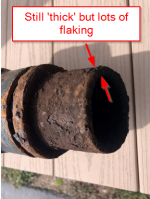
I did buy After Market (AM) rubber couplers with the intention of replacing them. Measurement of the thickness showed the AM were slightly thicker so was feeling good about them. When going to install on the Y Pipe I noticed a loose fit, not good. Checking them to the OEM ones I discovered the Y Pipe couplers are different diameters on either end. And was the same with the AM ones. In other words, they only go on one way > they cannot be flipped. Since we are already supposed to be on the water, I did not take the time to measure the pipes. So, I resorted to re-using the OEM ones until I could figure out more about this.

Question: are the elbows and Y Pipe diameters different such that the coupler only goes on one way? They are not marked ‘this end up’.

Another surprise to me was I could not figure out how to install the exhaust elbow with its two rubber couplers (one to the Riser, other to the Y-Pipe) without removing the Riser. So, I settled on attaching the boot to the Riser, and elbow pipe to that boot and then the Y-Pipe boot to the other end of the elbow pipe. And then carefully slid it onto the Y-Pipe while getting the Riser set on the Manifold. I did this without the gasket in place, fearful I would nick it or push it into the bilge. Once the Riser was in place, I lifted it slightly and slipped in the gasket. Perhaps pushing the Riser to elbow boot all the way back on the elbow would have worked, unsure, as I was tired and simply needed to get it done. I did not use gasket sealer on the Riser gasket.

I had planned on replacing all the oil, water, and power steering hoses (including the PS cooler) when I did this job as pulling the Manifolds and Risers provides a lot more access, but due to my injury it put my schedule off. So, I will take that on next year and simply pull the Manifolds and Risers again.

Head Corrosion.png
 

Donald0039

Petty Officer 1st Class
Joined
Jun 11, 2022
Messages
353
I would use black Permatex as a gasket sealer. The less the better. Too much and some can ooze into the passages and block the flow. You will no see the problem.
 
Top