Thermostat housing hole.

Sea Rider

Supreme Mariner
Joined
Sep 20, 2008
Messages
12,345
Congrats, excellent news and job done. The fuel leak was due to having such an awful internal carb mess. It would be the last straw for that to continue even though having changed so many carb parts LOL!! Did you happen to go for the 1 out turn on all 3 carb's pilot screws ?

Happy Boating
 

Douglasdzaster

Petty Officer 1st Class
Joined
Sep 11, 2020
Messages
315
Congrats, excellent news and job done. The fuel leak was due to having such an awful internal carb mess. It would be the last straw for that to continue even though having changed so many carb parts LOL!! Did you happen to go for the 1 out turn on all 3 carb's pilot screws ?

Happy Boating
Actually I did 1 1/2 turns and have not had to touch them. I ran it for a good while checking temperature etc. I want to get it on the water and see how it does under a load. The new epa approved fuel tanks ( which is all that’s available here) are a real heavy plastic but will not vent until it reaches over 5psi. So it swelled like a ballon which they say is normal. When you’re stopped(with the motor off) on the water the pressure will flood you’re carburetors. So I put a shut off valve in line to prevent it. When I shut it down i unplugged the fuel line and let it run the fuel out of the carburetors. Seems to be some controversy about doing that but everyone that says they do it don’t seem to have any problems. Finished up installing the fish finder and wiring for the new led navigation lights. I’ll be adding some led lights inside eventually. I’m using a sealed lead acid battery agm deep cycle like the kayaks use for powering everything but the trolling motor. So far I’m only drawing just under 1 amp. The battery is small and light and my back loves it. Lol Great for a boat like mine with a pull start. Battery for the trolling motor is another story since it draws up to 50amps.
 

Sea Rider

Supreme Mariner
Joined
Sep 20, 2008
Messages
12,345
If you use your boat frecuently don't need to run the carbs dry, the issue is that sometimes will not know when will be your next outing. Always run my motors carb's dry after each outing taking avantage that while the motor drops dead can flush it nicely for at least 5 minutes at fast idle rpm.

Luckily don't have environmental regulations so use the standard vented tanks, but seen some boaters with new motors suffering those mentioned issues. Don't forget to install the induction tach at a close resting position as to read the rpm numbers well.

Happy Boating
 

Sea Rider

Supreme Mariner
Joined
Sep 20, 2008
Messages
12,345
Yam's Multi Carbs Idle Balancing.-

As wanted to know if 2 stroke Yam motors are factory delivered with equal number of pilot’s screws in-out turns decided to use a guinea pig motor which still retains their factory settings to check that out. It’s a 6 year old Yamy that powers a combo used to follow skin divers while spearfishing in non calm waters cond mostly at idle, fast idle rpm for long time periods.

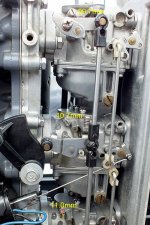
A vernier’s depth stick was placed at each pilot’s screw 12 o'clock head position to measure each individual height distance. Upper carb dialed 09.6mm, middle 10.6mm and lower 11.00mm settings, don’t know how many in-out turns those numbers equates to. Removed all plugs to verify the operational contrast between the uneven distance of each pilot's screw and its corresponding spark plug.

Multi Carbs Alignment.jpg

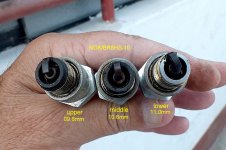
This is the plug’s condition found after less than 30 run hours from brand new installed. What’s strange is that first plug with pilot screw set at 09.7mm (lean side) it’s way fouled compared to second/third plugs set at a much richer side. Isn’t known at the moment if all carb’s butterflies remains fully closed at idle resting position which could account to increase the plug’s fouling condition ?

NGK Fouled Plugs.JPG

Although the motor runs healthy all carbs must rest at an awful internal condition with jets, nozzles, needle’s valve seats and pilot’s screws severely gunked up due to not running carbs dry for long years of usage soon after returning to terra firme. When all carbs are restored to mint clean factory conditions and pilot’s screws set to one in-out turns all spark plugs should come out darkened to a medium light chocolate look. A close top cylinder inspection with a flash light showed the piston’s head to have carboned-up way more that middle and lower cylinders. This motor will benefit having a long decarbonization procedure with CRC engine tune up prior its next departure.

Happy Boating
 

Douglasdzaster

Petty Officer 1st Class
Joined
Sep 11, 2020
Messages
315
Yam's Multi Carbs Idle Balancing.-

As wanted to know if 2 stroke Yam motors are factory delivered with equal number of pilot’s screws in-out turns decided to use a guinea pig motor which still retains their factory settings to check that out. It’s a 6 year old Yamy that powers a combo used to follow skin divers while spearfishing in non calm waters cond mostly at idle, fast idle rpm for long time periods.

A vernier’s depth stick was placed at each pilot’s screw 12 o'clock head position to measure each individual height distance. Upper carb dialed 09.6mm, middle 10.6mm and lower 11.00mm settings, don’t know how many in-out turns those numbers equates to. Removed all plugs to verify the operational contrast between the uneven distance of each pilot's screw and its corresponding spark plug.

View attachment 334881

This is the plug’s condition found after less than 30 run hours from brand new installed. What’s strange is that first plug with pilot screw set at 09.7mm (lean side) it’s way fouled compared to second/third plugs set at a much richer side. Isn’t known at the moment if all carb’s butterflies remains fully closed at idle resting position which could account to increase the plug’s fouling condition ?

View attachment 334882

Although the motor runs healthy all carbs must rest at an awful internal condition with jets, nozzles, needle’s valve seats and pilot’s screws severely gunked up due to not running carbs dry for long years of usage soon after returning to terra firme. When all carbs are restored to mint clean factory conditions and pilot’s screws set to one in-out turns all spark plugs should come out darkened to a medium light chocolate look. A close top cylinder inspection with a flash light showed the piston’s head to have carboned-up way more that middle and lower cylinders. This motor will benefit having a long decarbonization procedure with CRC engine tune up prior its next departure.

Happy Boating
I went ahead and started with new plugs when I put the carburetors back on. How long should I run it before checking them? I was going to look at them after a run on the water. They have about an hour on them now but that’s at idle with a little raised rpm time.
 

Sea Rider

Supreme Mariner
Joined
Sep 20, 2008
Messages
12,345
I went ahead and started with new plugs when I put the carburetors back on. How long should I run it before checking them? I was going to look at them after a run on the water. They have about an hour on them now but that’s at idle with a little raised rpm time.

Hard to tell, how about first 5 run hours at 3/4 to full wot rpm at open water. If plugs comes out medium darkened chocolate looking which is ideal, electricals components, timing advance and motor are doing their homework spot on. LOL!!

Did you installed the tach ? would be interesting to tach the motor with 2 up and check max achieved wot rpm on flat calm water cond if possible, Where do you intend to install the tach, said something as having placed an extension of some kind attached to the tiller grip, right ? Roll at least 4 pick-up wire wraps on the first spark plug wire, set number of sparks per revolution and number of cylinders. If set at 1P1R and the display reads double set it to 2P1R.

Happy Boating
 

Douglasdzaster

Petty Officer 1st Class
Joined
Sep 11, 2020
Messages
315
Hard to tell, how about first 5 run hours at 3/4 to full wot rpm at open water. If plugs comes out medium darkened chocolate looking which is ideal, electricals components, timing advance and motor are doing their homework spot on. LOL!!

Did you installed the tach ? would be interesting to tach the motor with 2 up and check max achieved wot rpm on flat calm water cond if possible, Where do you intend to install the tach, said something as having placed an extension of some kind attached to the tiller grip, right ? Roll at least 4 pick-up wire wraps on the first spark plug wire, set number of sparks per revolution and number of cylinders. If set at 1P1R and the display reads double set it to 2P1R.

Happy Boating
Tachometer is hooked up with several wraps around the first spark plug wire. Set to fire twice per revolution.I haven’t mounted it yet. I have the wire coiled up and storing it under the cowling when not running the engine. Keeping it out of the elements. Didn’t spend much on it so not sure how it’s going to hold up yet. The tiller handle is a good idea though. It have plenty of wire to do whatever. Planning on tracking the rpms at wot to see if I have the right prop as well. Hoping to see 5500rpm or so by myself without gear so I don’t drop below 5000 with a load causing the engine to work to hard. Also for kicks I’m downloading an app that uses the gps on my iPhone to see how fast I’m going. Before the carburetor work it would trim most of the boat out of the water. Straight hole shot without standing up the front.
 

Sea Rider

Supreme Mariner
Joined
Sep 20, 2008
Messages
12,345
At 5K the motor will be running around its middle wot rpm range which it's excellent.. What like doing is propping right the motor to achieve max wot revs when solo boating lightly loaded. Once there keep testing with slight more passengers aboard till the motor reaches its middle wot rpm range to maintain a nice hole shot from a dead stop. This scenario will be my max passengers allowed for offshore, open water boating, sumo boaters can stay home or find another good samaritan to have fun with.

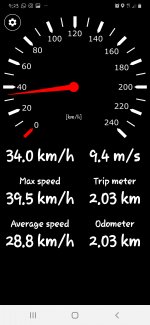
Is your current motor a manual or electric trim model ? if being manual does it sits trimed at 90 deg on transom? Have downloaded to my phone a nice multifunctional speedometer called : Jens Peterson Speedometer, check.

Happy Boating
 

Attachments

  • Jens Peterson Speedometer.jpg
    Jens Peterson Speedometer.jpg
    292.8 KB · Views: 1

Faztbullet

Supreme Mariner
Joined
Mar 2, 2008
Messages
15,589
Measuring is a worthless test. The reason being is there is casting differences and distance between body and screws shoulder will be effected, the seat pocket the pilot screw could also be machined deeper than the next carb. This is the reason you screw in till it lightly seats the back out the factory specified number of turns. This ensures all are the same distance internally in the pilot pocket no matter what a outside measurement reads. There is no outboard I know made that measures the pilot screw distance and for the posted reasons above.
calm waters cond mostly at idle, fast idle rpm for long time periods.
Either t-stat is not working, oil/gas ratio incorrect or low octane fuel..
 

Sea Rider

Supreme Mariner
Joined
Sep 20, 2008
Messages
12,345
This is my personal pilot's screw distance method used as a reference to set back all carb's PS to their individual factory settings delivered with when out of the box. Works well for me with carb's that have been fully serviced and worked to perfection independently of the pysical in-out turns factory delivered with which don't care at all. It's near imposible that with the state of the art in line robotic machining technology carbs will have such huge PS internal mistmatches as stated.

With reference to my guinea pig's motor comment : A resounding NO, the T-Stat is brand new, the water passage was cleaned to perfection, fuel/oil ratio is 50:1, runs with fresh E-8 / 95 octane fuel every time goes out. Although runs at idle/fast idle frecuently when spearfishing goes and returns from the site with burried throttle on the remote box for at least 15 Km per side as to clean the carbon buid up going on on all spark plugs with such activity which ain't happening .

Let's see how Doug's spark plugs comes out with state of the art carb service and 3 pilot's screws set to 1.5 in-out turns ?

Happy Boating

 
Last edited:

Faztbullet

Supreme Mariner
Joined
Mar 2, 2008
Messages
15,589
This is my personal pilot's screw distance method
That's OK if you don't feel comfortable adjusting carbs, just don't go stating its a factual item or step . The factory manual is ALWAYS correct despite your interpretation of its meaning...
 

Sea Rider

Supreme Mariner
Joined
Sep 20, 2008
Messages
12,345
That's OK if you don't feel comfortable adjusting carbs, just don't go stating its a factual item or step . The factory manual is ALWAYS correct despite your interpretation of its meaning...
Factual item, are we at some kind of war ? Made perfectly clear why I use this personal method on new out of the box motors, don't ramble with post 172, has nothing to do with number of in-out turn every motor brand recommends going for specially after carbs have benn fully serviced.

So that no one tells you stories, one method to find out if the pilot's screws housings were well machined at the carb factory is : screw fully in all pilot's screws till the spring is compressed, turn them out say 2 full turns and check if all the screw's grooves remains resting at same carb position on all 3 carbs. For that to apply all Pilot's screws will have to be machined exact same.

Happy Boating
 

Douglasdzaster

Petty Officer 1st Class
Joined
Sep 11, 2020
Messages
315
Sea Rider what have I mess up this time!
I still haven’t been able to take the boat out but I’m getting a lot done to it. Until a few minutes ago that is. I upholstered the first seat last night and was putting sealer on the wood for the other two today. While waiting for it to dry I grabbed a rag and simple green and began wiping down the engine getting all the little spots I’d missed in the past. I came across the tell tale hose and disconnected it to get it out of the way. I blew through the hose and some debris came out. I looked in the hole in the engine and it had some inside as well. So I get a tiny brush and began scrubbing the inside with debris coming out. I started wondering is this why it over heats on muffs. I grabbed my air hose and blew through the hose with it. Then stupid showed up!!! I blew into the engine as well not thinking it would hurt anything. I heard air coming through the lower unit so I knew I done a good job. A few minutes later what looks like lower unit oil is coming out of the water pick ups. I knew I messed up but tackled the next item. The motor has always been on the top hole of the trim pin which was stuck so I removed it so I could sand it clean. The motor is now sitting all the way in and black gunk coming from behind the prop. NOW WHAT! I pulled the prop and at the bottom of the shaft is this black stuff and what looks like grease as well. Could this be exhaust residue since the motor has all ways been trimmed up? And did I blow a seal with the compressed air. I just told the Admiral that I shouldn’t have to spend any money on the boat for awhile. Lol
 

Sea Rider

Supreme Mariner
Joined
Sep 20, 2008
Messages
12,345
Welcome back Doug,

How do you know the motor is over heating when on muffs ? the only possible way to do so is if the muffs are loosing too much water side of them. Modify the muff''s end to improve the grip on the lower leg and lose the least amount of water when flushing. The tell tale it's just a water indicator that indicates the water pump is workig OK

It's normal for motor to tend to clog the plastic tell tale tube and the small metal tube located at lower crankcase. Can insert the provided red cannula found in carb cleaner, WD-40 CRC cans at both mentioned sides. Don't know if possible to spill gear oil through lower water intakes if applying compressed air through the tell tale or small metal tube. Check the gear case oil level to be sure its full.

It's normal for filthy 2 stroke motors to drop small quantities of unburned fuel/oil through the lower leg specially if the motor is run on muffs for extended time, just place a container at lower leg to collect the filth. That's why must run the motor hard as if stealing the combo to clean out the entire exhaust system.

When do you plan taking the combo out for a wot test ? Did the trim pin set at first upper hole dialed the motor to sit on transom at 90 deg ?

Happy Boating
 

Douglasdzaster

Petty Officer 1st Class
Joined
Sep 11, 2020
Messages
315
No it was actually trimmed out a bit. Not 90 degrees. That’s why I wanted to adjust it a little and see how it did. It does good all the way trimmed but that’s by myself and it is a short shaft. Whatever it was I blew out of the water pick ups stopped coming out. May have been some exhaust water from running it in the tank last time. Since I posted I’ve found quite a few where people blow compressed air into theirs. It was kind of green looking and the oil I put in the lower unit is blue. I just knew I’d messed something up. The way the pick ups are I haven’t been able to get muffs to stay over them all the way and I have 3 different types now. Any ideas how I can make them stay on? I’ve tried everything I can think of. Tried a strap but it slides off. If the lower unit is fine then I’m planning on Saturday. Supposed to be calm. Or I’m going to grab my neighbor and have him show me the river. There’s got to be some places on it I can run wot. That’s why I’m trying to finish the seats. Then take it down to the launch in our neighborhood lake and float the boat so I can adjust the trailer and hopefully it won’t be so hard to launch. I back in as far as I can and the back of the boat floats but it stays stuck on the front roller and I have to lift it off. Hopefully adjusting the boasters and repairing the roller will take care of that.
 

Sea Rider

Supreme Mariner
Joined
Sep 20, 2008
Messages
12,345
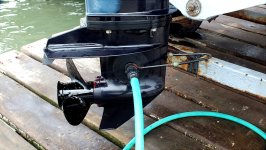
Since modified my ear muffs have minimum water loss along staying tight grabbed onto the lower leg.

01.JPG

Prior water testing the combo, set trim to 90 deg for motor to sit fully vertical on transom, place a boating mate up front, go wot and check if with prop aeration or back/over transom water splashes. If none of the above the motor sits spot on on transom at that precise trim. A wot run will indicate if the installed prop is doing its homework right running at least middle of its wot rpm range factory stated.

Happy Boating
 

Douglasdzaster

Petty Officer 1st Class
Joined
Sep 11, 2020
Messages
315
Since modified my ear muffs have minimum water loss along staying tight grabbed onto the lower leg.

View attachment 335646

Prior water testing the combo, set trim to 90 deg for motor to sit fully vertical on transom, place a boating mate up front, go wot and check if with prop aeration or back/over transom water splashes. If none of the above the motor sits spot on on transom at that precise trim. A wot run will indicate if the installed prop is doing its homework right running at least middle of its wot rpm range factory stated.

Happy Boating
I checked the lower unit and when I removed the top plug it actually released a little pressure so that should mean it’s not leaking. A little fluid came out as well and it looked good as it did when I put it in a few months ago. It did have that gear oil smell to it which what came from the leg yesterday did not. I think I’m good to go. Every time I use muffs I guess I’m loosing to much water because it over heats and starts running rough. I’ve checked with an ir thermometer and seen 230 . Steam came from the tell tale. I’m afraid thats going to happen one to many times is why I gave up on muffs. I do have one pair that I may be able to modify so I can try one more time. I’ve never had a motor before that wouldn’t run on them. I’ll probably be by myself Saturday but if I can catch my river guide not to busy we’ll try adjusting the motor and see how she does.
 

Sea Rider

Supreme Mariner
Joined
Sep 20, 2008
Messages
12,345
Some issues :
A motor in good shape should not overheat whatsoever when running on muffs provided that there's a good water flow going out the hose. Does same when running on a barrel ? At which portion of the powerhead did you aimed the gun to read 230 F ? What's the water pump condition, is the impeller the original one that came with the motor ? Before running the motor at open water, check at idle/neutral if the peeing indicator is peeing strong, now that you have clean it should squirt a firm water flow. If not, 2 issues to consider : water pump issue, excessive filth formation on the entire water passages or a combo of both situations.

Happy Boating
 

Douglasdzaster

Petty Officer 1st Class
Joined
Sep 11, 2020
Messages
315
Some issues :
A motor in good shape should not overheat whatsoever when running on muffs provided that there's a good water flow going out the hose. Does same when running on a barrel ? At which portion of the powerhead did you aimed the gun to read 230 F ? What's the water pump condition, is the impeller the original one that came with the motor ? Before running the motor at open water, check at idle/neutral if the peeing indicator is peeing strong, now that you have clean it should squirt a firm water flow. If not, 2 issues to consider : water pump issue, excessive filth formation on the entire water passages or a combo of both situations.

Happy Boating
It’s always ran fine in the tank. Thermostat opens and closes. Temperature around 140. Replaced water pump as soon as I got the boat so it doesn’t have much time on it. Unless it got damage from the over heating. There’s grooves around the pick ups that are making it hard to get a good seal causing it to loose a lot of water. Then they slip all the time. I’ve got some big rectangular ones I may be able to do something to and get a tight fit. Also I think I’ve been running the water to hard instead of letting the impeller do it’s work. These are just guesses. I’ve read a lot of forums where people are having the same problem and have to use a tank for back pressure from the exhaust. All Yamaha. I was sitting in the boat and noticed that red light was on so I shot the thermometer at the top side . That’s when I saw steam coming from the tell tale. I’m was planning on running it a few minutes before heading to the lake just to check everything. Not knowing if the boat was ever in salt water has me a little concerned about the passages. That’s a lot of bolts that could potentially break. But like I said it’s been peeing good in the tank. In fact I ran it quite a while when I was making adjustments. Tomorrow I work on the trailer if I don’t have time to run it I’m definitely running it Friday to get ready for Saturday and I’ll let you know. I’m hoping I’m done with the engine except for regular maintenance which I do often. I installed the new bench seats I made for it today. Sure are comfortable. I’m ready to run this thing but if I notice anything out of sorts I don’t go until repairs are made.
 

Douglasdzaster

Petty Officer 1st Class
Joined
Sep 11, 2020
Messages
315
It’s always ran fine in the tank. Thermostat opens and closes. Temperature around 140. Replaced water pump as soon as I got the boat so it doesn’t have much time on it. Unless it got damage from the over heating. There’s grooves around the pick ups that are making it hard to get a good seal causing it to loose a lot of water. Then they slip all the time. I’ve got some big rectangular ones I may be able to do something to and get a tight fit. Also I think I’ve been running the water to hard instead of letting the impeller do it’s work. These are just guesses. I’ve read a lot of forums where people are having the same problem and have to use a tank for back pressure from the exhaust. All Yamaha. I was sitting in the boat and noticed that red light was on so I shot the thermometer at the top side . That’s when I saw steam coming from the tell tale. I’m was planning on running it a few minutes before heading to the lake just to check everything. Not knowing if the boat was ever in salt water has me a little concerned about the passages. That’s a lot of bolts that could potentially break. But like I said it’s been peeing good in the tank. In fact I ran it quite a while when I was making adjustments. Tomorrow I work on the trailer if I don’t have time to run it I’m definitely running it Friday to get ready for Saturday and I’ll let you know. I’m hoping I’m done with the engine except for regular maintenance which I do often. I installed the new bench seats I made for it today. Sure are comfortable. I’m ready to run this thing but if I notice anything out of sorts I don’t go until repairs are made.
I didn’t get to work on the trailer today but I went and got the parts. Picked up another set of muffs that are a little bigger than the others. The rectangular ones I have just barely cover the intakes. These are a little bigger and I’ve got some modifications in mind. Thinking of pulling the lower unit to check the water pump and see if there’s any debris. I may have missed some when I took out the old one. I counted blades that had broken off and found all of those but you never know. I’d hate to have blown something loose the other day just to start the engine and have it push back up. Hopefully it all checks out and I’ll be on the water Saturday.
 
Top