I started the day wanting to accomplish two things: 1) get the gas tank out, and 2) safely liberate the control box from the upholstered panel that I took out the last time.
I didn't accomplish either, and for a while it kinda got me down. But, looking back on where I started vs where I ended up today, I did get a lot done.
I got all but one of the glued in screws out of the control box. Broke down and used the impact driver which I should have had the balls to do initially. The fourth screwhead, I unfortunately striped to kingdom come. Was going to cut a groove in the head and go to town with a big screwdriver, but broke the last blade for my Dremel. There's not enough clearance (slight recess to the tray it sits in) to get in there with a hacksaw blade, so to the back burner with that until tomorrow.
The gas tank has been literally glassed in place. I'd initially thought that the layer of fiberglass on top of it in places was just where the decking that had been laid over it had delaminated, but that doesn't appear to have been the case. When I finally got to it the other night, it was too dark for me to see clearly, but there was actual fiberglass tabbing over much of it. I peeled a lot of it back but - as if that wasn't enough - it seems as though the stringers have a slight cap that extends over the tank by about a quarter inch; enough to more or less lock it into place.
View attachment 356096
That was the point where I started thinking about the folks who don't worry about this sorta mess; the myriad of bad decisions and shoddy patch jobs that one finds in these older boats. How nice it must be to just break out the checkbook, then get out on the water straight away.
The pity party didn't last too long; a quick look around reminded me that there were a ton of other jobs that needed doing, that were doable, and would be just the ticket to get me out of the doldrums.
View attachment 356095
View attachment 356094
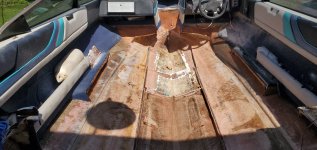
So I started ripping things apart. Not much better therapy than wanton destruction.
View attachment 356099
View attachment 356098
View attachment 356097
Foam, carpet, seat boxes, mulch disguised as structural supports... I got a ton of it out. It looks an absolute horror, but it's progress. And sometimes you have to count those small victories.
View attachment 356100
View attachment 356104
View attachment 356101
View attachment 356102
View attachment 356103
After that, took a trip to the hardware store and picked up some more Dremel blades, several blades for the angle grinder (cutting, grinding, and flap disks), and new blades for my oscillating tool. I picked up a pump to drain what I can from the fuel tank, and a few other odds and ends. Retail therapy also helps the mindset when one is otherwise frustrated.
Afterwards, I got back to it. Took out a lot more foam, ripped out more delaminated fiberglass tabbing from the bottom of the hull. Shoveled out more rotten wood. Removed what felt like 10,000 screws. Ripped out more upholstered panels. There's a lot of open space where there wasn't before... It's a welcome site.
View attachment 356105
Tomorrow I'm going to continue ripping things out. The jump seat boxes are going to be time-consuming; there's probably as much foam back there as the rest of the boat combined (which is saying a lot, there's been a LOT of foam everywhere else). But getting them out will allow me to pull up more of the decking, which will let me get to the back section of the stringers that the gas tank is sandwiched between, which puts me one step closer to getting that son of a gun out. Finally.