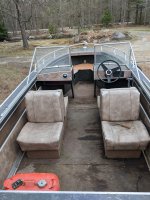
The novice build: 1968 Starcraft SuperSport V-16 "The Boat"

Status
Not open for further replies.

Saxist

Seaman Apprentice
Joined
Jul 4, 2020
Messages
40
INTRODUCTION!

I am completely novice to boats and have been overwhelmed with learning new jargon and marine repair techniques. This has been made more difficult by the huge variety in repair methods (and huge variety in repair quality...).

What's going for me is that I have ALOT of mechanical experience with motorcycles and cars. I also have alot of restoration experience with bikes, cars, furniture, musical instruments.....but again marine application is so very different.

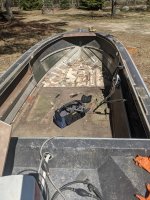
That said, I after doing a very long look over the boat I decided it was all there and all good enough to rip down to the bare hull and get this done right. Key statement there is 'done right'. A tall order for a first timer!

Here is where we begin.Screenshot_20210318-145935.png
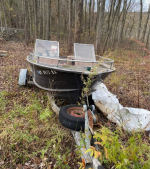
 

Attachments

  • PXL_20210331_183644034.jpg
    PXL_20210331_183644034.jpg
    4.2 MB · Views: 22

racerone

Supreme Mariner
Joined
Dec 28, 2013
Messages
37,992
The motor looks to be a 77 / 78 / 79 era.-----Looks like a good starting point.-----If you looked at the price of a similar new one you would get -----" Sticker shock. "
 

The John

Petty Officer 2nd Class
Joined
Nov 16, 2009
Messages
123
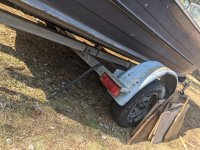
Nice, good luck. Looks like the boat is not sitting on the trailer Properly.

Are you in new york state?
 

Saxist

Seaman Apprentice
Joined
Jul 4, 2020
Messages
40
The trailer is not set up properly for this boat. I will be fixing that up after I get the boat off it and turtled for painting. Not to concerned there as it seems pretty basic automotive.

Came from Suffer NY and now lives with me in MA.
 

Moserkr

Chief Officer + Starmada Splash Of The Year 2021
Joined
Nov 23, 2020
Messages
869
Its cool seeing how these boats progressed from the 60s to 70s n so on. Im working on a ‘79 16’ss, and it sounds like I have less experience than you in general. You came to the right place to get her fixed up right! Dont forget to test for leaks. Having a solid, water tight hull should be first priority, as well as a solid transom. She looks all original though inside. Good find!
 

ShoestringMariner

Lieutenant Commander
Joined
Apr 18, 2015
Messages
1,602
Its cool seeing how these boats progressed from the 60s to 70s n so on. Im working on a ‘79 16’ss, and it sounds like I have less experience than you in general. You came to the right place to get her fixed up right! Dont forget to test for leaks. Having a solid, water tight hull should be first priority, as well as a solid transom. She looks all original though inside. Good find!
And solid floors. Rotten floors will allow twist i believe. but don’t worry, that’s only 5/8” plywood and your choice of coverage. I prefer nautolex for fishing reasons.

@Saxist, nice grab, you’ve got a good set up to start with. Lots of parts for those old motors still around
 

racerone

Supreme Mariner
Joined
Dec 28, 2013
Messages
37,992
If you do not know how old the impeller is then you must install a new one !-----This motor does not have overheat warning or shutdown.-----It would run till it goes ----BOOOM ----on you.
 

Saxist

Seaman Apprentice
Joined
Jul 4, 2020
Messages
40
Alright. Here is what I have ordered to repair and waterproof the hull. Please let me know if I am missing anything I need to do a better job of it. I own alot of automotive tools, so if any of those come in handy let me know...

2117t4 rivets on the way 3/16 x 7/16 as well as 3/16 x 3/8. 200 does it I hope...I expect lol.

3/16 braiser head rivet thingy for my air hammer.

1 qt of gluvit

Should I buy a bucking bar or is a sledge head going to do fine in these boats?

Fill with water...find leaky rivets and mark. Drain boat, drill out bad rivets, clean with wire brush inside and out, pound in new rivet. ......repeat as needed.

I'm assuming when the water dribbles out they run down the seams...then the whole seam would look wet right? How do I make sure the seams are happy??
 

MNhunter1

Lieutenant Junior Grade
Joined
May 12, 2014
Messages
1,059
Welcome! You can to the right place for solid and knowledgeable advice. There are many different groups out there on FB and such, but they are flooded with all sorts of various advice and ideas from those that may be appropriate to some that are outright wrong and/or dangerous. They crew here has many years of direct experience and numerous builds behind them specific to these later model aluminum Starcrafts. Don’t be afraid to ask questions, feed the mob with lots of pictures, and enjoy the process.
 

ShoestringMariner

Lieutenant Commander
Joined
Apr 18, 2015
Messages
1,602
Alright. Here is what I have ordered to repair and waterproof the hull. Please let me know if I am missing anything I need to do a better job of it. I own alot of automotive tools, so if any of those come in handy let me know...

2117t4 rivets on the way 3/16 x 7/16 as well as 3/16 x 3/8. 200 does it I hope...I expect lol.

3/16 braiser head rivet thingy for my air hammer.

1 qt of gluvit

Should I buy a bucking bar or is a sledge head going to do fine in these boats?

Fill with water...find leaky rivets and mark. Drain boat, drill out bad rivets, clean with wire brush inside and out, pound in new rivet. ......repeat as needed.

I'm assuming when the water dribbles out they run down the seams...then the whole seam would look wet right? How do I make sure the seams are happy??
Don’t fill the boat with water, take it to the launch instead. Too much weight for your trailer. Look for seepage/leaks and mark with a contractors pencil (or sharpie before everything gets wet)

Consider a rivet removal tool. If this site doesn’t sell them, pm me. I did some rivet replacements at the transom last round and as careful as I was to center the drill on the rivet head with a centre punch, it was difficult to get exact.

I also made the mistake of drilling right through which made crappy, oblong holes. That I had to fix with 5200...not sure how long that will be good for. In any case, get a good short straight punch to drive the rivets out once the head pops off. My 1975 SS160 has 5/32 rivets. 3/16 is no prob, just chase drill to size once you drive out the rivets.

a bucking bar would be nice, but a heavy hammer, BA bolt or chunk of steel bar stock will work fine. Bucking bar shines in tough access spots, but you could make your own if you have metal working skills/equip.

consider drizzling the rivet with 5200 when you install for extra measure.
 

Moserkr

Chief Officer + Starmada Splash Of The Year 2021
Joined
Nov 23, 2020
Messages
869
Solid advice from @ShoestringMariner I was going to mention adding 5200 as well to the rivet tail before setting it in. Ill be taking my boat to the launch here shortly to test for leaks. I have filled it with water before on the trailer but it did more harm than good with all the weight on an old sketchy trailer and poor bunks supporting it.

If no one has fixed your boat before, improperly with blinds or solids, then drilling out shouldnt be too hard if you’re careful. Lots of times someone before you will have done some poor repairs and there will be oblong, double, and cross drilled holes all over (my boat). Those may require sizing up to a 1/4” rivet to fill the holes properly.

The knee brace is a common spot for rivets to fail and tabs to stress fracture. Im one of many who had to cut the original tabs and rivet on new ones. I also upsized every rivet on my knee brace to 1/4” for strength, and to repair previous poor drill holes.

Floors and transom should be replaced if they are compromised. These boats need solid structure so they dont bend n twist from the stress of water. Lots of info in plenty of posts on how to do both right, or just ask. Some people have beefed up the structure too by adding brackets n braces. Lots of option depending on your plans.

That does beg the question, what are your plans for the boat when complete?
 

ShoestringMariner

Lieutenant Commander
Joined
Apr 18, 2015
Messages
1,602
@Moserkr, great info.
And OP, I can attest to rotten floors allowing twist. I’ve been VERY slowly resto-modding mine over the years. I first did the transom and rear floor so I could keep the boat in service seasonally. I tossed in some OSB sheathing because the ply floors were soft. But I noticed cracks developing in my splashwell so be careful of that if you plan doing a bit at a time.
I’ll be adding braces between my ribs as you will see another peoples builds here. I’m probably not going to photo document my thread heavily. I just don’t have the time. But look up threads by SHSU, watermann and others.

I did remove a TON of weight from mine...waterlogged foam, plywood and the OSB sheet that laid in it for 2 years. Probably lost a couple hundred pounds right there.

You should replace the foam with rigid foam board or styrofoam SM. It won’t absorb water.
Some people use the pour in foam but it’s more expensive I believe.
 

Saxist

Seaman Apprentice
Joined
Jul 4, 2020
Messages
40
The boat will never catch a fish again. The intention is a pleasure boat that can haul some kids on tubes when need be.

The water fill method on the trailer seems infinitely easier....though I understand the overloaded trailer concern.

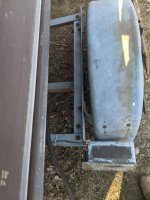
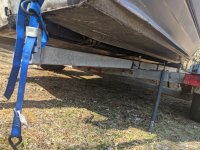
I attached a few shots of how it's currently sitting. The trailer seems decently beefy to me? I can also tip it left and right forward and back as needed, so as to put in less water weight.PXL_20210404_193258662.jpgPXL_20210404_193306632.jpgPXL_20210404_193320460.jpg

Thoughts on this?

As far as coating the rivets in 5200, it seems like some do and others keep the aluminum clean and bare for the riveting? I'll look more into it now thank you.
 

ShoestringMariner

Lieutenant Commander
Joined
Apr 18, 2015
Messages
1,602
Somebody said the effect of water trying to escape the hull wasn’t the same as pressure coming in. Not sure if there’s truth to that, don’t take my word.
Honestly, slow leaks are easy to spot from the inside, likely easier than crawling under a trailer searching for drips? I’d like to hear from someone who has done both if they can chime in
 

racerone

Supreme Mariner
Joined
Dec 28, 2013
Messages
37,992
Why not make an adapter for an air hose.------Possibly use an o-ring to make a seal.---Set the regulator to 10 PSI ---Put it over a rivet and have your helper spray some soapy water around the rivet inside the boat.
 

sidingguy

Petty Officer 2nd Class
Joined
Nov 3, 2017
Messages
136
No scientific theory,I filled my 221 Islander up with water.Kept a sharp eye on the trailer tires.Used the trailer jack to vary the level of water.I used enough water to cover the splash rails. Rolled around under the boat on my creeper with a sharpie marking leaking rivets. Did this several times to make sure I got all the bad ones.
 

SHSU

Lieutenant Junior+Starmada Splash Of The Year 2019
Joined
Mar 8, 2017
Messages
1,744
A lot of mixed advice on the hull leak test. That being said maybe I can help add some more confusion. ;)

Preferred method as suggested by many: Take to a body of water and launch. Make sure to take enough weight to help get the hull down as it will ride high being empty. Circle each area where there is a leak and buck when you get home.

Secondary method (I did this method as we aren't near any body of water. Its a an hour and 15 minutes both ways so it wasn't an option). Fill the hull with water. That being said, don't over fill. We had it on our driveway so it slanted to one side. That allowed us to move the hull around to cover different areas with water. Circle the exterior rivets that leak. You will have some issues with the rivets that are hidden by the bunks, so keep that in mind when you are looking for leaks if you go with this method.

In the end, you have to figure out what will work best for you and your situation.

As for the 5200 debate, if you are replacing a rivet use 5200. If you are just rebucking a loose rivet, don't bother and use Gluvit and such to coat the tail when you do the rest.

Again, just my 2 cents... so take it for what its worth

SHSU
 

Saxist

Seaman Apprentice
Joined
Jul 4, 2020
Messages
40
I know eye candy is the most important part of a build so here we go.

I am still ripping the boat down to bare hull. While I wait for rivets in the mail.
PXL_20210406_170318546.jpg

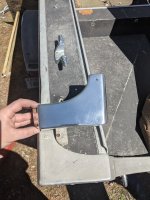
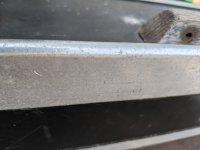
Casually working on the aluminum trim while I am waiting. Corners and nose will be polished to mirrors. I have been having difficulty getting a smooth finish on these pieces though....I sanded it down hard with 120 to get passed corrosion. Then 320, then 800 (sanding this stage extra long and making sure the 320 swirls are gone. Waiting for 600 grit paper lol). Then 1000 wet sand and a bench buffer. But the finish almost reminds me of orange peel in automotive paint finish? It's shiny...but you can see the surface bumpiness....
PXL_20210406_163612075.jpg

The corrosion is DEEP and has required random orbital 120 grit for extended time to get it smooth. I then hit with random orbital 320 grit. Finished off with direction maroon scuff pad. This has given me good results but is exceptionally time consuming compared to the pieces I've shined on antique motorcycles.

I have finally found acceptable results for the rest of the trim in the boat. 120 for ever, 340, straight to maroon pad, taking care to lay the scratches straight to give a brushed look.
PXL_20210406_195345001.jpg
 
Status
Not open for further replies.
Top