The novice build: 1968 Starcraft SuperSport V-16 "The Boat"

Status
Not open for further replies.

Saxist

Seaman Apprentice
Joined
Jul 4, 2020
Messages
40
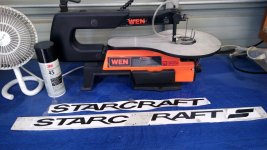
I know eye candy is the most important part of a build so here we go.

I am still ripping the boat down to bare hull. While I wait for rivets in the mail.
View attachment 337192

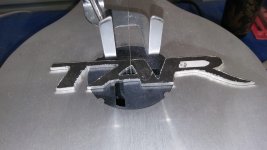
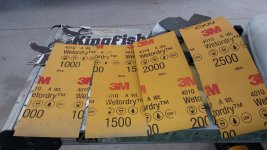
Casually working on the aluminum trim while I am waiting. Corners and nose will be polished to mirrors. I have been having difficulty getting a smooth finish on these pieces though....I sanded it down hard with 120 to get passed corrosion. Then 320, then 800 (sanding this stage extra long and making sure the 320 swirls are gone. Waiting for 600 grit paper lol). Then 1000 wet sand and a bench buffer. But the finish almost reminds me of orange peel in automotive paint finish? It's shiny...but you can see the surface bumpiness....
View attachment 337190

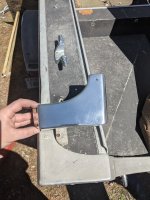
The corrosion is DEEP and has required random orbital 120 grit for extended time to get it smooth. I then hit with random orbital 320 grit. Finished off with direction maroon scuff pad. This has given me good results but is exceptionally time consuming compared to the pieces I've shined on antique motorcycles.

I have finally found acceptable results for the rest of the trim in the boat. 120 for ever, 340, straight to maroon pad, taking care to lay the scratches straight to give a brushed look.
View attachment 337191

A lot of mixed advice on the hull leak test. That being said maybe I can help add some more confusion. ;)

Preferred method as suggested by many: Take to a body of water and launch. Make sure to take enough weight to help get the hull down as it will ride high being empty. Circle each area where there is a leak and buck when you get home.

Secondary method (I did this method as we aren't near any body of water. Its a an hour and 15 minutes both ways so it wasn't an option). Fill the hull with water. That being said, don't over fill. We had it on our driveway so it slanted to one side. That allowed us to move the hull around to cover different areas with water. Circle the exterior rivets that leak. You will have some issues with the rivets that are hidden by the bunks, so keep that in mind when you are looking for leaks if you go with this method.

In the end, you have to figure out what will work best for you and your situation.

As for the 5200 debate, if you are replacing a rivet use 5200. If you are just rebucking a loose rivet, don't bother and use Gluvit and such to coat the tail when you do the rest.

Again, just my 2 cents... so take it for what its worth

SHSU
Thank you! Another product to go buy. Bwahahaha......marine body techniques have been interesting to learn...

The exterior of the transom skin appears to have some black hard as nails (wire wheel was hard pressed to fight with it..) product painted all over it with a brush. I was thinking I would just sand it flat and then pretend it's just part of the hull. Thoughts??
 

SHSU

Lieutenant Junior+Starmada Splash Of The Year 2019
Joined
Mar 8, 2017
Messages
1,744
The exterior of the transom skin appears to have some black hard as nails (wire wheel was hard pressed to fight with it..) product painted all over it with a brush. I was thinking I would just sand it flat and then pretend it's just part of the hull. Thoughts??

If you are having a hard time removing with a grinder and wire wheel then I would leave it and paint over it. Can't beat that kind of adhesion to aluminum. The black stuff is probably easier to adhere to then aluminum anyways.

SHSU
 

BWR1953

Admiral
Joined
Jan 23, 2009
Messages
6,200
Yeahhh... polishing aluminum is a pain. Mostly in the hands! :LOL:

I cut the Starcraft boat and trailer letters, logo and the Kingfisher bird for my 1976 Starcraft Kingfisher using aluminum sheet and a scroll saw. Then I hand filed and sanded everything. Took a lo-o-o-o-ng time! :sneaky:

I experimented with several levels of polishing, including taking it all the way up to mirror level. At one point, I got up to 8000 grit. Made it plenty shiny.

But that wasn't worth it to me. My main goal was to get to a nice, smooth surface so that I could apply primer and paint everything. It simply wasn't needed just to knock some eyes out. But it was (mostly) fun while experimenting.

4.jpg

3.jpg


12.jpg

1.jpg
 

Watermann

Starmada Splash of the Year 2014
Joined
Jan 12, 2013
Messages
13,795
337190-70499e1b073a770665c7f7b30b4ad629.jpg

Yeah polishing the cast AL end caps won't go so well, the grain of the material isn't suitable for polishing to a mirror finish.
 

SHSU

Lieutenant Junior+Starmada Splash Of The Year 2019
Joined
Mar 8, 2017
Messages
1,744
Yeahhh... polishing aluminum is a pain. Mostly in the hands! :LOL:

I cut the Starcraft boat and trailer letters, logo and the Kingfisher bird for my 1976 Starcraft Kingfisher using aluminum sheet and a scroll saw. Then I hand filed and sanded everything. Took a lo-o-o-o-ng time! :sneaky:

I experimented with several levels of polishing, including taking it all the way up to mirror level. At one point, I got up to 8000 grit. Made it plenty shiny.

But that wasn't worth it to me. My main goal was to get to a nice, smooth surface so that I could apply primer and paint everything. It simply wasn't needed just to knock some eyes out. But it was (mostly) fun while experimenting.

View attachment 337230

View attachment 337231


View attachment 337228

View attachment 337229
That is impressive!!!! How did you secure them to the boat? I may have to look at doing something similar.

SHSU
 

BWR1953

Admiral
Joined
Jan 23, 2009
Messages
6,200
That is impressive!!!! How did you secure them to the boat? I may have to look at doing something similar.

SHSU
I used 3M Scotch 4905 VHB Tape. Double-sided sticky stuff which is used to adhere badges and whatnot to vehicles and vessels of all sorts. Strong!

But it's very easy to remove if ya make a boo-boo. Just wiggle a bit of dental floss behind the badge and "saw" it down. Badge pops off, use a finger to roll off the residue, clean and try again. Easy-peasy. :cool:
 

Michigan Lakes

Petty Officer 3rd Class
Joined
Dec 20, 2018
Messages
86
Somebody said the effect of water trying to escape the hull wasn’t the same as pressure coming in. Not sure if there’s truth to that, don’t take my word.
Honestly, slow leaks are easy to spot from the inside, likely easier than crawling under a trailer searching for drips? I’d like to hear from someone who has done both if they can chime in
There is definite truth to that. When my SS16 is out for an easygoing cruise, I get almost no water in the bilge. When running hard, I get a rather significant amount bilge water if the pump is left off. I assume this is coming in along chine area when the hull stressed. Not really sure if there's any way to verify this aside from running the boat out w/o the floor in.
If you're not replacing the rivets in that area, I'd at least recommend Gluvit along the entire chine seam.
 

Saxist

Seaman Apprentice
Joined
Jul 4, 2020
Messages
40
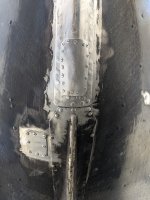
I wirebrushed some sort of cream colored rubbery like product off the outside of the boat (was thick enough in places to hide the seams of the repair entirely.) And this is what I found:
PXL_20210410_174703699.jpg

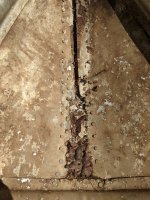
Then after pulling the ORIGINAL 1968 floor...I found this hellish mess on the other side:
PXL_20210410_154646289.jpg
The aluminum from the side panels (term?) is massively corroded along the entire riveting area. Totally compromised...

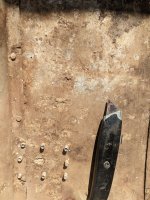
There are also a few other spots that are randomly corroded as well:
PXL_20210410_154638141.jpg
Majorly concerned what I will find as I pull the last two floor panels out...

How are the original seams held together? I'm thinking the front of this boat is going to need surgery....

I've got some reading to do for corrosion...advice appreciated..
 

ShoestringMariner

Lieutenant Commander
Joined
Apr 18, 2015
Messages
1,602
I wirebrushed some sort of cream colored rubbery like product off the outside of the boat (was thick enough in places to hide the seams of the repair entirely.) And this is what I found:
View attachment 337473

Then after pulling the ORIGINAL 1968 floor...I found this hellish mess on the other side:
View attachment 337474
The aluminum from the side panels (term?) is massively corroded along the entire riveting area. Totally compromised...

There are also a few other spots that are randomly corroded as well:
View attachment 337475
Majorly concerned what I will find as I pull the last two floor panels out...

How are the original seams held together? I'm thinking the front of this boat is going to need surgery....

I've got some reading to do for corrosion...advice appreciated..

oh dear. I would be removing those patches and going a little larger with 5200 and solid rivets. Or at least drilling out and replacing the rivets that are there with 5/32 or 3/16 solids. I’d also replace the solids that have been ground down on the keel strip. If you happen to be in southern Ontario I’ll give you a handful. It just so happens I just purchased a lifetime supply

That level of corrosion is rather unfortunate. Hopefully you don’t find any more spots like that
 

Moserkr

Chief Officer + Starmada Splash Of The Year 2021
Joined
Nov 23, 2020
Messages
869
Its the worst when you not only find that bad of corrosion, but also poor repair jobs on top of it. With some solid rivet holes double drilled and blinds halfway on top, they will all be coming out. If you’re lucky you can combine holes to 1/4” rivets which is what i was able to do. But my issues pale in comparison. Take off the patches and see what needs to be repaired. Cracks should have a hole drilled at the end to stop them from spreading, and im assuming thats what the patches are covering. Looks like a pita but fixable to me.
 

BWR1953

Admiral
Joined
Jan 23, 2009
Messages
6,200
I wirebrushed some sort of cream colored rubbery like product off the outside of the boat (was thick enough in places to hide the seams of the repair entirely.) And this is what I found:
View attachment 337473

Then after pulling the ORIGINAL 1968 floor...I found this hellish mess on the other side:
View attachment 337474
The aluminum from the side panels (term?) is massively corroded along the entire riveting area. Totally compromised...

There are also a few other spots that are randomly corroded as well:
View attachment 337475
Majorly concerned what I will find as I pull the last two floor panels out...

How are the original seams held together? I'm thinking the front of this boat is going to need surgery....

I've got some reading to do for corrosion...advice appreciated..
Oh my! :eek::oops:

Fear not, there are guys on here who can advise you on how to buff that right out! ;):D:LOL::giggle:
 

Saxist

Seaman Apprentice
Joined
Jul 4, 2020
Messages
40
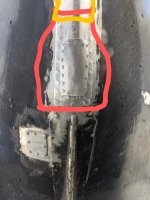
Forgive my absurd drawing skills.

Due to the corrosion basically destroying that entire area... My intuition would be to cut out the original outer hull piece entirely and replace with a wider piece of aluminum (red pen) that then slides under the cut off original stub (yellow) and gets riveted together.
PXL_20210410_174703699~2.jpg
I would make it longer than shown to extend above the waterline, but this was the pic I had and it shows the concept.


But I don't know what these original seams are held together with or how to separate them. Or how to stabilize the corrosion in that area.

If I start drilling these rivets out, is the boat going to start to deform, making it nearly impossible to hold properly in place

Kinda upset at the weight of this problem for a boat I was willing to put alot of elbow grease into. I don't want to bother if my hull isnt a terribly good candidate for long term stability. Thoughts?
 

SHSU

Lieutenant Junior+Starmada Splash Of The Year 2019
Joined
Mar 8, 2017
Messages
1,744
First things first, don't panic. Plenty of us here have run into the same thing. You need to get in there with a wire brush and clean out that area. Need to get a clear picture of what you are working with. From there we can provide recommendations on next steps as needed.

The other areas under the rest of the floor shouldn't be too bad. I suspect the hull was stored with the bow down which caused the water to puddle at the front, hence causing the damage.

SHSU
 

Saxist

Seaman Apprentice
Joined
Jul 4, 2020
Messages
40
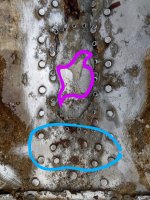
Well I cleaned it up and my diagnosis is the same...but it will let you all see it better!!

I definitely need some guidance on this... Pink is the hole that the patch is covering.

The blue area is also more compromised than Id like...
PXL_20210411_183338533~2.jpg

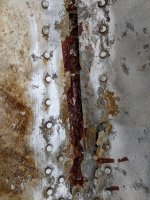
Slightly up you get this:
PXL_20210411_183344337.jpg
On the right side, you can see the sidewall of the boat has corroded and cracked all the way to the to the rivets in multiple places.

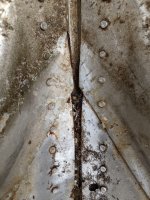
As things reach the lowest sidewall rib, the problems over:
PXL_20210411_183357305.jpg

So I am still thinking replacing the lower section of the front keel piece is in order. Looks like there is some original red goo in the seams...

What's my course of action here?
 

ShoestringMariner

Lieutenant Commander
Joined
Apr 18, 2015
Messages
1,602
Wow. Do you have any other deep corrosion elsewhere?

Me, I’d do as I suggested before, and maybe a padding of 5200 inside and an even wider inner patch. I’ll let the hull pros weigh in. Not sure if an inner patch, riveted further afield would put more strain. I’d hate to see you get spider cracks every where.

if that corrosion is everywhere else, I’d consider another hull. What’s the whole picture look like
 

Saxist

Seaman Apprentice
Joined
Jul 4, 2020
Messages
40
I have gotten the next section of floor removed.
No pits at all past that front area, despite being totally waterlogged with foam and SOIL. It's like a bag of miracle grow soil got dumped under here...

I have not removed the final piece of floor in the back though, which may end up being the determining factor of the viability of this hull. 😬
 

ShoestringMariner

Lieutenant Commander
Joined
Apr 18, 2015
Messages
1,602
I’d rip the floors up right to the back before you do any repairs. Check your knee brace. What does the transom look like?
 

Saxist

Seaman Apprentice
Joined
Jul 4, 2020
Messages
40
Transom appears solid and dry from what I can see on the inside of the boat...the back of the boat has been brush painted in some very hard black substance, it might have been preventative and so the transom survived clean. I intend to pull it anyways to inspect/repair the inside of the aluminum transom wall.

I'd really like to see the transom come out hard as a rock so I can reuse it (after working it over). Would that be frowned on if it's solid? I'd finish it over the way I would if I had made it myself...
 

ShoestringMariner

Lieutenant Commander
Joined
Apr 18, 2015
Messages
1,602
Transom appears solid and dry from what I can see on the inside of the boat...the back of the boat has been brush painted in some very hard black substance, it might have been preventative and so the transom survived clean. I intend to pull it anyways to inspect/repair the inside of the aluminum transom wall.

I'd really like to see the transom come out hard as a rock so I can reuse it (after working it over). Would that be frowned on if it's solid? I'd finish it over the way I would if I had made it myself...
Maybe save some time and inspect it? if it’s solid why bother?
Check for rot all along where the splashwell meets the ply. Check for rot or soft wood all along the bottom edge, around the drain tubes, around the motor bolts, especially lower. Use a scratch awl and push to see it it sinks in the wood.

check the rivets all around the rear and the transom skin for pitting.

is your motor plate plywood? I replaced mine with aluminum plate
 

SHSU

Lieutenant Junior+Starmada Splash Of The Year 2019
Joined
Mar 8, 2017
Messages
1,744
What's my course of action here?

My thoughts from what I see:

1: Remove original patch
2: Create an oversized patch that covers the entire keels width and then sum to rivet into good aluminum. Make sure the length also covers at least 6 inches extra on both sides to provide additional support.
3: back butter with 5200
4: Rivet together with solids.
5: Make sure hull is stored with bilge being the lowest point.

Let me know your thoughts

SHSU
 
Status
Not open for further replies.
Top