The novice build: 1968 Starcraft SuperSport V-16 "The Boat"

Status
Not open for further replies.

classiccat

"Captain" + Starmada Splash Of The Year 2020
Joined
Dec 20, 2010
Messages
3,412
I had some how missed your above post too, thank you!

I drove to it 3.5 hrs, transom and rear bottom of it had well over a thousand small corrosion pits that looked like the deepest ones on mine. Wouldn't have taken it for $200.

The 860 acid etch isn't even being recommended by the maker?! their concern was adhesion, where mine/ours is cleaning out the pit to end the corrosion. Thoughts?
"Aluminum Adhesion - Epoxyworks" https://www.epoxyworks.com/index.php/aluminum-adhesion/


I'm not experienced looking at this corrosion and determining depth either, would you think a cheap pit gauge (like welders use on pipes) from Amazon would be a good buy for me? I need to set some type of parameters for which spots get preemptively patched and which get cleaned out and filled with marine tex...over 1/2 thru gets a patch? 3/4 thru? Or poke them all with a scratch awl and anything that goes thru gets an obvious patch and anything that doesn't gets filled?
That stinks that you had to drive that far to see a swiss cheese hull. All of the "flex seal" was definitely a red flag.

That's a very cool 2015 adhesion study...for the record I treated my corrosion in 2013 🤣 ! I wasn't necessarily using the 860 for adhesion but to clean and passivate the aluminum pits before filling. (Alodine; ~Part-B is the industry standard for aluminum prep.) The study shows that the adhesion is very dependent on the epoxy being used. I'm curious how Marine Tex measures up...i'm guessing not nearly as good as Gflex...that stuff is amazing. I sealed my seams with Gflex...both the exterior when turtled and the interior when upright. I can tell you that after 7+ years, the marine tex seems to be holding up; i'm able to keep tabs on my handiwork using sub-deck access panels that I installed for cleaning the limber holes.

I used judgement and a pick to determine whether to patch externally. I suppose a feller could quantify the pitting using a dial gauge. You could also scribe a line onto piece of paper and measure with a ruler.
 

ShoestringMariner

Lieutenant Commander
Joined
Apr 18, 2015
Messages
1,593
Sorry to hear of your difficulties and of the other boat that didn’t pan out. What’s your POA now?
 

Saxist

Seaman Apprentice
Joined
Jul 4, 2020
Messages
40
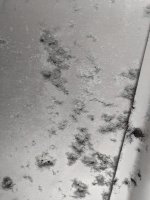
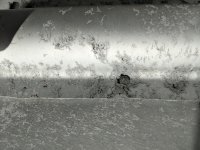
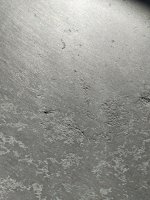
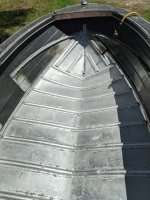
I have been chewing away at the original hull to attempt to use it. The first 2 front sections as well as the bow triangle area are in just terrible shape. I have concentrated on this area alone as there's no point to the rest if this area is a losing war.

I have hit it truely 10 times with 2:1 zepalume and there is still brown corrosion in the deeper areas.

Very much at a loss for how to get all of this salt corrosion properly neutralized so that I can move to the next stage.

PXL_20210514_153844600.jpgPXL_20210514_153856631.jpgPXL_20210514_153918014.jpgPXL_20210514_153930044.jpg
 

Moserkr

Chief Officer + Starmada Splash Of The Year 2021
Joined
Nov 23, 2020
Messages
869
The hull is looking very clean! Not sure how you completely stop it from having the corrosion signs. But overall it looks like it will be useable for you. Im sure someone here knows how to fully neutralize and seal the corrosion issues. Dont give up on her!!

I was fortunate to not have to deal with that issue. I could be wrong here, but I do remember reading that once the top layer of corrosion is dealt with, it can reappear within a day after exposure to oxygen again. I know its important to clean and neutralize within hours before sealing with something like paint. My few spots were so light that I was able to just use 50/50 vinegar/water. My transom skin had some deeper pits and those were wire wheeled, cleaned with W/V, then sealed with putty.
 

SHSU

Lieutenant Junior+Starmada Splash Of The Year 2019
Joined
Mar 8, 2017
Messages
1,722
From what I see you have done a good job cleaning what you have. If you want to keep the hull, I think you are at a point where you move to the next step and patch the holes. Aluminum sheet riveted to the hull back buttered with 5200 and then the interior skinned over with JB Weld, Skinning the interior where you have patches may be over kill, but I figure if you are already filling the other pitting areas, might as well apply to the deep areas protected by the patch.

Just my 2 cents...

SHSU
 
Status
Not open for further replies.
Top