Steam Launch parts acquired

nurseman

Lieutenant Junior Grade
Joined
Jun 2, 2013
Messages
1,045
Wow! I don't know how I have missed this thread, but I just read through it and have to say what a fantastic looking boat! The steam power just puts it over the top. Congrats on a successful splash.
 

seikeinlemming

Petty Officer 2nd Class" & 2020 Splash of the Year
Joined
May 23, 2011
Messages
140
Wow! I don't know how I have missed this thread, but I just read through it and have to say what a fantastic looking boat! The steam power just puts it over the top. Congrats on a successful splash.
Better late than never! There are still plenty of updates in the months and years to come. Feel free to ask questions – I don’t bite. Lol
 

seikeinlemming

Petty Officer 2nd Class" & 2020 Splash of the Year
Joined
May 23, 2011
Messages
140
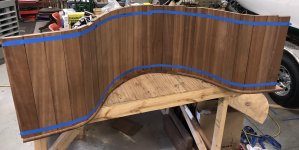
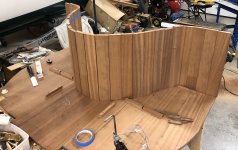
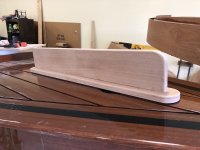
Some more progress has been made! I have begun the process of assembling the skirting around the seats at the boiler. The seat is upside down and the mahogany has been cut and fit to follow its curve. In the upcoming days we will determine the floor thickness and cut all of these to length to fit perfectly allowing the floor to slide just under the skirting.


IMG_2011.jpg

IMG_2012.jpg


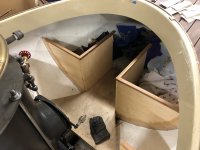
Here is the existing supports in the boat for the seating to show where the finished seat will go:
IMG_2013.jpg
 

seikeinlemming

Petty Officer 2nd Class" & 2020 Splash of the Year
Joined
May 23, 2011
Messages
140
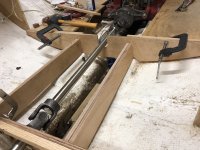
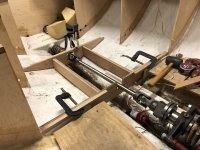
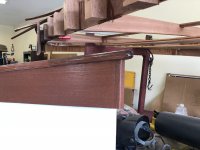
I haven’t been able to do as much this winter as I would’ve liked, but a decent amount of progress has been made on the structure to support the rear raised floor. As we routed the propeller shaft in through the boat, it became necessary to raise the rear deck by 3/4 of an inch for clearance. In the fall for our initial run, I had built a temporary structure out of pine from Lowe’s which worked perfectly. In the photo attached you can see the permanent structure (which was based on last fall’s design) cut to fit and ready for a big epoxy session. I will be rounding over the sharp corners to better accept the fiberglass.

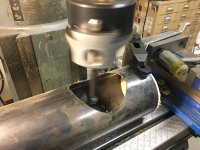
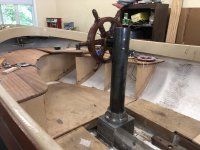
We have also been working on building the pedestal for the steering wheel. You can see the hole being bored out that will accept the hydraulic steering helm unit. The helm unit will bolt inside the column and the lines will run down to the base and out to the stern. The steering mechanism is already mounted and just needs a few final touches to be operable. This steering column will be covered in mahogany to match the style of the rest of the boat.
 

Attachments

  • 7CB72E1D-3EF8-4741-B0C8-72E6DFD2497D.jpeg
    7CB72E1D-3EF8-4741-B0C8-72E6DFD2497D.jpeg
    3 MB · Views: 17
  • 42621898-9CE1-4277-B2F0-5E2C330BBC59.jpeg
    42621898-9CE1-4277-B2F0-5E2C330BBC59.jpeg
    3 MB · Views: 17
  • F669257B-D351-4CC1-A9BD-D6F4B7F0388B.jpeg
    F669257B-D351-4CC1-A9BD-D6F4B7F0388B.jpeg
    2.1 MB · Views: 17

seikeinlemming

Petty Officer 2nd Class" & 2020 Splash of the Year
Joined
May 23, 2011
Messages
140
I guess it's been over 3 months and I owe you another update. It's been a few months of boring things like tabbing various supports in to the hull and making structural stuff work. The exciting parts are in the photos below.

IMG_2386.jpg

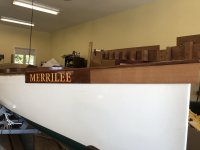
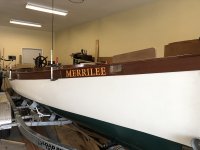
The photo above shows the gold leaf name completed and taped in place (just for the photo and the fit). We were going to do the gold leaf ourselves but my uncle is a retired sign maker and loves doing gold leaf so we let him have a shot at doing it. Part of this project has always been to let as many people in the family help out on various parts where they can, so it was neat to have his expertise involved. I'm positive it looks much better than if we did it ourselves with no experience. Since this photo was taken, the mahogany on both sides of the name has been stained and it is waiting for a day when I have time to roll the boat outside and affix everything to the hull.

IMG_6241.JPG
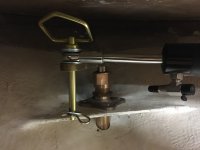
Next is the steering mechanism with a temporary pin connecting everything. When we took the boat out in November, some of you may remember that after the tiller broke off, I had to grab a little tiller arm to maintain direction. In this photo you can see the little tiller arm attached to the Seastar hydraulic steering ready for the rest of the steering to be complete. We also added a keyway and keyed the tiller arm to the rudder so it doesn't slip - that had been a temporary shortcut we made to get on the water which is now corrected.

64445237063__3354F8F2-19DA-42A7-B017-C51FD09EB2DE.JPG
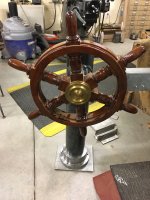
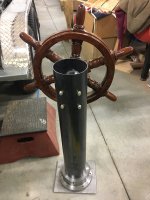
Here is the steering wheel on the steel and iron support that has been built for it. The round base was turned out of a solid block of iron. The square below it is the top of a mount that will go above the propellor shaft. All of this metal will be covered with mahogany.

64445238857__E5E491FC-9074-4E6F-A93F-9A16ECC061E6.JPG
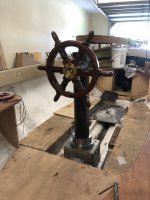
Rear image of the wheel to see how the Seastar helm has been fitted to the pole. Our wood slats will cover these bolts while being removable in case we need access to the bolts for servicing.

Within a few days the wheel should be bolted in to the hull and we can hook up the hydraulic lines.

Outside of these images, progress has been made adding a mount for the bilge pump, making a registration panel for the front that attaches magnetically so it can be removed for photos and other necessary times.

We are trying to get a fair number of things complete so we can put everything back together and try out the new steering on the water in July (maybe...).

First child on the way around Labor Day, so work on this project may slow down a bit after that, but at least there will be someone to take out on the boat(s) and maybe *fingers crossed* interested in it enough to not want to sell this one when I die!
 

seikeinlemming

Petty Officer 2nd Class" & 2020 Splash of the Year
Joined
May 23, 2011
Messages
140
And a few days later we have some more progress! The steering wheel base has been built and positioned, the wood band is stained and running from now to slightly past mid-ship, and the registration plate is fashioned, sanded and awaiting stain.


In the next few days we will be drilling and tapping 4 holes down into the steel embedded in the hull to fasten the steering column. As soon as that is done we will be able to install hydraulic lines. Woodwork will continue on the steering column and finishing up the floor.
 

Attachments

  • CC75C8D0-F996-45B0-9ED6-F59AF197F9BA.jpeg
    CC75C8D0-F996-45B0-9ED6-F59AF197F9BA.jpeg
    2.5 MB · Views: 17
  • 4F0F57B8-3396-49FA-8927-74CB9706A3DF.jpeg
    4F0F57B8-3396-49FA-8927-74CB9706A3DF.jpeg
    2.7 MB · Views: 16
  • 04867407-3EA5-4849-B06D-05D9411C718B.jpeg
    04867407-3EA5-4849-B06D-05D9411C718B.jpeg
    1.6 MB · Views: 15
  • 9C9B4974-D3E7-4CDD-A93F-13A01B7BF5E4.jpeg
    9C9B4974-D3E7-4CDD-A93F-13A01B7BF5E4.jpeg
    2.8 MB · Views: 17

seikeinlemming

Petty Officer 2nd Class" & 2020 Splash of the Year
Joined
May 23, 2011
Messages
140
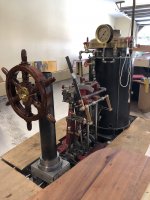
Just got everything mounted back in the boat and the hydraulic steering filled and tested. Photos are of the final configurations/spacing of the boiler, engine, and steering wheel.

We are gearing up to take it out on the water in July, there’s a punch list of a few things that need to get done before then but we are on track to be steaming along again soon!
 

Attachments

  • 0B293C29-9ED9-40D9-B6B8-B1202003A356.jpeg
    0B293C29-9ED9-40D9-B6B8-B1202003A356.jpeg
    1.4 MB · Views: 18
  • 776329F5-F879-4C6E-BB98-7A0DB386AB28.jpeg
    776329F5-F879-4C6E-BB98-7A0DB386AB28.jpeg
    2.9 MB · Views: 18

seikeinlemming

Petty Officer 2nd Class" & 2020 Splash of the Year
Joined
May 23, 2011
Messages
140
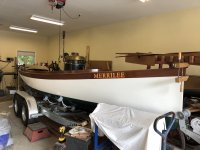
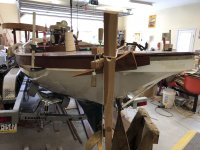
Trim work continues, here are some updated photos as we get further and further to the stern. The last photo is on the bow which was attached today. Ignore the wood above it, that’s just the canopy in partial construction and in storage.


Unrelated to this trim, but I’m going to throw a question out there that is more generic boat stuff: in the past few weeks we installed hydraulic steering from seastar(purchased 4 to 5 years ago prior to them re-branding). I get the manual stated five turns lock to lock, however, The following things are experienced and I’m wondering if that is normal or or if I need to fix something.

The system was filled and bled three times, so there is probably no air in it (yea, I know, that’s a bold statement when dealing with hydraulic systems).

- When turning the whole way in each direction, after the cylinder stops moving and the wheel gets harder to spin, if you continue applying pressure to the wheel it will turn indefinitely even though you are at the end. Is this normal?

- If you turn the entire way in either direction and then turn the opposite direction there is a click sound that is made in the helm. The volume of the click sound is louder the more pressure you put on the system at the end of your turn, but it’s always audible regardless of pressure. If you change directions midway before you hit the end, it sounds like there is a small little mechanical shift in the helm, but very quiet. Maybe the pressure at the ends is just making that louder as it releases?

I have read countless forum posts here and other places ranging everywhere from “ Teleflex/seastar says that’s normal” to “no it shouldn’t do that. My other boats do not use hydraulic steering so this is entirely new to me. Any insight someone more experienced than myself can provide is much appreciated!
 

Attachments

  • ADA3A6B6-6669-41A5-92E8-FD44CFE0BFB7.jpeg
    ADA3A6B6-6669-41A5-92E8-FD44CFE0BFB7.jpeg
    4.4 MB · Views: 15
  • 5C26735F-89AA-4238-BA9E-AD6D91C35200.jpeg
    5C26735F-89AA-4238-BA9E-AD6D91C35200.jpeg
    2.5 MB · Views: 15
  • ECF71474-92CC-47CE-8299-15B373DCDC2B.jpeg
    ECF71474-92CC-47CE-8299-15B373DCDC2B.jpeg
    2.9 MB · Views: 15
  • C47ED98A-0851-4412-9345-2C1B9339A86D.jpeg
    C47ED98A-0851-4412-9345-2C1B9339A86D.jpeg
    2.2 MB · Views: 13

seikeinlemming

Petty Officer 2nd Class" & 2020 Splash of the Year
Joined
May 23, 2011
Messages
140
Work has slowed down tremendously on the Merrilee. As of the last post at the beginning of July, our intent was to take it out a second time in the last week of July. Getting all the trim on and at least two coats of varnish was paramount for that timeframe. The week prior to the planned second splash, our new first mate decided he wanted to be born 6 weeks early and of course all the boat plans get dropped. Fortunately progress had been made that the boat was ready to go in the water as he was born and so hopefully we can get a day this fall yet to get it wet and test out the new steering and other improvements.

All hope is not lost, though. If you recall, there are two people working on this project and my dad has been able to make some progress on some pumps and other stuff.

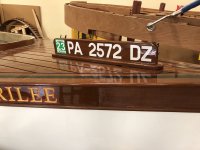
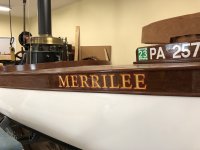
Our boat registration FINALLY came in June (Thanks PA Fish and Boat commission), and I was able to get the registration plate built. While the rest of the front deck is finished in varnish, the registration plate is actually coated with epoxy. Since the registration sticker will need to be replaced over time (and I use a blade to do so), the extra durability of the epoxy was desirable to permit that. This panel is actually magnetically attached to the deck. When we want to take photos, we can remove it to look more period, and then snap it in to place when we need to be out on the water.IMG_3262.jpeg

Here you can see the completed trim (partially sanded), particularly worthy of note is the bead that runs along the bottom to ensure a smooth uniform look at the bottom of the wood, it allows me to hide slop and other inconsistencies.
IMG_3263.jpeg

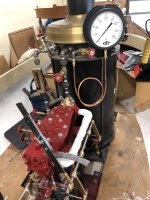
Some of you may recall the first splash video my reference to the steam gauge not working correctly. We purchased and piped in a brand new gauge that while it is not as period as the previous one, allows us to get out on the water until we are able to fix up the original. It will also serve as a backup in the event that the other one fails.
IMG_3261.jpeg

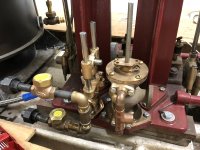
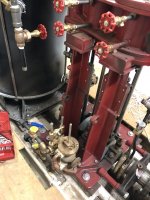
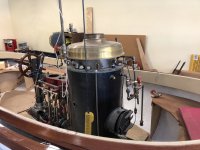
There are two pumps that are powered by the engine, one is a vacuum pump (right) and water pump (left). These both receive power from the up and down motion of the cylinders. The water pump will move water from the holding tank to the boiler, and the vacuum pump creates a vacuum on the exhaust of the engine to assist in pulling steam through and out of the engine, making it run more efficiently. The link to power these is being built now and the hope is that we can get one or both of them piped in to work by the time we would take it out yet this fall.

As for the water pump, it is the second of three methods to get water in the boiler. We use an injector which uses a series of valves and steam to replenish water (if the boat is stationary). This was installed and operable last fall. This almost-complete pump will provide water while the engine is running (not using additional steam so it is more efficient because you are already running the engine). The third one which will be it's own mini project is essentially another very little steam engine on one side and a pump on the other end. It will also allow us to move water when the boat is stationary. Since having water in the boiler is very critical, it will be nice to have three different options to do so.IMG_3259.jpeg

IMG_3260.jpeg


Those are the updates for now - I really wanted to be able to post about a month ago with the video of splash number 2 and say that the steering worked great, but obviously we had a change of plans. Stay tuned this fall as hopefully we can find a day to get this out on the water again.
 

seikeinlemming

Petty Officer 2nd Class" & 2020 Splash of the Year
Joined
May 23, 2011
Messages
140
These old-timey things sure are complicated! :)
To an extent they are complicated, except if you compare it to an internal combustion engine with all the things on it that have to be in sync- it's actually a whole lot simpler!
 

Scott Danforth

Grumpy Vintage Moderator still playing with boats
Staff member
Joined
Jul 23, 2011
Messages
49,570
To an extent they are complicated, except if you compare it to an internal combustion engine with all the things on it that have to be in sync- it's actually a whole lot simpler!
yes and no.

steam engines require fuel to be converted with water into steam prior to the steam being harnessed and generating work

internal combustion engines directly convert fuel and air into work via an enclosed explosion.
both require passages, valves, timing, etc. to work.
at the end of the day if you go down each path of each system the steam engine has a few more bits in the comparable assembly (assuming a carbureted motor) unless you compare a vintage mechanical fuel injection system then they are about the same

however anything purely mechanical in design is a wonderful thing. love this build.
 

seikeinlemming

Petty Officer 2nd Class" & 2020 Splash of the Year
Joined
May 23, 2011
Messages
140
Made some progress yesterday with our test fire-up. After being delayed from our end of July on-the-water day, we've selected this coming Monday as the second splash day. We had made so many changes since last fall that we wanted to make sure it all worked. Two stainless steel water tanks were added under the front seats (port and starboard to balance weight as much as possible). We now dump water into those tanks to pump it into the boiler. It's a massive upgrade from a plastic bucket boiler-adjacent that can't hold up to the heat and melts before you even launch the boat.

Up for testing were the following:

Revised Injector piping - we moved this around and piped it into the starboard water tank. This was the item we had issues with last fall to get water in to the boiler, but with the revised setup, all should be good.

Added on-engine water pump - Closeups of this in previous posts, video below of it running. This pumps water from the port water tank into the boiler. There are two check valves that aid in this pumping action. During our test we found that it wasn't working as expected and the valves were too strong and resisting the free flow of water. My dad mentioned that in previous steam setups he has used check valves and they didn't have the spring in them, so we pulled the springs out and everything worked perfectly. It was precisely this reason that we spent 4 hours in a full-out test before getting to the lake.

Bilge pump - We added a Rule 900GPH bilge pump and wired it into a battery that is placed under the back seats. This mount was glassed in to the hull and pump wired in with temporary switch and fuse, all ready to bail us out if we run in to any water in the bilge.

When we get to the lake, we will also be testing the new hydraulic steering, although we've already tested that extensively so it was omitted from any testing yesterday. Four new/revised systems to be an improvement on 11 months ago when we had it out.

Here is the video of the pump test. When it shows the front of the boiler, you will see the piping for the water to go in from the pump on the right (above the firebox door) and the revised injector on the left.


I will assemble footage from Monday and get it up on here after we are out on the water.
 
Top