Starcraft Holiday 18 make over

BOYS & TOYS

Petty Officer 2nd Class
Joined
Mar 1, 2008
Messages
141
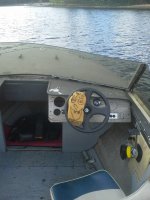
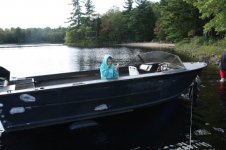
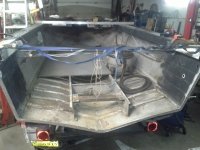
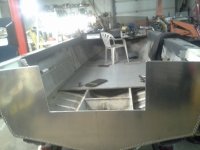
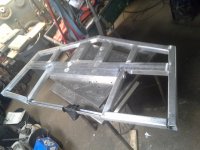
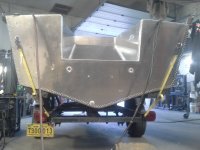
I found this site very helpful to makeover this 18ft Holiday so I thought maybe someone else could get inspiration from some pictures. I will try to answer any questions. I'll try to post in order of repairs.
It has been used each summer since I picked it up so its a longtime rebuild.

It had a older 65hp Mercury mounted on it and a 1999 125hp Mercury that came with.
 

Attachments

  • 20170912_20.jpg
    20170912_20.jpg
    65.2 KB · Views: 83
  • 20170113_103921.jpg
    20170113_103921.jpg
    1.3 MB · Views: 79
  • 20170113_112349.jpg
    20170113_112349.jpg
    614.6 KB · Views: 74
  • 20170129_160029.jpg
    20170129_160029.jpg
    1.2 MB · Views: 78

BOYS & TOYS

Petty Officer 2nd Class
Joined
Mar 1, 2008
Messages
141
The old transom was corroded and full of holes. It must of had an interesting past. It left the factory as a outboard, changed to inboard and back to outboard.
 

Attachments

  • 20170129_160146.jpg
    20170129_160146.jpg
    1.3 MB · Views: 55
  • 20170303_160935.jpg
    20170303_160935.jpg
    437 KB · Views: 55
  • 20170303_161007.jpg
    20170303_161007.jpg
    1.1 MB · Views: 56

BOYS & TOYS

Petty Officer 2nd Class
Joined
Mar 1, 2008
Messages
141
3/16" 5052 was riveted to the transom .I didn't want to use plywood core for the transom so 2" tube was welded up to fit. I designed the transom to use long and x long shaft motor by adding or removing a piece of 2x4 aluminum that bolts in.
I made a jig to drill the motor mount pattern.
 

Attachments

  • 20170306_174628.jpg
    20170306_174628.jpg
    492 KB · Views: 53
  • 20170306_174653.jpg
    20170306_174653.jpg
    531.7 KB · Views: 56
  • 20170306_211220.jpg
    20170306_211220.jpg
    1.3 MB · Views: 56
  • 20170306_211359.jpg
    20170306_211359.jpg
    454.1 KB · Views: 59
  • 20170307_120620.jpg
    20170307_120620.jpg
    506.3 KB · Views: 54
  • 20170318_214600.jpg
    20170318_214600.jpg
    384.5 KB · Views: 51
  • 20170318_214644.jpg
    20170318_214644.jpg
    485.6 KB · Views: 51
  • 20170318_214453.jpg
    20170318_214453.jpg
    969.7 KB · Views: 53

BOYS & TOYS

Petty Officer 2nd Class
Joined
Mar 1, 2008
Messages
141
I turned spacers and welded them to prevent the motor mount bolts from distorting the tube.
Needed to find a spot for the kicker mount.
The outside skin and the support are welded together.
 

Attachments

  • 20170322_091617.jpg
    20170322_091617.jpg
    560.6 KB · Views: 34
  • 20170322_091734.jpg
    20170322_091734.jpg
    614.9 KB · Views: 34
  • 20170326_190046.jpg
    20170326_190046.jpg
    1.3 MB · Views: 34
  • 20170327_095757.jpg
    20170327_095757.jpg
    606.9 KB · Views: 35
  • 20170407_083925.jpg
    20170407_083925.jpg
    1.2 MB · Views: 32
  • 20170408_200429.jpg
    20170408_200429.jpg
    552.7 KB · Views: 34

BOYS & TOYS

Petty Officer 2nd Class
Joined
Mar 1, 2008
Messages
141
The Crestliner Commander layout for fishing inspired the splash well.
Made reinforced filler pieces between the splash well and the gunnels to handle being stepped into.
One corner trim piece was missing so I made a pair to match.
 

Attachments

  • 20170722_204057.jpg
    20170722_204057.jpg
    1.2 MB · Views: 56
  • 20170722_204135.jpg
    20170722_204135.jpg
    1.1 MB · Views: 52
  • 20170806_171146.jpg
    20170806_171146.jpg
    1.1 MB · Views: 53
  • 20170807_124128.jpg
    20170807_124128.jpg
    463.4 KB · Views: 51

BOYS & TOYS

Petty Officer 2nd Class
Joined
Mar 1, 2008
Messages
141
If you want to test your marriage ask your wife for help setting a few rivets. 😀 
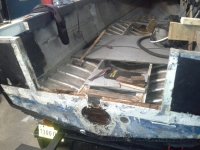
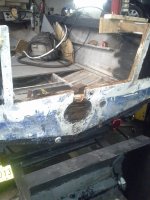
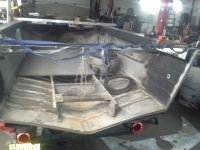
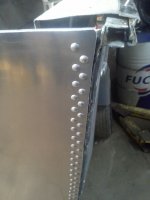
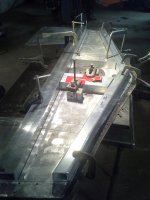
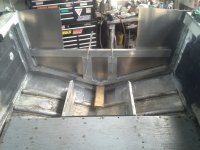
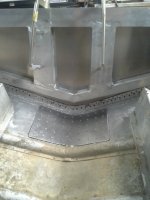
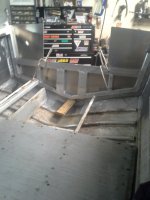
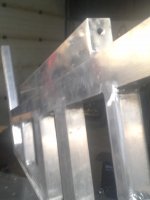
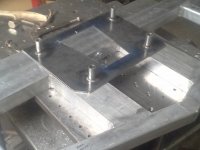
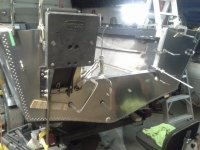
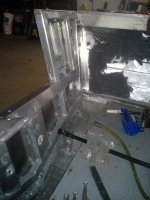
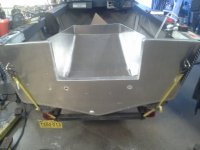
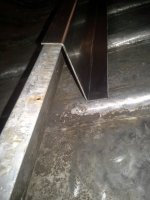
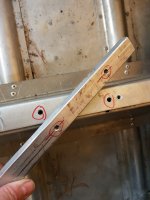
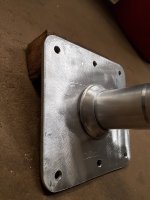
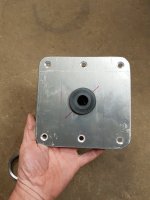
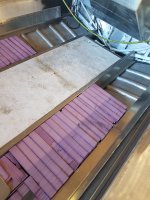
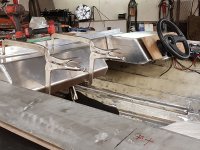
I found random corrosion holes in the hull with some under ribs. More tig welding laying on the remaining ribs.
The stringer design seems weak so I bent another piece and riveted it to the original piece in a box style.
Added a bunch more box style structure to the stringers forward to the bow.
Made a hot wire foam cutter and filled the under deck with foam.
Made inserts to go inside the box stringers for some of the seat bolts to thread in.
Aluminum plates were welded to the stringers for the seat bolts to thread in.
 

Attachments

  • 20170417_192140.jpg
    20170417_192140.jpg
    637.7 KB · Views: 48
  • 20180128_152613_001.jpg
    20180128_152613_001.jpg
    1.9 MB · Views: 48
  • 20180303_232122.jpg
    20180303_232122.jpg
    2.1 MB · Views: 49
  • 20180303_215102.jpg
    20180303_215102.jpg
    2 MB · Views: 51
  • 20180811_182720.jpg
    20180811_182720.jpg
    2 MB · Views: 50
  • 20180811_182715.jpg
    20180811_182715.jpg
    1.9 MB · Views: 51

classiccat

"Captain" + Starmada Splash Of The Year 2020
Joined
Dec 20, 2010
Messages
3,405
Welcome and thanks for sharing that amazing transformation! That original transom skin was rough; started life as an I/O I presume but took a wrong turn somewhere.

You may get a few PMs about that transom corner trim piece; another old starmada member fabs them out of plastic.

Are you planning to splash her this season?
 

ShoestringMariner

Lieutenant Commander
Joined
Apr 18, 2015
Messages
1,563
Excellent fabrication work, I like your idea of eliminating the plywood.
is that bead board styro down the centre? If so, are you not worried about it water logging or deteriorating causing little floating beads in the bilge? Or mouse tunnelling
 

classiccat

"Captain" + Starmada Splash Of The Year 2020
Joined
Dec 20, 2010
Messages
3,405
Are there still plans to add kneebraces? I'd probably go the v5 route and tie them directly to your beefed-up stringers. @Watermann can probably get you some good close-ups. IIRC they tie the splashwell/transom/stringer together.
 

BOYS & TOYS

Petty Officer 2nd Class
Joined
Mar 1, 2008
Messages
141
Welcome and thanks for sharing that amazing transformation! That original transom skin was rough; started life as an I/O I presume but took a wrong turn somewhere.

You may get a few PMs about that transom corner trim piece; another old starmada member fabs them out of plastic.

Are you planning to splash her this season?
Thank you. The transom had a1/16" sheet of aluminum riveted over the old mess then a piece of 1/4" bolted on top. The 1/4" piece was continued in the splash well.
The tags on the boat said it was an outboard.
It's been in the water each summer.
 

BOYS & TOYS

Petty Officer 2nd Class
Joined
Mar 1, 2008
Messages
141
Excellent fabrication work, I like your idea of eliminating the plywood.
is that bead board styro down the centre? If so, are you not worried about it water logging or deteriorating causing little floating beads in the bilge? Or mouse tunnelling
Thank you.
Good eye😉
It is in a very thick piece of the original "to last rebuild" foam probably 6" thick that seemed perfect. Blue and pink foam is definitely preferred. All others was tossed. So far all good. These pictures are not new just trying to show in order.
I don't think mice and bugs are fussy about foam types ☹
 

BOYS & TOYS

Petty Officer 2nd Class
Joined
Mar 1, 2008
Messages
141
Are there still plans to add kneebraces? I'd probably go the v5 route and tie them directly to your beefed-up stringers. @Watermann can probably get you some good close-ups. IIRC they tie the splashwell/transom/stringer together.
I think you're ahead of the pictures 😀 because that's exactly what I did. The knee brace was gone when I got it. Probably a victim of the I/O conversion.
I welded a piece to fit inside each stringer to the transom tube then lots of blind rivets to join. If the stringers need removal just drill the rivets out.
 

classiccat

"Captain" + Starmada Splash Of The Year 2020
Joined
Dec 20, 2010
Messages
3,405
I think you're ahead of the pictures 😀 because that's exactly what I did. The knee brace was gone when I got it. Probably a victim of the I/O conversion.
I welded a piece to fit inside each stringer to the transom tube then lots of blind rivets to join. If the stringers need removal just drill the rivets out.
Apologies for stealing your thunder! 🤣
 

BOYS & TOYS

Petty Officer 2nd Class
Joined
Mar 1, 2008
Messages
141
I like the idea of tons of deck space if required. Time to make rear seat mounts. I bought one made of "stainless" so said the package. It did have some ss I think?
This is my all aluminum version.
 

Attachments

  • 20180319_164515.jpg
    20180319_164515.jpg
    2.7 MB · Views: 14
  • 20180319_142625.jpg
    20180319_142625.jpg
    1.9 MB · Views: 14
  • 20180319_162113.jpg
    20180319_162113.jpg
    2.1 MB · Views: 13
  • 20180319_162113.jpg
    20180319_162113.jpg
    2.1 MB · Views: 12
  • 20180319_142633.jpg
    20180319_142633.jpg
    2.1 MB · Views: 12
  • 20180319_164225.jpg
    20180319_164225.jpg
    2.3 MB · Views: 11
  • 20180319_142656.jpg
    20180319_142656.jpg
    1.6 MB · Views: 14

BOYS & TOYS

Petty Officer 2nd Class
Joined
Mar 1, 2008
Messages
141
Seat post time. I dusted off the lathe and made some aluminum and stainless chips. 3/4"thread in mount
I just used loctite type product to join the tube to the ends.
The swivel/sliders attached to the seats were bought along with the front pedestals.
 

Attachments

  • 20180319_142425.jpg
    20180319_142425.jpg
    1.8 MB · Views: 24
  • 20180319_142453.jpg
    20180319_142453.jpg
    1.1 MB · Views: 11
  • 20180319_142523.jpg
    20180319_142523.jpg
    2 MB · Views: 11
  • 20180319_164236.jpg
    20180319_164236.jpg
    1.5 MB · Views: 24
  • 20180411_115328.jpg
    20180411_115328.jpg
    343 KB · Views: 25

BOYS & TOYS

Petty Officer 2nd Class
Joined
Mar 1, 2008
Messages
141
This picture has been shown before but I forgot to mention the chine reinforcements.1/8" was bent and riveted to the top of the ribs and the sides of the hull. 3/4" plywood treated with old timers mix and then varnish is the first thing I tried on the deck.
 

Attachments

  • 20180811_182720.jpg
    20180811_182720.jpg
    2 MB · Views: 35
  • 20180811_182720.jpg
    20180811_182720.jpg
    2 MB · Views: 37

MNhunter1

Ensign
Joined
May 12, 2014
Messages
979
Nice work! Looking forward to the pictures of the completed windshield after the sneak peek of the cardboard mock up.
 

Moserkr

Chief Officer + Starmada Splash Of The Year 2021
Joined
Nov 23, 2020
Messages
834
Very nice work! You obviously have skills and tools many do not possess. Looking forward to seeing the rest and how she floats.
 

BOYS & TOYS

Petty Officer 2nd Class
Joined
Mar 1, 2008
Messages
141
So this is the dash and windshield when I bought it.
I didn't like looking over or through the plastic plus no access to the bow. Getting randomly splashed also no fun.
Previous owners drilled and mounted everything possible to the gunnel tops and bow skin leaving hundreds of holes. The gunnel holes were welded and I replaced the bow skin.
The wood support behind the dash was replaced with 3/16" aluminum bent on bottom and a piece welded into the top to in the shape of the original wood.
I reused the wood supports under the bow skin since they looked good.
 

Attachments

  • 20160818_170555.jpg
    20160818_170555.jpg
    731.8 KB · Views: 31

BOYS & TOYS

Petty Officer 2nd Class
Joined
Mar 1, 2008
Messages
141
Keeping with the aluminum theme new consoles and a water tight dash made.
I used "CAD" cardboard aided design 😀
Need to show a picture of my little helper drilling rivets. He helped me with everything he could do.
The last pic has been shown before but it shows the window template.
I have a friend who works in a large machine shop that helped me bend the window frame.
 

Attachments

  • 20180416_210928.jpg
    20180416_210928.jpg
    3.3 MB · Views: 55
  • 20180416_210950.jpg
    20180416_210950.jpg
    3.3 MB · Views: 59
  • 20180126_153749.jpg
    20180126_153749.jpg
    1.8 MB · Views: 55
  • 20180411_115328.jpg
    20180411_115328.jpg
    343 KB · Views: 57
  • 20180429_145356.jpg
    20180429_145356.jpg
    1.7 MB · Views: 54
  • 20180429_201913.jpg
    20180429_201913.jpg
    4.4 MB · Views: 56
Top