Sig 300 Bad Stringer and motor mount

Roady68

Seaman Apprentice
Joined
Sep 17, 2016
Messages
38
No Title

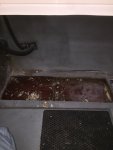
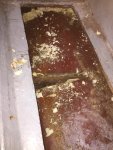
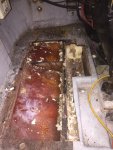
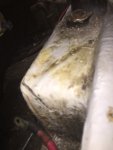
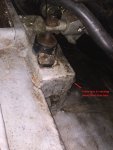
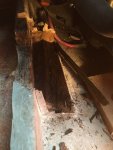
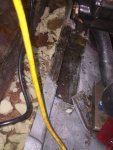
Did some more demo work. As I mentioned, I had removed a couple of 1' square sections of the battery bunk to see what was underneath. The wood is drying out in that area nicely. A lot of water held up in the foam. So my goal is to get all of the foam pulled out. There are several little outriggers from the stringer that were only held in place with the foam. You can see two of them in the pictures here. They are not glued or glassed in. Just a tab keeps them located on the stringer. Unfortunately to get to the foam forward, I am going to need to pull the decking under the cushions in the rear salon (aft berth). Wife isn't going to be happy. I'll just make quick work and get it covered back up before she sees. Removing the foam is a pain in the butt.
I also need to get the remaining rear deck removed to see if the screws from the trim tabs poke through the hull and are the source of water. Weather is turning cold for a few days. So no work until next weekend.
 

Attachments

  • photo259384.JPG
    photo259384.JPG
    183.1 KB · Views: 2
  • photo259385.JPG
    photo259385.JPG
    346.9 KB · Views: 2
  • photo259386.JPG
    photo259386.JPG
    331.7 KB · Views: 2

Roady68

Seaman Apprentice
Joined
Sep 17, 2016
Messages
38
No Title

The engine mount fiberglass is cracking. My suspicion is that the wet wood is loosing strength and the weight of the engine is putting too much stress on the fiberglass. My goal is to cut it out and rebuild it and reglass it in. Any other ideas? I don't think it needs to be as long as it is. My guess is that its set up for 6 cyl and 8 cyl applications. When I rebuild, I may shorten it up.
 

Attachments

  • photo259396.JPG
    photo259396.JPG
    135.4 KB · Views: 0
  • photo259397.JPG
    photo259397.JPG
    270.1 KB · Views: 0

Baylinerchuck

Commander
Joined
Jul 29, 2016
Messages
2,726
Same exact thing I found with my Chap. I suspect the wood swelled due to the water and cracked the fiberglass. My motor mounts were in essence four 2x6 pieces of wood covered in glass. The bottom of the mount was not glassed, so water was soaked in from the bottom. The only way to fix it is to remove and rebuild. I don't think the motor ever sank due to it still being perfectly aligned with the gimbal.
 

drewm3i

Petty Officer 1st Class
Joined
Dec 31, 1969
Messages
280
What you are calling outriggers are actually supposed to be bulkheads. If they aren't glassed to the hull, that is beyond shitty workmanship.
 

drewm3i

Petty Officer 1st Class
Joined
Dec 31, 1969
Messages
280
Is that engine mount solid with a hammer test? You really need to pull that motor...
 

Roady68

Seaman Apprentice
Joined
Sep 17, 2016
Messages
38
The bulk heads are not glassed in. Just held in place by expanding foam. The foam did make them pretty solid. My plan is to replace them with pieces that match the contour of the hull and glass them in. The mount is solid with the hammer test, but the wood is wet when I drill through the fiberglass. The engine will get supported so I can pull off that mount, but not removed. I will have enough room to work now that the sea water pump, alternator and fuel filter/separator are removed. It will take a bunch of different tools I have (air, electric and hand tools) to fit in there, but I have done some dry runs on moving around in the area and I should be able to work. The weather hasn't been very cooperative. If its warm, its raining and windy. If the weather clears and calms down, its cold. We had single digits on Sunday. Brrr. Anyway, we will be warming up more consistently in the next few weeks. So I hope to get back on the work. In the meantime, I have been working on fixing switches that didn't work right. I also refinished the dash panels with vinyl wrap that looks like wood grain. I will post in the electrical section this week to show what I have been up to.
 

Roady68

Seaman Apprentice
Joined
Sep 17, 2016
Messages
38
Progress has been slow. March weather has been more typical of February. In fact, we had more snow in March than almost the whole winter. Anyway, more progress made. I removed the decking covering the stringers back to the transom. I believe I found the source of water intrusion. On this hull, the trim tabs are mounted to the bottom of the hull in a recess, not on the transom as I more commonly see. The screws penetrate up into the hull and into a block of wood that is glassed in. I'll get some pictures later. Anyway, the glassing in along the edge is not real good. And, several of the screws poke up through the glass. I am sure the sealant has dried out and let water intrude up through the screws, soaking the wood and allowing water to enter into the area under that deck. So I can focus my attention there (I will seal up the port side screws while I am at it, though that side is dry).

I also cut out a section of that deck inside the cabin. There is evidence of water in that area, but everything looks decent now. Moisture reading on meter is high, but not pegged like back in the engine bay. There is a bulkhead that is glassed in between the cabin and engine compartment, so I think that hindered a lot of water from getting into the cabin area stringers. My guess is that the moisture readings are due to the water wicking up the stringer. So this weekend I will start to address the trim tab area. And I still need to address the motor mount and swim platform mount (which started this whole exercise). I hope I can start putting back together by end of April. I have lucked out that nothing is rotted except the motor mount box.

I do have a couple of questions I will ask here and maybe generically in another thread. First, I removed a lot of the expandable foam in the area under that deck. I am assuming there is some structural integrity that the foam offers. The foam was holding the small bulkheads in (see pics earlier in thread). I want make new bulkheads and actually glass them in. The reason to do that is that I want to avoid refoaming right away until I am sure the leaks are taken care of. Second, I will be replacing the decking but not glassing it in right away for the same reason. I plan on screwing it down with stainless screws. Given how easy everything came apart, I would think I can at least duplicate similar strength. I will be adding a couple of those round screw access covers so I can monitor inside the cavity. Does this sound like a reasonable plan? If everything stays dry then I can glass it in and add foam later this season or during off season next year. I'll try to sketch up what I am thinking later this week. Third, I thought I saw a method of replacing or repairing screw holes in cored fiberglass. I am either trying to find a link, or looking for recommendations. I thought it was something like drilling out the wood, using an epoxy and the screwing into the epoxy. Any ideas?
 

Baylinerchuck

Commander
Joined
Jul 29, 2016
Messages
2,726
Yes the foam is going to add rigidity to the hull, and a lot of times support for the deck. I also believe that the deck itself adds a ton of lateral rigidity when properly fiberglassed to the hull.
 

Roady68

Seaman Apprentice
Joined
Sep 17, 2016
Messages
38
No Title

OK, I spent some more time on boat. Mostly to remove foam. Foam has some serious water retention in some areas, and is dry in others. So far, the wet stringers are drying out very nice. No rot found either. But, I am still thinking the screws for the trim tabs were a source of water. I removed the trim tab and I can look through a couple of the screw holes and see light. The screws were longer than the board and glass tabing and poked up into the hull. So if the sealant was starting to dry out, or shrink up, it would definitely be a leak path. I have a couple of questions on what to do with the core that the trim tabs were screwed into. I am planning on replacing the core board. But I don't want to screw the new screws into wood as before. I am thinking about have larger diameter holes in the core where the screws go into and using epoxy to form a non-wood material to screw into/ See my sketch on the current and proposed Detail A. Would this work? Is there a different material than wood I could use for replacement core? Also, if I cut the top of the fiberglass tabbing that is folding the core in, do I use the "peanut butter" to glue new board to the hull and sides of the glass? Though my drawing isn't to scale, the amount of fiber glass holding that core board in isn't an exaggeration. It must be 2" thick. Hence I don't want to have to sand it down to the hull.

Thoughts?
 

Attachments

  • photo262948.jpg
    photo262948.jpg
    126 KB · Views: 0

Woodonglass

Supreme Mariner
Joined
Dec 29, 2009
Messages
25,924
Sorry to rain on your parade but...Any/all wood that has gotten wet, will eventually rot. If you don't replace it now, you WILL replace it later. NO resin will adhere to wet or even slightly damp wood. MANY people have come on this forum with the exact same conditions and some follow our advice and others don't. Some, not all, of those that did NOT replace the wet wood, have returned to the forum and reported that they SHOULD have listened to our advice because they are now tearing back into their boats to do what they should have done the first time.

The proper repair would be to cut all stringer and motor mount channels out, grind it down to the hull and replace all wet wood with new wood and then Glass it all back.

Bottom line is...It's your boat and you're free to do as you see fit.
 

Roady68

Seaman Apprentice
Joined
Sep 17, 2016
Messages
38
I agree, but I am not tearing anything major out until I am sure the source of water has been found and taken care of. The two stringers in question are not even glassed in. If you look at the pics, there is a deck that covers the two stringers. The out side face and top of the decking was glassed in. I have the decking in the garage and its dry. And not by my touch, but by the Tramax meter that the surveyors use. If the water intrusion is take care of and I have to go into it in a few years, so be it. But if dry, and strong the its getting buttoned up for this season. The mount is definitely bad and that is getting cut out and replaced along with that short stringer. The rest of the boat is bone dry. So something happened on this one side, and I want to make sure I have found the problem.
 

Baylinerchuck

Commander
Joined
Jul 29, 2016
Messages
2,726
Looking at your drawing, could you replace the wood with seacast? I would think that the epoxy would be too hard and brittle to screw directly into unless you drilled all the way through it, and through bolted the tab. I don't know, just my take.
 

Roady68

Seaman Apprentice
Joined
Sep 17, 2016
Messages
38
Looking at your drawing, could you replace the wood with seacast? I would think that the epoxy would be too hard and brittle to screw directly into unless you drilled all the way through it, and through bolted the tab. I don't know, just my take.

Is it possible to get a small amount of seacast. All the kits I see are 5 gallon pails. I'll have to look more later today. I like that idea as it gets rid of wood core below the water line.
 

Roady68

Seaman Apprentice
Joined
Sep 17, 2016
Messages
38
Another question. Got more demo work done and decided to cut out engine mount and stringer area that was wet. It was the wettest wood and after drilling low, definitively starting to rot. The engine mount was a large block of wood about 4" square and 12" long laying on its side along the stringer. It was glassed in around the stringer and hull but not epoxied or secured with hardware to the stringer that ran next to it. For the stringer I will use the marine plywood. The block of wood though has me asking myself some questions. First, what do I replace it with? Second, should I attache it more securely to the stringer? Does one use many lamination of marine plywood to get desired height? Or a block of pressure treated wood? Or a block of cypress, white oak? Or lamination of starboard or azek board? Should I add a couple of stainless or bronze bolts or screws to the stringer along side? Anyone have an idea.

I still have to get the core out from the trim tab area. That will be one night this week. Then trim and sand the fiberglass to get ready to glass in new pieces. I need to get more pictures. I get so caught up working I forget to take pictures. How Friscoboater documented his build is beyond me. I have 4 weeks left to get into water. I'll have to start burning some more vacation days.
 

Woodonglass

Supreme Mariner
Joined
Dec 29, 2009
Messages
25,924
I'd use ext. Grade plywood to fabricate the mount. 6 layers will give you 41/2"
 

Roady68

Seaman Apprentice
Joined
Sep 17, 2016
Messages
38
Just an update, So I got carried away and removed stringer up to bulkhead at fuel tank. The section of stringer in front of the bulkhead is showing about 15% moisture on my meter. Its in the yellow range, but not enough for me to cut the cabin apart and remove fuel tank.

I have a couple of good nights of grinding ahead of me this week. I am thinking 40 grit flapper wheel on 4.5" grinder and using my pneumatic die grinder with the 3M roloc discs. I use those on my metal fabrication on my cars. The die grinder is tiny and will allow me to get into tight spaces since the engine is still in the boat.

I used 3/4" foam board to make pattern of stringers. I cut new stringer out of Coosa board. If I am going to replace it, I am not using wood again. Only issue is I need to sister up the stinger to get it the length I need. The board is 4' and I need 5'6" to get to the bulk head. I did some quick calculations and it looks like five 1/4"-20 stainless bolts will carry same load as 3/4" x 5" (stringer height) board in shear. Well, four will work, I rounded up, assumed highest strength for composite fiberglass board and added some margin. I plan on using a short section to overlap, or sister, the seam and bolting and epoxying the stinger to get longer piece. The bolts and epoxy should be strong enough. I left a few inches of a stub of old stringer to be able to line it up. I may add a couple bolts there too. Then tab it in and fiberglass it in. I think I am going to bed the stringer in a layer of PL. Originally, the stringer only had a few layers of fiberglass on the outside face. The inside of the stringer had a smattering of chopped strand with some resin and it was paper thin. I was actually afraid on how fast I cut it out.

Question: Since I am using Coosa board, I think I am going to add a limber hole. As I said above, I have no idea how water got into the cavity, so I would like a way for it to get out. Most posts I have read here and other forums indicate there is a risk of getting new wood wet. But since I am using composite, I think I am ok. Does this sound feasible. Is a 1/2" hole large enough?
 

Roady68

Seaman Apprentice
Joined
Sep 17, 2016
Messages
38
Started the grinding. Man this has to be the worse part of the job. 4.5" angle grinder makes quick work. But it makes some dust. I got the big stiff cut back, and I am starting to see original pink glass. There is a think layer of grey gel coat or paint in the bilge are that seems to be pretty thick. What a pain.
 

tpenfield

Moderator
Staff member
Joined
Jul 18, 2011
Messages
17,712
Roady,

Thanks for the update, but I am feeling that this thread is becoming 'picture deprived'. Having some visuals on your progress would be very helpful for folks to follow along and offer advise.
 

Roady68

Seaman Apprentice
Joined
Sep 17, 2016
Messages
38
No Title

Some pictures from a few weeks ago during demo. Since there are a ton of pictures of typical stringer repairs, I share some of some things that have been a bit different. Certainly doing the work without removing the engine isn't recommended, but a necessity for me due to boat storage location. I'll grab better pictures of my solution to hold up the engine. Some notes though, I am a smaller guy so I fit fairly well. Also, I am using many different tools to get the areas so it takes a bit longer, but seems to be working. I'll be hitting the tight spots with my small die grinder with 3M rol lok discs this week.
 

Attachments

  • photo266898.JPG
    photo266898.JPG
    204.4 KB · Views: 1
  • photo266899.JPG
    photo266899.JPG
    290.4 KB · Views: 1
Top