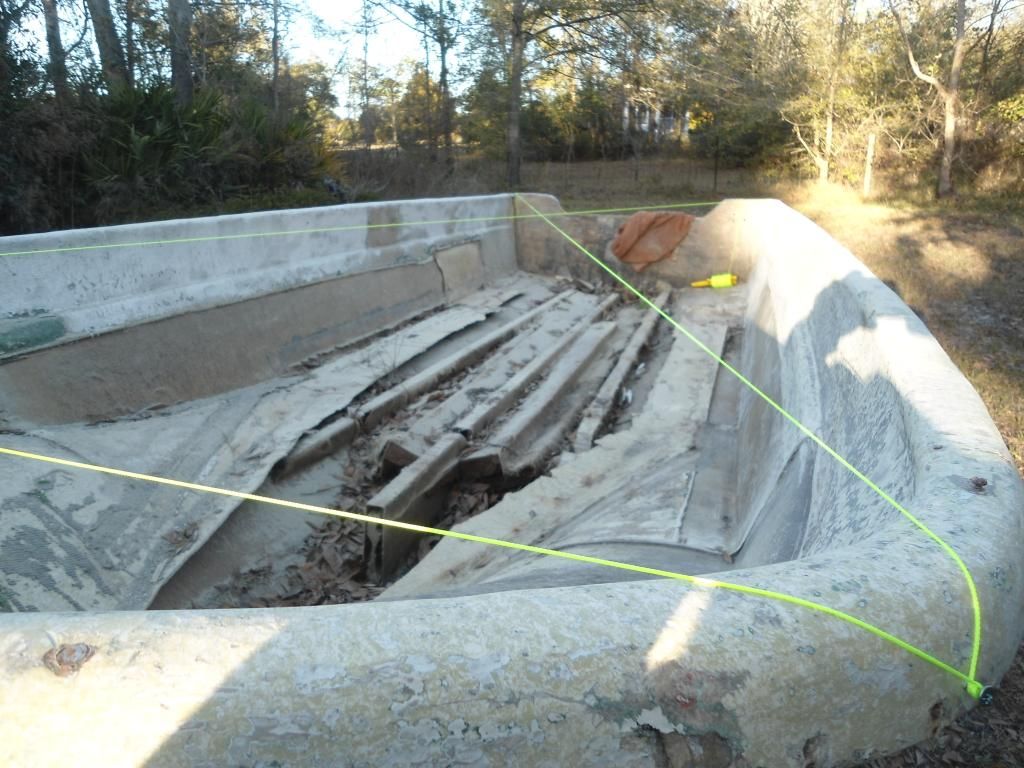
Restoring childhood boat. A 1972 Ranger. Help needed (pictures).

artfan1

Seaman
Joined
Aug 14, 2015
Messages
71
Yup you NAILED it!!! That's a good Deal on the insert!!! With patience you should be able to straighten the RR make it work or at the very least only have to purchase a small length of it. I'm a C.O.B. so I know ALL about pinching penneys and saving a buck when and where you can. If you check out my restoration thread you'll see many instances where I "INVENTED" a lot of things to get the boat put back together and she works just fine!!!!;)

I like the idea of using as much original as I can anyway, so that always saves some money. I'll work on the aluminum rub rail this winter when I am stuck inside. Both you and gm280 feel it can be straightened out so I'll give it a try. Maybe I can but parts of it are pretty bad.
The insert has a lot of areas that are discolored. Pinks and greens. I'm guessing it's from algae and Missouri clay maybe? Depending on how nice the restoration looks at the end, and how good my paint or gelcoat comes out, I might want to put clean bright new insert in there and the price for this insert isn't as bad as what I was hearing others have had to pay for theirs. Also, I love your restoration thread of the Lonestar Flamingo. I've been reading through it. Lots of great information.

I following this one. This looks like a fun project. Good luck on the cap removal.

Thanks for the encouragement and for following along.

I wanted to ask you this for sometime now.... If it is not so much trouble, can you post a picture for from inside the boat under the gunnels where the cap meets the hull. I want to see how it looks like before you start cutting. You posted a drawing of it before but I would love to see a picture if possible

Sure thing. I will take some tomorrow. It's not consistent all the way around so I will take a few. Might even take video since it's hard to really get in there and focus the camera. I wish I had my son's GoPro right now. He's suppose to be bringing it to me.
One good thing I found out today is that the area in front of the casting deck, (the fat part of the cap at the bow), doesn't have all the tabbing. So I most likely won't have to wrestle with that part to cut it loose from the underside. I have one of those "borescopes" my wife bought me a few years ago. It's pretty good at seeing into tight spaces. I used that to look around under there and it looks to be free of any added layers of fiberglass. So that's good.
 

kcassells

Fleet Admiral
Joined
Oct 16, 2012
Messages
8,720
Hi Art,
You're surely not procrastinating. If anything your moving along just fine. I'm the king of slow.
Looking forward to your project. :popcorn:
 

gm280

Supreme Mariner
Joined
Jun 26, 2011
Messages
14,604
artfan1, I was sitting here reading over your latest comments and wonder something. I never had to order any rub-railing myself. But thinking about it now, the shipping cost have to be through the roof. Rub-rail cant be bent or folded to ship, at least in my simple thinking brain, so how do they ship pieces like that through the mail to your house? :noidea: I mean some pieces of railing could easily be 15 to 20 feet long or more... However, I think your railing can be easily bent back into the correct shape, polished to whatever finish you like and reused without issue... I also like your enthusiasm and efforts. It will take that to keep this project moving along. But don' worry when that enthusiasm wanes a little. Most everybody's does along their projects at some place. But you have to take a breather as well very now and then too. Keep up the great work an effort.. :thumb:
 

Woodonglass

Supreme Mariner
Joined
Dec 29, 2009
Messages
25,927
Hey, I just posted a thread on some really good vinyl cleaner from an iBoats sponsor. It REALLY works. I'm betting it'll clean your vinyl rub rail insert pretty darn good with the help of a magic eraser too.;)
 

artfan1

Seaman
Joined
Aug 14, 2015
Messages
71
I wanted to ask you this for sometime now.... If it is not so much trouble, can you post a picture for from inside the boat under the gunnels where the cap meets the hull. I want to see how it looks like before you start cutting. You posted a drawing of it before but I would love to see a picture if possible

Here are the photos I promised showing the underside of the cap where it meets the hull.
It's hard to get a good focused shot since it's hard to position my iPhone under some areas. Not sure how I'm going to get a tool under there to cut it loose but I'll figure something out. I thought about maybe cutting a line across the liner just below the cap. If the liner is loose enough from the hull, I might be able to pull the cap up with a couple of inches of liner still attached. Thoughts?

Above the starboard side of the fuel compartment
IMG_4278.jpg


Above the port side fuel compartment.
IMG_4282.jpg


Center of bow. You can see the light shining through the rope rub damage.
IMG_4285.jpg


The bow/starboard corner. I REALLY wish it was like that all the way around. It would just lift off.
IMG_4287.jpg


You can see areas above the transom in my previous photos but if you needed different locations, just let me know. Taking these photos helps me to plan out my attack on this thing.
 

DeepBlue2010

Lieutenant
Joined
Aug 19, 2010
Messages
1,305
Just thinking out loud with you here..

What if you use this untapped portion of the cap - near the bow - to your advantage in the following manner..

Using a reciprocating saw with thin and relatively long blade, try to insert the blade between the hull and the cap from the bow. Set the saw to a low speed and continue cutting moving toward the stern.

If it gets tight as you cut, you mentioned the outside lip is lifting slightly just by your fingers, this means you can drive a small plastic or hammer wedge few inches ahead and few inches behind you and continue cutting. Your hull shape will allow enough clearance for the saw to stay vertical while cutting.
 
Last edited:

artfan1

Seaman
Joined
Aug 14, 2015
Messages
71
Just thinking out loud with you here..

What if you use this untapped portion of the cap - near the bow - to your advantage in the following manner..

Using a reciprocating saw with thin and relatively long blade, try to insert the blade between the hull and the cap from the bow. Set the saw to a low speed and continue cutting moving toward the stern.

If it gets tight as you cut, you mentioned the outside lip is lifting slightly just by your fingers, this means you can drive a small plastic or hammer wedge few inches ahead and few inches behind you and continue cutting. Your hull shape will allow enough clearance for the saw to stay vertical while cutting.

Hey, I like that idea. I have some composite shims like you use when hanging a door. Those should work to hold it out a little. I'll lean a piece of plywood against the hull to protect it from the moving sawsall. Might work. Thanks.
 

artfan1

Seaman
Joined
Aug 14, 2015
Messages
71
Hey, I just posted a thread on some really good vinyl cleaner from an iBoats sponsor. It REALLY works. I'm betting it'll clean your vinyl rub rail insert pretty darn good with the help of a magic eraser too.;)

I'll see if I can pick some of that up. I looked at their site and it says there are a couple of stores near me that sell their product. Thanks.
 

artfan1

Seaman
Joined
Aug 14, 2015
Messages
71
artfan1, I was sitting here reading over your latest comments and wonder something. I never had to order any rub-railing myself. But thinking about it now, the shipping cost have to be through the roof. Rub-rail cant be bent or folded to ship, at least in my simple thinking brain, so how do they ship pieces like that through the mail to your house? :noidea: I mean some pieces of railing could easily be 15 to 20 feet long or more... However, I think your railing can be easily bent back into the correct shape, polished to whatever finish you like and reused without issue... I also like your enthusiasm and efforts. It will take that to keep this project moving along. But don' worry when that enthusiasm wanes a little. Most everybody's does along their projects at some place. But you have to take a breather as well very now and then too. Keep up the great work an effort.. :thumb:

I don't know how they would ship this unless it came by truck. The insert is flexible and is wound up in a roll but the aluminum would have to be straight. In the case of this boat, each of the 2 pieces are about 18' long. They meet in the center of the bow.
I'm going to give it my best shot to straighten mine out where it's damaged.
 

kcassells

Fleet Admiral
Joined
Oct 16, 2012
Messages
8,720
I had ordered a new rail and rope for a future install. The aluminum rail came rolled up. Will be simple to hammer and straighten out. The rope lies on the flat aluminum. But I see the concern with yours whereas you have insert curves to place the rubber in. Good points to think about prior to an order.
 

Woodonglass

Supreme Mariner
Joined
Dec 29, 2009
Messages
25,927
The description the DB gave for cutting the cap is exactly how you should do it. I thought this was how you stated you were intending on approaching it. It's the ONLY way to do it. The flexible blade will make short work of it and any Boo Boo's that may occur will be an easy fix.
 

artfan1

Seaman
Joined
Aug 14, 2015
Messages
71
The description the DB gave for cutting the cap is exactly how you should do it. I thought this was how you stated you were intending on approaching it. It's the ONLY way to do it. The flexible blade will make short work of it and any Boo Boo's that may occur will be an easy fix.

I see now that you were saying that all along. I don't know why I was missing the obvious. My brain must have been asleep or something. Then today, when DB mentioned the plastic wedges, "CLICK" it just clicked in my brain. I kept wondering how I was going to get a large sawsall up under that cap (on the inside), and find the hidden seam. I think I'm on track now.

Now that I know I will coming at it from the outside, it seems so much easier. I might even start off using a thin hacksaw blade. I have one with a handle at one end so that the blade is open at the other. It should slip right up in there. If the weather is good tomorrow, I'm starting in on it.
 

MTboatguy

Fleet Admiral
Joined
Jul 8, 2010
Messages
8,988
I would go with the power saw, trying to cut those tabs with a hand saw with a fine toothed blade is going to take a while and your hands will be very sore when you are done
 

artfan1

Seaman
Joined
Aug 14, 2015
Messages
71
I had a slight speed bump todayI think so anyway.

I was finishing up my cradle and noticed that if I stood at the bow and looked eye level to the gunwale, that there was a twist in the boat. I'm not sure why it's that way either because it appears to be setting evenly on the trailer. Both bunks run tight down the chine on both sides. And when I look at the stern it is evenly centered.

The trailer is level, as much as I can get it anyway. If you look at the photo I took of this, you can see the top of the cap at the bow and the cap at the stern are not parallel. It's not a huge amount but enough that I wanted to see what everyone thought before I started securing the supports on my cradle and removing too much structure.
IMG_4297.jpg


If I finish my cradle now, it will hold it in a twist right? So then when I begin putting things back, any twist would be permanent.

I can't imagine the boat was built with that twist in it so it has to be a problem with the way it's setting on the trailer. Do I need to straighten this thing out? If so, what should I look at first? Should I even worry about this now? Can this all be resolved once the cap is off and the liner and floor are removed?
 
Last edited by a moderator:

Woodonglass

Supreme Mariner
Joined
Dec 29, 2009
Messages
25,927
I'd get the cap off and then I'd get everything as level as possible and then take some measurements. Know anyone with a contractors Grade Level??
 

artfan1

Seaman
Joined
Aug 14, 2015
Messages
71
I'd get the cap off and then I'd get everything as level as possible and then take some measurements. Know anyone with a contractors Grade Level??

I have a 48" level that is pretty good. I'll continue with the cap cutting tomorrow but since the cradle is in the way for a large portion of where I need to be running the sawzall, it won't be supporting anything until I have the cap cut loose from the stern to about 10'-11' towards the bow. After I cut it that far, I can put the cradles support up against the hull and lock it down. Then I will work on the rest of the cap. The stern will be the most difficult I'm sure. I'll report back with my progress. Thanks!
 

kcassells

Fleet Admiral
Joined
Oct 16, 2012
Messages
8,720
Well let's see what happens whn the cap comes off. Maybe just taking off the rub rail gave the cap a chance to move.
 

gm280

Supreme Mariner
Joined
Jun 26, 2011
Messages
14,604
Not sure you need to get too worried about that presently. It is extremely hard to get everything leveled out on a trailer for starters. And then even with the cap off, what's to say the hull lip would be even enough all the way around to be able to use that as a point of reference. The nature of boats in general make it very hard to get everything level and balanced out. There easily could be a slight height difference between one side's bunk to the other and from front to rear as well. That IS why I never used the level to verify the boat was level. I used the boat against itself rather then the floor of my shop... If you make the transom your reference point, then everything else would be compared to the transom, if that makes any sense. IN other words, If you took the time to level the frame of your trailer (being how you are going to use the trailer as part of the cradle) you would also have to make certain the bunks measured the exact same front to rear and crossways also to each other. Then you have to make sure the hull was sitting properly from front to back and crossways too. If that all worked out, then you can use a level to make comparison. However, there are ways to verify the boat won't be twisted once you get things moving along. String is going to be a close friend in the days to come. Cross diagonal string pulls will help get everything correct... :thumb:
 

sphelps

Supreme Mariner
Joined
Nov 16, 2011
Messages
11,462
Yep . If you plan on doing all the new glass work where she sits now start at the transom and level that . Then the trailer may or may not be level but I would set some block under it to keep it from bouncing around . Worry most about getting it straight just before you start glassing . You may want to bring it into the garage or shelter so leveling it now may just be a waist of time . As gm said pulling a string diagonally will help get the twist out before glassing stringers and such ..
Shim up which ever side of the bow needed until the line just touches each other ..
 

DeepBlue2010

Lieutenant
Joined
Aug 19, 2010
Messages
1,305
In addition to everything said above, don't be surprised of the hull corrects itself after you finish decaping and removing all old rotted and water saturated wood.

With the status of the stringers/bulkheads as they currently are, the hull might be giving a little under the weight


I like the "leveler" SPHelps used. Simple but accurate way to tell if all points of the surface you are measuring fit in the same plan. There are water leveler sold in Home Depot and Lowe's that are designed to be inserted in these lines if you if you want to know your level relative tot the ground.
 
Last edited:
Top