Restoring a 1987 Glasstream 172 Cutlass

Status
Not open for further replies.

zool

Captain
Joined
Aug 19, 2012
Messages
3,432
Home depot should have 15/32 or 19/32 bcx on the shelf...sistering those together will be fine, thats what I used...
 

boedekerj

Seaman
Joined
Jul 24, 2017
Messages
71
Scarf joints are great if you’re trying to get good strength When joining two pieces of lumber for added length. How long are those stringer channels? I don’t recall of the top of my head. Frankly as you get towards the front, I’d be less concerned with a big long scarf joint. At the point the glass and resin will be bracing that last 18” or so just fine, IMHO. (So if you make a joint in the stingers, do it farthest away from the transom.)
 

AlabamaNewbie

Petty Officer 1st Class
Joined
Jun 25, 2018
Messages
239
Peanut Butter question -

So I am not ready yet to buy a bulk order of glassing supplies. However - I have a few places on the cap that I need to fill and I figure that's something I can do when its too hot to put on the space suit. Example - the holes where the bimini top brackets are screwed in are stripped, so I want to PB the holes and reattach.

So, I have some of the woven fiberglass that you get from WalMart from a project from years ago, and I can get a small pint of resin/hardener pretty cheap from there or the parts store. Can I take that old woven glass and cut it up and use it as the glass material in the PB, or is there something special about the bags of glass you buy already ready to mix in?
 

AShipShow

Lieutenant Commander
Joined
Jul 8, 2016
Messages
1,792
Personally, I wouldn't risk it. Probably would be fine, but why not just order chopped fibers and cabosil and other supplies that your going to to need anyways... Don't buy the resin if you're not ready for it, but nothing else goes bad. You could still get your walmart resin, but you will have the chopped fibers, and your going to need cabosil to thicken it anyways, and walmart definately doesn't sell cabosil.
 

AlabamaNewbie

Petty Officer 1st Class
Joined
Jun 25, 2018
Messages
239
I also found some Bondo stuff called Short Strand Fiberglass Filler. Says it has fiberglass strands in it, and it's relatively cheap. I wonder if that's just a marketed version of PB?

The reason I don't just go ahead and order the glass,etc is because I am not far enough along to know how much of what I will need, and I don't have the money yet to get it. But this weekend we are working on wet sanding and polishing the upper. The screws for the bimini bracket on one side is stripped. I probably can find a few more stripped screw holes while I am at it. I'll have to pull all of the hardware, rails, etc to do the wet sanding and polishing, so I wanted to address the little things at the same time. They aren't structural, and really I could address most of them by using bolts,washers, and nuts instead of screws anyway. So I'm doing like normal - thinking out loud. lol
 

kcassells

Fleet Admiral
Joined
Oct 16, 2012
Messages
8,715
So to be nice ... all that stuff is elcrapo x elcrapo.
Should make sure all is marine grade.
Bondo blows for any marine application cause it has a % of talc in it that absorbs water. Even if it says marine.
Glass from walmart is for what? cars? Woven meaning what weight?
You need to research more on your own for the info. uscomposites gives a great desription on glass materials, resins and uses.
Also Iboats sells thiem too.. :eek:
 

AlabamaNewbie

Petty Officer 1st Class
Joined
Jun 25, 2018
Messages
239
So this weekend I learned that the day my boat was assembled in 1987, it was most likely a Monday. That year, the 4th of July was on a Saturday, so I am guessing the guys from the plant were off on Friday and had a 3-day party before showing up Monday morning and throwing this thing together. After getting the thing the entire deck off, I am just scratching my head. Seeing it now completely exposed - a lot of things make sense. But the way it was done --- doesn't.

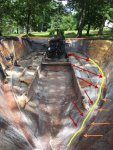
First pic - you can see where the deck was laying up to the bulkheads. there is actually a flat "ledge" ( i guess that's called a strake?) that the deck sat on. That flat continues right up to the point of the bow. How ever - about 10 inches before the end of the inner stringer, it drops off the ledge and runs below it. The yellow line shows the path of the deck, the orange arrows show where it looks like the deck should go, and the red arrows shows where it actually was. It does it on both sides - but not uniformly.

You can also see on the left side some hanging fiberglass from a cross piece. It had to be like that from day 1, as the foam was completely filled in all around it and under it. Yeah, that was fun. Fiberglass icicles are heck on your knuckles! I didn't want to bust it out though because I didn't want to lose the cross piece before I could take good measurements.

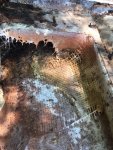
The second picture is just a close-up of where the deck dropped below the "ledge" .


The third picture is just a random piece of 'glass. Maybe it was a patch, maybe it had some purpose, but it just sort of looks random.

My son picked up a 10' x 10' pop up canopy, so at least I have some shade going forward. I'm going to throw some sides on it for when I am grinding so I don't coat my neighbors homes with that nasty dust. My goal is to have a clean hull in 7 -10 days.
 

Attachments

  • IMG_7860.JPG
    IMG_7860.JPG
    160.1 KB · Views: 6
  • IMG_7858.JPG
    IMG_7858.JPG
    188 KB · Views: 5
  • IMG_7855.JPG
    IMG_7855.JPG
    183.2 KB · Views: 5

AlabamaNewbie

Petty Officer 1st Class
Joined
Jun 25, 2018
Messages
239
Questions:

1. Most of my stringers were removed with a vacuum. That makes it impossible to use them to pattern the new stringers. What is the best way to get that curve cut right? Trial and error?

2. I've read to coat the stringers in resin and wait until it's tacky before doing your first layer of glass/resin. Does it have to be tacky, or can it be completely cured? I have a bunch of other pieces (seat bottoms, backs, etc) that are coated in resin but not glassed, figured it would be easier to do that all at once.
 

Woodonglass

Supreme Mariner
Joined
Dec 29, 2009
Messages
25,927
I'd use cardboard strips taped together to make a stringer pattern. It's best to do all your glassin' when it's tacky. Gives you a much better bond between layers. If you wait you'll need to sand with 60 grit and clean with acetone and the bond will be weaker
 

AlabamaNewbie

Petty Officer 1st Class
Joined
Jun 25, 2018
Messages
239
I'd use cardboard strips taped together to make a stringer pattern. It's best to do all your glassin' when it's tacky. Gives you a much better bond between layers. If you wait you'll need to sand with 60 grit and clean with acetone and the bond will be weaker

Gotcha, thanks!
 

kcassells

Fleet Admiral
Joined
Oct 16, 2012
Messages
8,715
Always coat your stringers and all wood, edges are important. The cut wood will have voids. Fill them. Then coat all wood and let dry. You want to saturate the wood with the 1st coat.
Set your wood, stringer, bulkheads etc in pb with a small gap off hull,then coat again. Thats when you add the glass.
 

AlabamaNewbie

Petty Officer 1st Class
Joined
Jun 25, 2018
Messages
239
If its not one thing, its another.

So I got the rest of the stringers out last night. I'd been focused on that and not really paid much attention to my transom yet. Mostly because I still have to get the engine out anyway, so I'd sort of ignored it for now.

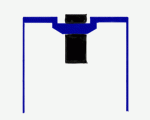
Well for some reason I stopped and looked at it last night. I've read a lot of posts, seen a lot of videos, etc. on replacing the transom, so I had in my mind what to expect. But all of them I have seen just had a flat transom across the back.

But no, mine is shaped like this sketch. Sorry I didn't get any pictures last night, it was dark by the time I was crawling out of the thing and didn't feel like going in and getting the camera.

Why can't just ONE THING on this be easy?!?!
 

Attachments

  • photo298750.gif
    photo298750.gif
    9.6 KB · Views: 0

Woodonglass

Supreme Mariner
Joined
Dec 29, 2009
Messages
25,927
That's Really not that uncommon. The side "wings" are NOT really the transom. The do offer support for a ladder, swim platform, tow eyes etc... The Center secton is the transom and most important to get correct. It must be at the proper angle, proper thickness and both sides must be parallel. The Specs for the outdrive and transom are easily found via a web search.

Also, when the time comes for the upholstery, we have a LOT of experienced upholsterers here on the forum so let us know if you need help. If you've never sewn vinyl there are some Tips n' Tricks that could help you get up to speed a lot faster than trial and error!!:D
 

AlabamaNewbie

Petty Officer 1st Class
Joined
Jun 25, 2018
Messages
239
Also, when the time comes for the upholstery, we have a LOT of experienced upholsterers here on the forum so let us know if you need help. If you've never sewn vinyl there are some Tips n' Tricks that could help you get up to speed a lot faster than trial and error!!:D

Thanks! I have sewn vinyl before, but its been a while ago. I'd done a few motorcycle seats back when I built customs, but those were pretty small and it was easy enough to scrap it and start over if I goofed. This is going to be a challenge for sure. I plan on getting some el-cheapo vinyl and practice my french seams. That's where it will really show if I can't keep my stitch straight!
 

oldrem

Commander
Joined
Nov 7, 2013
Messages
2,002
A walking foot is the most versatile type - great for heavy fabrics
 

Woodonglass

Supreme Mariner
Joined
Dec 29, 2009
Messages
25,927
Is it a detachable walking foot or a Real Walking foot machine? Just curious. What model is it?
 

AlabamaNewbie

Petty Officer 1st Class
Joined
Jun 25, 2018
Messages
239
Its a Singer 4432, detachable walking foot. Not the best i know, but hopefully it will work for this project, it's the best I could afford.

Back when I'd do a few motorcycle seats, the biggest problem I had was that the detachable walking foot didn't grab as well, and you had to give yourself a little extra edge for it to reach and grab. I took a finger nail file and lightly etched in a cross-hatch pattern that was just slightly deeper than was on it originally, and that helped it grab/walk a ton better. This is a brand new machine and foot though. I am going to try it like it is and may have to redneck engineer it down the road.
 
Status
Not open for further replies.
Top