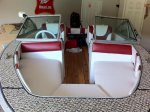
Restoring 1986 Sea Nymph SS155 (pics)

lmuss53

Lieutenant Junior Grade
Joined
Sep 9, 2008
Messages
1,227
Re: Restoring 1986 Sea Nymph SS155 (pics)

That's it, brass nipple at the back between the 2 holes is the pulse. Center brass nipple is (inlet) line from gas tank. Black plastic nipple is (output) line to carbs. You don't want to split anything then, just use the stock plumbing to go from the pump to the carbs, it already goes to both carbs. Sorry I was busy and couldn't check in yesterday, if you PM me a phone number I'll try to help you over the phone. I'll try to check back this afternoon.

I've had three of those 2 cylinder OMC 50's, they are sweet and powerful, and bulletproof.
 

Piece715

Senior Chief Petty Officer
Joined
Jan 26, 2009
Messages
757
Re: Restoring 1986 Sea Nymph SS155 (pics)

Alright got it hook up right... think you had the nipples labeled wrong Imuss... The black is the fuel inlet... next is fuel outlet.. and the back is the pulse. Gotta fired up and is running pretty good. Looked at the engine while running and the hoses are cracked and the the primer solenoid the one with the red knob on it is leaking like pretty bad around one of the screw holding the gasket. I'm guess the ethonal in the gas just ate all the rubber pieces! so may have to buy another solenoid... :facepalm:

EDIT: Holy POOP! The solenoid is 150!!! not replacing that... hopefully i can find the gasket!
 

Piece715

Senior Chief Petty Officer
Joined
Jan 26, 2009
Messages
757
Re: Restoring 1986 Sea Nymph SS155 (pics)

I take that back the primer solenoid is 200 and there are only 5 primer solenoid gaskets in stock in the state of Arkansas at the moment. Closet place is 92 miles away. Its BRP 0333448... The question I wanted to make sure the screws were tight but they just keep turning; all of them. I mean is it likely that all 4 screws are stripped out or is that how it seats? CUZ i really dont want to spend another 200 if I don't have to... the solenoid is working fine just leaking
 

lmuss53

Lieutenant Junior Grade
Joined
Sep 9, 2008
Messages
1,227
Re: Restoring 1986 Sea Nymph SS155 (pics)

You're right piece I went and looked at mine, sorry pal.

Make sure the red valve on the solenoid is turned so it is parallel to the solenoid body. It should be pointed to the rear back along the solenoid body. Having that out of position will cause the solenoid to leak. I haven't had one apart in a while but I don't recall the screws not getting at least good and snug.

If the hoses are not known to you to be ethanol compatible you should swap all of them out very soon. I changed my fuel line, the one from filter to pump and also from the pump to top carb. I didn't change the jumper from top to bottom carb.

You can unhook that solenoid and run without it for a test run if you take something to squirt a little premix in the carb with if you need it to start. I use an old fashioned pump type oil can. Don't use any ether to prim that with, prime with premixed fuel only.
 

lmuss53

Lieutenant Junior Grade
Joined
Sep 9, 2008
Messages
1,227
Re: Restoring 1986 Sea Nymph SS155 (pics)

Piece, you can also probably replace that diaphram with a piece out of one of the VRO pump diaphrams. Find a section that fits on the solenoid completely and cut it out. Cut the holes out by tapping on a piece of sharpened copper tubing, of the appropriate ID, layed on at the right spots. Now if your screws aren't stripped that should fix the leak.
 

Piece715

Senior Chief Petty Officer
Joined
Jan 26, 2009
Messages
757
Re: Restoring 1986 Sea Nymph SS155 (pics)

Piece, you can also probably replace that diaphram with a piece out of one of the VRO pump diaphrams. Find a section that fits on the solenoid completely and cut it out. Cut the holes out by tapping on a piece of sharpened copper tubing, of the appropriate ID, layed on at the right spots. Now if your screws aren't stripped that should fix the leak.

Thanks for the advice Imuss. Took the primer solenoid off the motor and brought it to Art's Marine. The mechanic took a look at it for me. He replaced the plastic and the gasket. He said that the housing always gets a small crack but we couldn't find one. It only leaks when you're starting the motor. It doesn't leak when running. Even after all that it still leaked. He said to just bring it back to him and we'll either try larger screws or epoxy before having to replace it.

Got the motor running yesterday. All the fuel lines were replaced with alcohol resistant tubing. The fuel pump was installed. It didn't want to idle at first. Figured it was due to all the gummy stuff gas leaves due to it sitting for 3 years. I have sea foam in the gas so i ran it with the fast idle level up at about 2k RPMs for 5-10 minutes and then slowly back the fast idle handle back down. It idled great for another 5-10 min. Then we killed it and waited a couple minutes and tried to restart. Well it didn't restart and I noticed the solenoid primer was leaking pretty good at start. So the air could be starving the motor again. Also tried to get the sheared bolt out. Wouldn't come so it's gonna need to go to machine shop to be plugged and retapped.

Here is a video of the motor running:
 

Piece715

Senior Chief Petty Officer
Joined
Jan 26, 2009
Messages
757
Re: Restoring 1986 Sea Nymph SS155 (pics)

Is it ok to run the motor with the water with the trim tab off? Or is that not advised? I know people run them all the time with the trim tab broke off but to run it with the trim tab plate off?!
 

Piece715

Senior Chief Petty Officer
Joined
Jan 26, 2009
Messages
757
Re: Restoring 1986 Sea Nymph SS155 (pics)

Since i have a failure to launch this weekend (unless I can run the boat in the water without the trim tab plate) I decided to work on some cosmetic stuff I have been slacking on doing. Here are the back cushions for the bow seating. Have them held on with extreme velco, UV and water resistant.

photo.jpg
 

Piece715

Senior Chief Petty Officer
Joined
Jan 26, 2009
Messages
757
Re: Restoring 1986 Sea Nymph SS155 (pics)

Ahhh Arkansas summers! Now if was only from my boat!

photo (2).jpg
 

lmuss53

Lieutenant Junior Grade
Joined
Sep 9, 2008
Messages
1,227
Re: Restoring 1986 Sea Nymph SS155 (pics)

I've heard of people having them fall of and not knowing it run them for a long time. I'm trying to think of what it could hurt. I guess exhaust could flow out through there but I don't know if that would hurt anything Ask over at the Johnny/Rude forum.

I hate to say it but it sounds like it was idling on one cylinder there. Don't let it run with a dry cylinder, that will kill it. With the cover off get it idling again and squirt a little premix in each carb. I bet one loads it up and the other makes it surge. If that happens you need to pull and clean the carbs. I would do it anyway, it will give you peace of mind that it is done and it is not hard to do. Post your idling vid on the engine forum and see what they think, there are certainly better minds than mine over there.

Great work getting her going so far.
 

Piece715

Senior Chief Petty Officer
Joined
Jan 26, 2009
Messages
757
Re: Restoring 1986 Sea Nymph SS155 (pics)

Made a new thread about the motor maybe firing on one cylinder as well as running without the trim tab plate and mark1961 gave some good advice

I've never run a motor of that hp without a trim tab.....some older motors of similar hp and larger never used to have them so running without one may not be so bad.....i will defer to others for a definative answer though.

Next time you have it running remove one spark plug lead at a time and see if it bogs down then picks up again when you replace it (use insulated pliers).....if it does each time both cylinders are pulling their weight.....if it stalls or there is no change you have a cylinder out, not automatically going to be the carbs at fault however.

It sounded good when running so I hoping everything is ok with the motor.... I'll try pulling a spark plug lead (with insulated pliers :D) next time I put it back together.

The sheared trim tab plate bolt wouldn't budge despite 3 days of PB Blaster and 3 EZ out bits. So next I moved to drilling the bolt and was gonna retap it but the tap requires too much drilling before even starting to thread. So gotta find a machine shop to plug the hole and retap. That's my current dilemma.

Next dilemma is getting the primer solenoid to stop leaking. Pretty sure the screws were torqued too much the last time it was serviced... by a shop that will remain nameless but will more than like be getting a notice of complaint from the BBB and maybe an earful from me. So I'll head back to Art's Marine, not the bad shop ;) and talk to their mechanic again as he had ideas to try before replacing the $250 primer solenoid.

If the motor is firing on both cylinders and the leaks all stop the only thing left to do and make sure she is running good. Maybe slight adjustment of idle... Last time it took a bit just to get her to idle. She kept dying had to warm it up for a good minute but that could have been due to crud and or the leak in the solenoid. I'm about ready to throw in the towel and take it in somewhere; its really wearing on me! :(
 

Piece715

Senior Chief Petty Officer
Joined
Jan 26, 2009
Messages
757
Re: Restoring 1986 Sea Nymph SS155 (pics)

On a more uplifting note I was able to make it on the water with some friends on Monday. It was nice to have a relaxin day away from the garage. We were on Greer's Ferry Lake and a buddy came of with our next adventure.

photo(9).jpg

Meet Arkansas' tallest island, Sugar Loaf Mountain.... thinking boat to island.... hike to top... camp for the evening.... hike back to boat.... Sounds like a blast to me!
 

lmuss53

Lieutenant Junior Grade
Joined
Sep 9, 2008
Messages
1,227
Re: Restoring 1986 Sea Nymph SS155 (pics)

Pulling a plug wire of is a good way to check, but also a good way to get a good kick in the shorts if you're not careful.:) One step at a time buddy, you'll get it. If the plug wire trick shows one not firing then the squirt trick I mentioned can tell you if it is a fuel issue. If adding fuel doesn't get the second cylinder firing then you will have to check spark. You can make or buy a spark gap tester and check each wire to see that you get a good strong bright blue 7/16 long spark off of each wire. If pulling the plug wires off bogs it down equally then you'll know it is firing on both and you can give it a try. I'm gonna check at my buddie's shop tomorrow and see if the trim tab missing is a big problem. I'm kind of thinking if you can handle the steering torque it will not be a big deal. I'll try to post tomorrow (Wednesday) evening from work what he says.

I also think that if you could get a good hole in the busted off bolt and tap it 1/4-20, a 1/4-20 bolt and a flat washer will probably hold the trim tab on for 20 or 30 years. #7 is the recommended drill for a 1/4-20 thread but you might want to go a little larger because you are trying to tap that hard bolt. I think I would try a 7/32 drill and 1/4-20 tap and if you can get a decent thread in it bolt the trim tab on and go boating. The 7/32 will give you a hole about .015 bigger and will give you about a 60% thread, but you'll be a lot less likely to break the tap off. Try to drill the hole as straight and deep as you can and then lube the tap up good wd-40 or pb blaster. If you already have a bigger hole than that let me know how big it is and we'll figure out a thread you can put in it. You don't HAVE to have the 3/8-16.

Make sure you get a good sharp drill and let it do the work. Running a good drill into a banged up hole is a good way to make it dull, so you may need more than one. If it is making chips it is cutting, don't rush it in that hard bolt.

On your solenoid, try a thin single strand (or 2) of copper wire straight into your suspected stripped out plastic hole. You may have to strip a piece of stranded wire and cut a few of the small diameter strands to get wire small enough to use. It will fill in a little space and let your screw get a bite, if it works snug them up and quit. I'll also check on a used solenoid for you tomorrow. My friend has a pile of donor motors. I know he has a blown 110 that has the solenoid if it is still there.

The boat trip to the island and the overnighter on top sounds like a blast.
 

Piece715

Senior Chief Petty Officer
Joined
Jan 26, 2009
Messages
757
Re: Restoring 1986 Sea Nymph SS155 (pics)

Pulling a plug wire of is a good way to check, but also a good way to get a good kick in the shorts if you're not careful.:) One step at a time buddy, you'll get it. If the plug wire trick shows one not firing then the squirt trick I mentioned can tell you if it is a fuel issue. If adding fuel doesn't get the second cylinder firing then you will have to check spark. You can make or buy a spark gap tester and check each wire to see that you get a good strong bright blue 7/16 long spark off of each wire. If pulling the plug wires off bogs it down equally then you'll know it is firing on both and you can give it a try. I'm gonna check at my buddie's shop tomorrow and see if the trim tab missing is a big problem. I'm kind of thinking if you can handle the steering torque it will not be a big deal. I'll try to post tomorrow (Wednesday) evening from work what he says.

I also think that if you could get a good hole in the busted off bolt and tap it 1/4-20, a 1/4-20 bolt and a flat washer will probably hold the trim tab on for 20 or 30 years. #7 is the recommended drill for a 1/4-20 thread but you might want to go a little larger because you are trying to tap that hard bolt. I think I would try a 7/32 drill and 1/4-20 tap and if you can get a decent thread in it bolt the trim tab on and go boating. The 7/32 will give you a hole about .015 bigger and will give you about a 60% thread, but you'll be a lot less likely to break the tap off. Try to drill the hole as straight and deep as you can and then lube the tap up good wd-40 or pb blaster. If you already have a bigger hole than that let me know how big it is and we'll figure out a thread you can put in it. You don't HAVE to have the 3/8-16.

Make sure you get a good sharp drill and let it do the work. Running a good drill into a banged up hole is a good way to make it dull, so you may need more than one. If it is making chips it is cutting, don't rush it in that hard bolt.

On your solenoid, try a thin single strand (or 2) of copper wire straight into your suspected stripped out plastic hole. You may have to strip a piece of stranded wire and cut a few of the small diameter strands to get wire small enough to use. It will fill in a little space and let your screw get a bite, if it works snug them up and quit. I'll also check on a used solenoid for you tomorrow. My friend has a pile of donor motors. I know he has a blown 110 that has the solenoid if it is still there.

The boat trip to the island and the overnighter on top sounds like a blast.

Appreciate all the help, Imuss! When I put the motor back together I'll give it a shot... lower unit is still off due to working on the bolt. The reason I'm trying to find a machine shop at this point is all the tap sets i can find require i hefty amount of drilling before the tap even begins to thread. I'm having no luck getting a response from any of the local welding/machine shops.... Would a boat shop be able to do this type of work?

I'll also give the solenoid trick a go... I was just gonna go with a slightly larger screw but the copper strands sounds like a good start! Thanks again
 

lmuss53

Lieutenant Junior Grade
Joined
Sep 9, 2008
Messages
1,227
Re: Restoring 1986 Sea Nymph SS155 (pics)

piece, I'll have to check on the solenoid and running without trim tab for you tomorrow, I forgot that today is Wednesday and he is closed on Wednesday.
 

Piece715

Senior Chief Petty Officer
Joined
Jan 26, 2009
Messages
757
Re: Restoring 1986 Sea Nymph SS155 (pics)

piece, I'll have to check on the solenoid and running without trim tab for you tomorrow, I forgot that today is Wednesday and he is closed on Wednesday.

Its all good Imuss... I have a local repair welder coming out hopefully after work this evening. He is pretty sure he can knock it out while he is there sooo the trim tab plate hopefully won't be a problem after tonight. I'd still be interested in that primer solenoid though... just let me know what ya find. Thanks!
 

Piece715

Senior Chief Petty Officer
Joined
Jan 26, 2009
Messages
757
Re: Restoring 1986 Sea Nymph SS155 (pics)

The trim tab has been FIXED!!! :D Called a local welding repair man yesterday during lunch. He told me to call when I got off work at 5 so i did. Came straight to the house and welded, drilled, and tapped the hole. He charged $65/hour so all in all it cost $80. The first weld after it was tapped didn't hold too well; next one wasn't drilled deep enough to seat the trim plate, so we shortened the bolt by bout a 1/4" and BOOM! We have success! On a side note despite ordering the correct bolt for the motor according to the Evinrude site... i still think it would have been too long. It was different than the bolt that sheared.

Next step to reassemble the lower unit and start testing the motor some more to determine if she's given us full power... Keepin the fingers crossed!
 

Todd4

Petty Officer 2nd Class
Joined
Feb 11, 2012
Messages
111
Re: Restoring 1986 Sea Nymph SS155 (pics)

Congrats! One more step closer. It's important to check the cylinder firing. If one cyclinder is running lean, a two stroke can burn a hole through a piston (running hot). Good luck. Hope it's firing on all...2!

Todd
 

Piece715

Senior Chief Petty Officer
Joined
Jan 26, 2009
Messages
757
Re: Restoring 1986 Sea Nymph SS155 (pics)

Congrats! One more step closer. It's important to check the cylinder firing. If one cyclinder is running lean, a two stroke can burn a hole through a piston (running hot). Good luck. Hope it's firing on all...2!

Todd

Yep next step in the process. Like i said last time we had it running for a good half hour and on fast idle for at least 10 min due to it not wanting to idle for a bit. I kept checking the temp and it seemed to hold stable. Even the pee stream was coming out cold and I have seen some overheating engines when that stream gets HOT! But better safe than sorry... will try the mentioned techniques by Imuss and Mark!
 
Top