Restore/Update 1963 Glastron V143 JetFlite

Kern Fischer

Seaman
Joined
Jun 24, 2013
Messages
51
Hello Guy and Gal Boaters,

I recently discovered these forums and decided to post the story of the restoration I have under way.

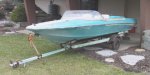
The boat is a 1963 Glastron V143 JetFlite. The 1961-1963 JetFlites used the same basic hull design. The 1961 and 1962 models were white with red trim and a fully open cockpit area. The 1963 was a one year model with an aqua/white color scheme and tonneau covers over the back part of the cockpit area.

63gl-jetflite-crop.jpg
Glastron Factory Image

It is theorized that the design of the 1963 was influenced by the 1962 Ford Thunderbird Sport Roadster, which featured a tonneau cover over the back seat. The Thunderbird cover could be removed for carrying passengers in back when desired. Likewise, the JetFlite covers can be removed for extra space. A recent attempt to contact Bob Hammond, one of the principals in Glastron at that time, to confirm or deny this design connection, was unsuccessful.

img043.jpg
1962 Ford Thunderbird Sport Roadster

This boat was not a ?find? as many old boats are. I have owned the boat since new. When first purchased, we lived in the Detroit area and access to good boating water was relatively easy, with Lake St. Clair and the Detroit River being close. The boat was also trailered to other, more distant waters. In 1973 we moved to the Chicago far west suburbs and I started a new business. Time for boating was limited and water was less accessible.

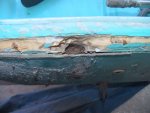
The last time that the boat was used was 1995, so in 2011 a decision was made to sell it. There was no response to ads that were placed so in early 2012 a further decision was made to keep it, get it functional again, and enjoy it, now that more time was available.

Initial planning was to restore it to a usable level and keep the budget under $ 10K including getting the motor checked and tuned. After starting the project, further information that was gathered indicated that this boat is somewhat rare. I posted a request on a couple of web sites to see how many others were out there. I found four 1961 and three 1963 besides mine. One 1963 was in good original condition and two were rough and needed restoration.

I was not able to find any production numbers for the JetFlites of that era, even though I was able to contact Bob and Bettye Hammond at that time. Data that was available showed that Glastron produced close to 3600 boats in 1963 and they had 18 models in their line. This would average out to about 200 units per model. However, the JetFlite was a small specialized boat, whereas most of the others were larger and more family oriented. This led to the theory that JetFlite production numbers were less than average, probably less than 100, and perhaps as low as 50. These numbers cannot be verified so are only guesses at this time.

Several factors, including the rarity, the pleasing (to my eye) design, my long ownership history, and personal resources that were adequate, led to the decision to do a full out, make it the best we can, restoration/rebuild/update on the boat. It will not be a precise factory restoration as some materials are no longer easily found, some factory construction was compromised for speed and/or cost, and many years of usage have shown areas where improvements would be useful. It will be what in the car enthusiast circles is known as a ?Resto-Mod? - it looks vintage but is updated underneath.

The project is partially completed but still has a ways to go. I will be posting information in short sections about what has been done. Then as further work is undertaken, more postings will be added.
 

Vintage Rider

Seaman
Joined
Mar 6, 2016
Messages
62
A very neat project. Speaking for myself, I'm glad you weren't able to find a buyer when you wanted to sell. Many people have the ability to restore that boat but only you have the memories it represents. They are one of the things that become more precious the older we get. Congratulations on making the right decision and I look forward to seeing what you've done/doing/will do. Post lots of pictures and don't worry about boring anyone with details because you won't!
 

Bondo

Moderator
Staff member
Joined
Apr 17, 2002
Messages
71,034
further information that was gathered indicated that this boat is somewhat rare.

Ayuh,..... Welcome Aboard,..... I don't think the jet-flite is as rare as ya think,.....

There's been several rebuilds here at iboats,....
I've got a '61, 'n a '67 in my backyard,..... 'n I've known several others in my own area,...

Cool little hull, but not so rare,....

This is my '61 with only an 80hp Merc on it,....
I also ran the '67 with a 135hp Tower of Power,....
f3551-1.jpg
 
Last edited:

Woodonglass

Supreme Mariner
Joined
Dec 29, 2009
Messages
25,929
I get a sense from your post that you might be thinking that if you do a "Close to Factory" restoration on this boat that you will have a fairly "High Dollar" item. I'm sorry to have to tell you that if you invest $5,000 into the restoration of this boat, you'd be extremely LUCKY to break even on your investment. Classic Boats are NOT like Classic Cars. They are just OLD restored Boats. Unless you find that one special person that just absolutely MUST HAVE that particular boat and even then if they have and Real World Boat savvy they KNOW that these old boat restorations don't bring that much money. Now some of the Mahogany Restoration do, but not the fiberglass boats. Just an FYI for you to Chew on!!!;)
 

Kern Fischer

Seaman
Joined
Jun 24, 2013
Messages
51
Hello Bondo & Woodonglass,

Bondo - I put out the word on the Classic Glastron and Fiberglassics forums, wondering how many other '61-'63 JetFlites were out there. As mentioned in my first post, I only found a few (Less than 10). I realize there are probably others out there and perhaps their owners did not see my posts. Also, the moderator of the historic section on the Classic Glastron site noted that he had never seen a 1963 JetFlite with the tonneau covers. This is the only information that I had to build upon for my rarity thoughts. I would still welcome contact by any other owners who have the early JetFlites.

Woodonglass - I have looked at pricing on various fiberglass boats for sale and realize that I will never get my investment out of this boat. I have already spent 3-4 times what I might be able to sell it for and I am not through yet. I have also spent a significant amount of time on the project. Up front I realized that this would not be a profit making venture. I am not doing it for the profit. My goal is to make it the best JetFlite in the world. I am doing it for the personal satisfaction of creating a high quality, unique end result and leaving a legacy for following caretakers of the hull.

I had two collector cars that I had owned for long periods and recently sold. I did not make a profit on either but I did insure that they went to caretakers who would respect what they were and properly care for them. The first was restored by its new owner to better than factory condition. I had a chance to drive it after he finished it and was very pleased to know that it will probably be doing well long after I am gone.
 

Bondo

Moderator
Staff member
Joined
Apr 17, 2002
Messages
71,034
Also, the moderator of the historic section on the Classic Glastron site noted that he had never seen a 1963 JetFlite with the tonneau covers.

Ayuh,.... I ain't done awhole lota research on the jet-flites, just casual knowledge of 'em,.....

I do know it's a spunky little hull when severely over-powered,....
Pure Adrenalin Rush,...

That's also the 1st I've seen of the toneau cover,... I Really like it,....
It would probably help, Alot, with the big back-splash that happens when there's too much motor hangin' off the transom,....

If I ever get 'round to throwin' the 150hp Tower of Power in the garage onto one of the hulls in the backyard,....
I'll probably fab up a cover like that, or similar,...

Somewhere in the archives is a thread by a guy that had a jet-flite, converted to a Batboat,..... like Batman,....
Don't remember his name though,....
 

Woodonglass

Supreme Mariner
Joined
Dec 29, 2009
Messages
25,929
I meant NO offense. I only wanted to offer a FYI about restoring Old Boats for a Profit! I'm sure she'll be a Beautiful Boat once completed. My 1961 Lonestar was a labor of love and I wouldn't part with her for any amount!!!!;)
 

Kern Fischer

Seaman
Joined
Jun 24, 2013
Messages
51
Woodonglass - No offense taken. I assumed that you were only trying to be helpful to anyone who did not enter into this kind of project without having their eyes wide open. I am a mechanical engineer with most of my career spent in the automotive industry so I realize what it takes to do a project this extensive.

Thank you for caring.
 

Kern Fischer

Seaman
Joined
Jun 24, 2013
Messages
51
Bondo - before hanging that Tower of Power on the back of an early JetFlite, I would be inclined to check the stringers and transom very carefully. My transom started to crack at the upper corners where the transom meets the sides of the motor well and that was with only a 65 HP four cylinder on the back. The design of the transom board is also not optimized to transfer the power into the hull. I redesigned my transom board to spread the load, both power and weight, over a much larger area of the hull.

I am keeping my 65 HP motor because it provides adequate speed and gives very good cruising fuel economy.

I also found serious structural issues with the stringers when I took out the floor. The stringers were not bonded to the bottom and the fiberglass caps over the stringers were very poorly installed. The whole bottom and floor areas were flexing when going over waves and the whole boat literally shook. Later postings will show how I rebuilt the bottom structure to make it stronger.
 

sphelps

Supreme Mariner
Joined
Nov 16, 2011
Messages
11,471
Very cool boat !! Looking forward to the restoration pics . !
 

Bondo

Moderator
Staff member
Joined
Apr 17, 2002
Messages
71,034
The design of the transom board is also not optimized to transfer the power into the hull.

Ayuh,.... Agreed,.... The transom ain't flat all the way across,...

The plywood transom pushes against the stringers, 'n all of it is tabbed into the hull,....
 

Kern Fischer

Seaman
Joined
Jun 24, 2013
Messages
51
Bondo - The original transom board on my boat was wider at the bottom and angled up and in to the motor well area. This does transfer a lot of transom push to the stringers and lower hulll. However, if you analyze the forces being applied to the transom under power, the primary push on the transom will be at the bottom of the motor clamp and the top of the transom is being pulled aft by the torque arm from the propeller center line. All of the forces are localized in the upper 10-12 inches of the transom and are transferred to the hull by the stiffness of the transom.

My revised transom has the widest portion of the transom board at the top with the side sections transferring thrust loads into the upper deck surfaces. In addition, I have a large aluminum angle that extends up into the transom behind the motor well and has its lower leg under the motor well. This transfers the transom bending loads into the bottom of the motor well, spreading them over a large area.

As mentioned, I do not intend to change my motor but feel that the revised transom could easily handle a Tower of Power, and perhaps more, without creating structural failure.
 

Kern Fischer

Seaman
Joined
Jun 24, 2013
Messages
51
No Title

When purchased, this boat had several differences between its configuration and the catalog picture previously posted. It also has differences compared to pictures sent to me by a couple other owners that responded to my inquiries to find other owners. These differences lead me to believe that this hull was produced later in the model year and design/equipment changes were made during the production time. This hull was also purchased in the fall of 1963, which may have also indicated that it was later production. This cannot be verified, it is only speculation at this time.

Specific differences between this hull and the factory image are:

1. The bow light was located close to the bow rather than back by the windshield, probably to minimize
glare from the white trim on the foredeck during nighttime operation.
2. The cleats look to be a different design, although the factory picture of the cleats is not clear.
3. The stern light appears to be a different design.
4. The scoops at the front outer corners of the tonneau covers appear to be a different design.
5. The factory picture shows white welting along the rear edges of the tonneau covers. This boat had no
welting on those edges.
6. The port rear side corner appears to have an emblem or logo on it. Probably a similar item was on the
starboard rear side This boat had nothing in those areas.

Examination of the boat prior to starting the restoration indicated that the transom was water logged and had swollen to the thickness that the motor clamps would not fit over it. The boat was also going to need new upholstery, polishing/plating of hardware, and refinishing. The trailer was also looking rough and would need to be made to look better to match the look of the boat.

Pictures of the boat and trailer prior to starting the project are shown below.
 

Attachments

  • photo240854.JPG
    photo240854.JPG
    140.6 KB · Views: 2
  • photo240855.JPG
    photo240855.JPG
    102.7 KB · Views: 2
  • photo240856.JPG
    photo240856.JPG
    104.6 KB · Views: 2

Kern Fischer

Seaman
Joined
Jun 24, 2013
Messages
51
After some internet searching, a restoration shop in southwest Michigan was chosen for the project. Their experience was primarily wood boats but they had also worked on some collector fiberglass boats and their web site pictures looked good.

The boat and motor were taken to the shop in the spring of 2012 but due to other work they did not get to it until August. They cut out the center transom section and replaced the wood and the fiberglass skin. They did not cut out the side transom boards but indicated they had bonded the new center to the sides. I expressed concern that the forces on the center might create cracking along the joints between the center and sides so they installed a full width reinforcement board on the inside of the transom below the motor well.
IMG_7315R.jpg
The replacement outer skin after cutting out the center transom board and replacing it.
IMG_7430R.jpg
The inside of the transom and the rear floor. The motor well is protruding down at the center top of the picture. The step on the rear bottom of the motor well is one leg of an aluminum angle that was inserted to stiffen the transom area and spread the torque loads over a larger area.

They also faired and sanded the outer hull and painted it a color that was close to original. I also asked that they examine the stringers and inject foam into the cavity between the bottom and the floor. They stated that the stringers were solid and did not need replacing.

While they were working on the hull, the motor was sent to a dealer for a check and tune to get it ready to use. A new windshield was made, using the old one for a pattern. Some of the hardware parts were sent out for polishing or plating and some upholstery was started. The shops chosen for the plating and upholstery work were selected as they were very well recommended in the collector car field.

After working on the boat for several months, the restoration shop lost their shop lease, business did not justify renting a new location, and the boat had to be transferred to another shop. The shop where it was taken was a body shop near the original location. This body shop was owned by a couple who had some experience restoring cars but they had never restored a boat.
 
Last edited:

Kern Fischer

Seaman
Joined
Jun 24, 2013
Messages
51
In November 2012 the hull and trailer were moved to City Auto Body in Grand Haven, MI. When moved, the hull had been painted by the restoration shop but they had rubbed through the paint on the deck and the side scallops were not configured correctly.

IMG_0047.JPG
The hull and trailer at the time of the move to City Auto Body.

IMG_0048.JPG
Left profile showing the incorrect side scallop.

Planning the project with the owner of City Auto Body included fairing and repainting the hull, fitting the tonneau covers for a consistent gap to the deck surfaces, and modifying and restoring the trailer. Work on the hull was started but the trailer was given priority as it would be needed later to hold, store, and move the hull. The owner of City had to modify his thinking about the trailer work. Originally he was considering it as just a trailer. After further work and discussions he came to the mind set of thinking of it like he did when restoring a car.

After starting the restoration, it was decided that during my ownership the boat and trailer would always be paired together. Therefore, some modifications were planned for the trailer to match the appearance and quality of the boat restoration and to improve the performance while towing. These modifications included:

A. Move the axle rearward six inches to add tongue weight and minimize sway when towing.
B. Change the wheel/tire package to a ten inch wheel with a wider tire.
C. Replace the fenders to match the wider tires.
D. Modify the front winch post and weld it to the tongue.
E. Replace the keel rollers and the front stop roller.
F. Revise the front bunk brackets.
G. Move the rear tie down loops inboard to clear possible future hull trim tabs.
H. Replace the tail lamps with LED units for maximum visibility.
I. Make fairings for the tail lamps to better integrate them into the trailer rails and to hide the
brackets and wiring.
J. Paint the trailer to match the boat hull color, with some white accents.
K. Replace all fasteners, brackets, & hardware with stainless steel.

The pre-restoration pictures show that the trailer needed some serious attention to make it look good again. New wheels and tires had been purchased prior to taking the trailer to Michigan. It took three tries to get the right size and look for fenders to mate with the new tires. These were then skirted on the inside to provide a mounting surface to the frame.

Prior to disassembly, metal modifications were made and new parts were welded to the frame. These included the front winch post, front mount plates for the walk boards, brackets for the front bunks, and moving the axle spring mounts. Communicating the desired configuration of the front winch post was difficult at first but eventually it was mounted at an angle that matched the bow line of the boat. The result is a much more integrated look than the original clamp on post.

After all the weld work was completed, the trailer was disassembled and the parts were sand blasted to eliminate rust. The parts were then coated with an epoxy primer and rust pits were filled with body filler to provide a smooth surface. Then the parts were primed and color coated to match the hull color.

DSCN8197.JPG
The partially assembled trailer.

IMG_0016.JPG The new winch post angled to match the bow line. Compare to the original in previous photos.

New keel rollers were purchased and installed. The originals had adjustable brackets that were long and protruded below the frame rails. The new brackets were not adjustable and were much smaller for a cleaner, more finished look.

DSCN8710.JPG
The mostly complete trailer ready for return home for final detail and assembly items.

City Auto Body added a very nice final touch to the trailer work by getting the manufacturer serial number plate reproduced so it was also new.

Additional items required to complete the trailer include adding the winch handle, the walk boards, wiring, lamp fairings, contouring and padding the bunks, and wheel covers.
 

Woodonglass

Supreme Mariner
Joined
Dec 29, 2009
Messages
25,929
Not the best transom replacement methodology but hopefully it will get the job done. What about the stringers?? Have they been inspected?
 
Last edited:

Kern Fischer

Seaman
Joined
Jun 24, 2013
Messages
51
I agree that it was not a good solution. As you will see in some later postings, that transom board was removed and a revised structure was created. The stringers were not rotted but had shrunk away from the fiberglass caps and were broken in a few places so they were replaced, again to be shown in later postings.
 

Willyclay

Captain
Joined
Sep 8, 2006
Messages
3,260
I have owned the boat since new.

I am hooked by the fact you are the original owner. I rescued a V-153 from the landfill and that started my love of Glastrons. Welcome to the iboats.com forum. The members here are great and the experts can help you solve any problem with your boat, motor and trailer. Good luck with that classic old beauty!
 

Kern Fischer

Seaman
Joined
Jun 24, 2013
Messages
51
While the trailer was being restored, work was also proceeding on the hull painting. The decks had typical waviness of fiberglass moldings of that era so the surfaces were faired and block sanded for flatness. There was also some spider web cracking of the gel coat on the foredeck from crawling around on the deck during usage. All holes in the decks were filled except the control cable/electrical harness access at the front starboard side of the motor well. Various hardware items may be located in slightly different positions or have different mounts so new holes will be drilled as required.

DSCN8416.JPG
Fairing the port foredeck. To get it flat a significant amount of area had to be covered.

DSCN8367.JPG
Fairing the port stern deck. Note the tonneau cover in the left foreground.

DSCN8419.JPG
The starboard stern deck. There was a large crack on the rear corner that was repaired and filled.
The tonneau covers are lying in position but have not yet been detail fitted.

As a part of the new hull paint, the side scallop shape was corrected. This scallop is a Glastron design feature and it had to be correct to show the factory paint scheme at its most original.

After block sanding, the hull was primed and painted and then clear coated. The selection of the paint color was a two step process. Part of the upholstery will be an aqua color and a material was chosen that was as close as possible to the original gel coat color. Then the paint color was chosen to closely match the upholstery material.

DSCN9870.JPG
There are many photos of the hull in the paint booth and this one shows what a nice finish that was obtained
even before it was color sanded and buffed.

After painting the hull was buffed and polished to a finish level that was the equal of many show cars.
 

Kern Fischer

Seaman
Joined
Jun 24, 2013
Messages
51
Also included in the repaint process were the motor control unit, the steering wheel, the seats, and the center console.

The original steering wheel had gold spokes and hand grip areas with the rest of the rim being white. There were several cracks around the rim from aging. The cracks were filled with epoxy and blended into the shape of the wheel. The new color scheme replaced the gold with aqua and the rest of the rim remained white.
STRG WHL.JPG
The original steering wheel and motor control. The only gold accents on the boat were the steering
wheel spokes/grips and the mylar on the center console. The color seemed out of place in the
overall scheme.
IMG_0008A.JPG
The finished parts as returned from the paint shop.

The motor control was originally an off-white with a black choke lever and a red grip on the throttle handle. White, matching the rest of the hull white color, was retained for the housing and throttle arm. The grip was painted aqua as an accent and the aluminum choke handle was polished.

The new switch panel had a small trim piece that was included and was originally black. This was painted to match the hull color.
 
Last edited:
Top