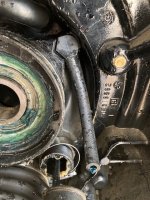
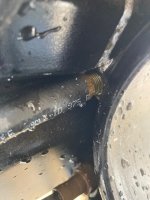
This is a 2017 Bravo 3.
When removing the stern drive, all of the videos I've seen tell you to cut the gear lube hose. Seems pretty stupid that you have to destroy something in order to remove the sterndrive but all the sources I checked said to do that so that's what I did.
Now the problem is removing the old pieces and installing a new one.
The old hose is very much stuck on to the adapters. I've heard that the transom adapter is very finicky and easy to break which can cause a nightmare to replace, so I'm being pretty gentle. But I've worked at it for an hour now and it's nowhere close to coming out. So before I start using some real force or using a small crowbar to pry it off I thought I would check with you guys.
The piece of the hose that's attached to the bell housing is also stuck, but it will rotate. There's a nut at the very bottom but can't get a wrench on it because the metal bell housing is too tight. But since the hose rotates it should just pull off right?