Question On Changing Stringer Location

jbcurt00

Moderator
Staff member
Joined
Oct 25, 2011
Messages
25,034
Would love to here from whydoI before I start the same project
In the mean time, please do as I suggested and start a topic about yours.

That was the primary point, the discussion proceeding w/out member Why was secondary.

Not going to start until you hear from Why? Might never come back, thousands dont, hence the new topic request.

Besides you're likely to have questions Why doesnt, proceed at a quicker pace then Why. And even exact same year, make & model boats are more then 50% likely to have different problems based on prior owners neglect/poosmr maintenance. End result may be the same: full gut & rebuild; but the road to get there will be different.

Different skills, access to tools, time available for hot/itchy/smelly work, sufficient work space and weather all contribute to rebuilds being different. So, as a favor to yourself start a topic and tag any member you wish w an @ symbol immediately before their user name like so:
@alexanderpalacios11@gmail
@WhydoIDoThis2Myself

That'll send a notice to Why to get them to visit your topic &/or respond. Until Why does, you'll get other responses too...
 
Joined
Sep 23, 2021
Messages
25
What was your progress on this? About to start the Same thing. 1987 Fundeck. 19 foot.
Still working on it! Lol it rained for about a week here and then I had to go out of town for work for about a week Lol. Resined the boards. Took a couple tries with the foam to get the shape right, but I got it. I got the hull ground out pretty good, laid poly putty in the stringer channel, set the stringer, the filet'd (spelling) the corners on the port side.

I ran out of putty so I laid PL compound on the other (starboard) channel and then laid the stringer. That's when I ran into issue number one, warped board #$*?!#@!!! And because PL takes so long to cure I couldn't just hold it in place for 20 minutes to get it straight.


Unfortunately the rain started after that.

For anyone curious, the Pl compound, in 85ish degree, mid-to-low humidity, takes about 3 days to fully cure. On day 4 it was just as Sturdy as the polyester putty.

I'll most likely do one of two things at this point. 1)start over on the bent stringer, or 2) use the new bulkheads to straighten it out. Gonna run it by the boat shop this weekend and see what he says.

Keep you guys updated.

Also, if you have the help and space, the top of the fun deck separates from the hull (easy). I don't have the help or space, so I just cut the floor out lol.
 

Attachments

  • IMG_20210929_133411580.jpg
    IMG_20210929_133411580.jpg
    1.8 MB · Views: 10
  • IMG_20210929_164457317.jpg
    IMG_20210929_164457317.jpg
    1.7 MB · Views: 10
Joined
Sep 23, 2021
Messages
25
I am using 3/4 inch marine grade plywood for all stringers and bulkheads. The top 2 1/2 inches in height I added a piece of 3/4 inch plywood along the stringer to make them 1 1/2 inches thick where the floor decking is attached to the stringers. Gives you more width for screwing the deck down.
Did you just screw and glass that part as well?
 
Joined
Sep 23, 2021
Messages
25
As far as difficulty level, I can only speak on my project. I've read a ton of threads on this forum about stringer repair, however, with my boat being a deck boat, and with me removing the ski locker and changing things up, although the principle is the same (grind, sand, clean, measure, cut, resin, PB or whatever you chose to use, set stringer, filet corners, tab, glass, repeat), everyone's project can vary. I'll do my best to keep you guys updated over the next few weekends.
 

88 Capri (2022 SOTY)

Master Chief Petty Officer
Joined
Aug 25, 2019
Messages
819
Still working on it! Lol it rained for about a week here and then I had to go out of town for work for about a week Lol. Resined the boards. Took a couple tries with the foam to get the shape right, but I got it. I got the hull ground out pretty good, laid poly putty in the stringer channel, set the stringer, the filet'd (spelling) the corners on the port side.

I ran out of putty so I laid PL compound on the other (starboard) channel and then laid the stringer. That's when I ran into issue number one, warped board #$*?!#@!!! And because PL takes so long to cure I couldn't just hold it in place for 20 minutes to get it straight.


Unfortunately the rain started after that.

For anyone curious, the Pl compound, in 85ish degree, mid-to-low humidity, takes about 3 days to fully cure. On day 4 it was just as Sturdy as the polyester putty.

I'll most likely do one of two things at this point. 1)start over on the bent stringer, or 2) use the new bulkheads to straighten it out. Gonna run it by the boat shop this weekend and see what he says.

Keep you guys updated.

Also, if you have the help and space, the top of the fun deck separates from the hull (easy). I don't have the help or space, so I just cut the floor out lol.
Glad to see you're making good progress, looking good 👍
 
Joined
Sep 23, 2021
Messages
25
Also, from what I've gathered around the forum, when I ground out the channels, I got them fairly clean and level. Most of the rotten wood flakes out if it hasn't turned to mud like most of mine.and I used the PL/ poly putty to build up any voids or gaps. I really slathered it in there lmao. Fill it up and already have some running out before laying the stringer. Also, on my boat, there was NOTHING under the previous stringers. No resin, no nothing, and only 1 layer of rove/biax? Glass. The parts where they butt boards together has about and extra 1/4 in of resin to cut through. I would suggest using a grinder with a diamond wheel to cut the old stringers out. Personal 2¢.
 

76SeaRay

Lieutenant Junior Grade
Joined
Aug 24, 2017
Messages
1,071
To answer your question above, I did screw and glass the extra width board to the stringer.

Careful if you use a cutoff wheel on the grinder. It can cut through the hull quickly and easily if you slip and hit it edge on to the hull.
 

88 Capri (2022 SOTY)

Master Chief Petty Officer
Joined
Aug 25, 2019
Messages
819
To answer your question above, I did screw and glass the extra width board to the stringer.

Careful if you use a cutoff wheel on the grinder. It can cut through the hull quickly and easily if you slip and hit it edge on to the hull.
I agree about the cutoff wheel. I started my demolition with one but bought a multi-tool which was much easier to manage in tighter areas and didn't make nearly the amount of dust. Not to mention what I thought to be safer.
 
Joined
Sep 23, 2021
Messages
25
Yeah. I went pretty slow and steady. There was a gap under the old stringer, but almost a half inch above the hull that the wheel slipped into and I followed that.
 

Lectro88

Petty Officer 1st Class
Joined
Oct 24, 2020
Messages
303
Would hate to think about all the work I have done with grinders, sanders and multi tool.
Almost, all most... would pick it tops of the 3.
I wouldn't want to be without any of the mentioned.
But the multi tool does so much, even things I used to do with grinder.
Little tedious wood cuts, fiberglass lip sticking up or out 1/8"-1" M.tool.
You can burn through blades til you learn slower revs, or coated high dollar blades. or finer blades vrs coarse. Everybody works different.
Some of the best money I ever spent was porta cable variable speed and then 3 times that on blades and attachments. Probably most will agree except on the particular brand name. I'm not pushing brand.
Wonder how it would do in cordless.. Hmmm.
I feel a box store urge coming on. Lol.
 

88 Capri (2022 SOTY)

Master Chief Petty Officer
Joined
Aug 25, 2019
Messages
819
Would hate to think about all the work I have done with grinders, sanders and multi tool.
Almost, all most... would pick it tops of the 3.
I wouldn't want to be without any of the mentioned.
But the multi tool does so much, even things I used to do with grinder.
Little tedious wood cuts, fiberglass lip sticking up or out 1/8"-1" M.tool.
You can burn through blades til you learn slower revs, or coated high dollar blades. or finer blades vrs coarse. Everybody works different.
Some of the best money I ever spent was porta cable variable speed and then 3 times that on blades and attachments. Probably most will agree except on the particular brand name. I'm not pushing brand.
Wonder how it would do in cordless.. Hmmm.
I feel a box store urge coming on. Lol.
I found that the carbide tipped metal blades worked for me the best with the lower rpm as you stated.
 

todhunter

Canoeist
Joined
Sep 15, 2020
Messages
1,308
I tried several different multi-tool blades, including expensive name brand blades. In the end, I ended up going with cheap blades from Amazon - 10 packs for ~$20. Three 10-packs got me through my entire restoration.
 

Lectro88

Petty Officer 1st Class
Joined
Oct 24, 2020
Messages
303
Three things I do with multi-tool.
I use fine coated blades for fiberglass.
Run at slower speeds.
Keep water flowing on cut to stop dust, keep things cool and lubricated.(fiberglass only)
Just pay attention with water and power tools.
It doesn't take much water to stop dust and cool things off, you can use a drink bottle even.
 
Joined
Sep 23, 2021
Messages
25
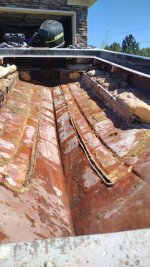
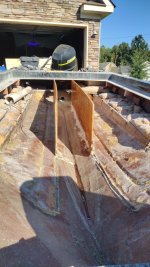
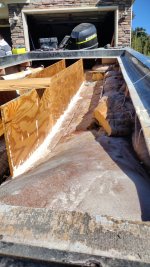
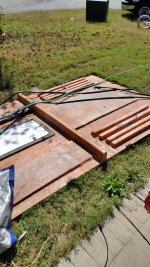
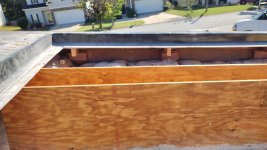
Update!!! Got the main stringers set (first pic). Two coats of resin per board. Used a metric butt ton of poly putty from the local marine shop to bed them. A TON. Gonna throw some bulkheads, which have also been resin'd, in the middle about every 3 feet (3 bulkheads in total). They weren't there before. There actually weren't any really. There were 2x4's glassed to the bottom of the deck that just sat on top of the original ski locker (2nd pic). I think what I'm going to do it just sandwich and glass new 2x4 to old one, and then screw the other side to the new stringers before I glass everything....bad idea? This boat, like a lot of deck boats I've seen,IMG_20211017_145725411.jpgwere built in two parts; The deck, and the hull, and just glued and screwed together.

For the person asking how hard this job is. I'd like to think that I'm pretty resourceful. But I am a complete novice at this. The hull curve is a cold hearted Bia**h to trace/measure without a big enough compass. I tried foam, cardboard, and a small compass and it still took me 4 cuts before I got a useable one. That was the hardest to ME.

Also, after putting the first stringer in, I found when you let the PB, or putty, or whatever you use set up for a minute or two, it's a little easier to work with.

Things I wish I had that would have made this easier.

1) a flat work area. Try your hardest to find a level place to work. My house is on a @#$&+? Mountain.

2) plenty of sun. My driveway is shaded for most of the day so if you need things like resin to dry in a timely manner, find some sun to work in.

Just my 2¢ so far.

More updates to come if you guys are still interested.
 

Attachments

  • IMG_20211017_150546135.jpg
    IMG_20211017_150546135.jpg
    1.9 MB · Views: 1
  • IMG_20211017_150525409.jpg
    IMG_20211017_150525409.jpg
    2.3 MB · Views: 1

88 Capri (2022 SOTY)

Master Chief Petty Officer
Joined
Aug 25, 2019
Messages
819
I agree about the cutoff wheel. I started my demolition with one but bought a multi-tool which was much easier to manage in tighter areas and didn't make nearly the amount of dust. Not to mention what I thought to be safer.
I also wanted to mention that I did use the grinder with 36 grit flapper wheels to grind the gelcoat off.
 
Top