Project Fuggly - No Longer Fuggly And Splashed!!!!!!

archbuilder

Vice Admiral
Joined
Sep 12, 2009
Messages
5,697
Thanks for your nice comments TC and GM. I did the old move stuff around yesterday. Put the side panels in the hanger, cleaned out the smaller shop and moved Fuggly back in. Today I did more cleaning / organizing then went back to actual work. I'm starting to see a market for a shop cleaning service lol!

I worked on getting ready to put some hard points in the hull. I prepped and epoxied in the bolts for the seacast battery hold downs and also located / drilled holes for some bow eyes up front. I will also be drilling for eyes in the back for the rear tie downs. More or less putting in all of the hardware to strap her to the trailer.


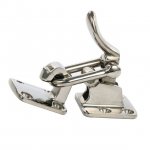
Here is a shot of the bow eye mocked up in the holes I drilled after a lot of measuring....always makes me nervous!


I sanded down the back of the premade backing plates I bought. Didn't cost a lot and saved a lot of time.


Battery hold downs with the carriage bolts epoxied in


One of the backing plates epoxied in.


here is a shot of the holes for one of the eyes and the hard points on the trailer. The idea is these straps will keep the boat from sliding forward in hard braking.


Time for something to eat and hitting the rear of the boat tomorrow.
 

gm280

Supreme Mariner
Joined
Jun 26, 2011
Messages
14,593
I honestly have to admit, your trailer and hull look very nice. The extra work you did along the way is showing up now and it looks great. :thumb: :thumb:

Too bad we don't live close, I sure could learn a lot from you.
 

Patfromny

Lieutenant Junior Grade
Joined
Dec 2, 2012
Messages
1,197
You're getting there. It's nice when you're putting on all the shiny stuff. I'm guessing you are going to glass those backing plates to the hull? I would also make some stainless plates to go between the u-bolts and the hull. I'm sure you have that in the plan but thought I'd mention in case it was an oversight. Keep going Arch. She's really coming together nicely.
 

archbuilder

Vice Admiral
Joined
Sep 12, 2009
Messages
5,697
Thanks GM! You might actually learn a lot of what not to do if you were closer, lol! But for the most part I am pretty happy with the way she is looking.

Pat, the backing plates I used are actually an epoxy product. I'm not going to glass it in because its epoxy and most of the force that would be put on these is a shear condition. The straps will run almost parallel to the hull, so I'm not sure that additional glass would help. I will have a stainless backing plate. This is the fun part, as you said, its nice to bolt on shinny stuff.

I washed off the drive, gimble housing etc this morning at the car wash. I need to get it tore apart, overhauled and painted next.
 

Patfromny

Lieutenant Junior Grade
Joined
Dec 2, 2012
Messages
1,197
I would at least glue the backer to the hull so it doesn't move back and forth. This might prevent elongated holes if the blots get loose. I'm sure you are more qualified to make that call than me though. Looking great
 

archbuilder

Vice Admiral
Joined
Sep 12, 2009
Messages
5,697
Pat it is applied to the hull with West systems six-ten. Shouldnt be going anywhere......if does, part of the hull will go with it lol.
 

archbuilder

Vice Admiral
Joined
Sep 12, 2009
Messages
5,697
Ok for some reason I don't feel like today was productive....but I did get a few things done. I drilled out and installed the bow hard points.


Then laid out and drilled the rear. They are kind of low because I wanted to go through the Seacast. Nice and solid, I really like that about composite construction.


Just when you think you are done grinding glass


I ground down some of the build up around the edge of the dog house so the trim would go on. It came out nice, but a lot of itching!


I called it quits after that, but I did finish up glassing in the hard points for the battery and fuel tank. I don't see those going anywhere.


And finally a shot of the de-greased (sort of) drive parts. I am going to start working on it next week. I ordered a vacum / pressure tester, once I run those test, I will get the drive rebuild started.


gm280

Supreme Mariner
Joined
Jun 26, 2011
Messages
14,593
Arch, you know when you tackle a boat project, you have to become a woodworker a fiberglasser, an electrician, a plumber, a welder, a metal worker, a machinist, a seamstress, a carpet layer, and most of all a critic. You've seemed to be all those things.

I do like the border you installed on the edges. It does top it off really well. :thumb:

I see you did some fiberglass grinding and the dust proves that. Hope the itch dissipates quickly.
 

sphelps

Supreme Mariner
Joined
Nov 16, 2011
Messages
11,435
Everything is turning out great Arch !
I think this is the first boat I've seen with 3 bow eyes ...😐
 

gm280

Supreme Mariner
Joined
Jun 26, 2011
Messages
14,593
I was wondering what the out-drive was doing at the trailer tongue. I will admit, I am not familiar about I/O setups, but I honestly didn't know the out-drives were that far toward to the bow. :facepalm:
 

archbuilder

Vice Admiral
Joined
Sep 12, 2009
Messages
5,697
Thanks GM, but I don't sew, guilty of everything else lol! I have thought about learning, might do that now that Wood is in the neighborhood.

Thanks Sam. I think 3 eyes is fairly common on the newer cats. My freinds Skater is that way.....but as much as it cost it should come with a force field to secure it lol!

Ahmicha, thank you for your kind words!

Today I did fiberglass sanding....yeah, but not as bad as yesterdays grinding episode. I prepped and painted the bilge and area aft of the rear seats with bilge coat. Went down nicely, I am going to hit it again tomorrow. I think I will do the area in front the toe board with it also. it took a little less that half a quart to cover the back area, so the coverage is pretty good.


archbuilder

Vice Admiral
Joined
Sep 12, 2009
Messages
5,697
I put another coat of bilge coat on tonight. I also buffed the cowl vents and the dog house latch. The vents are a little pitted but should work. The latch is kind of the same way. I would like to replace both, but haven't found vents this size or the latch. Has anyone seen this type latch? I have found some similar, and bought one, but its too long. It really needs to be set up for a 90 degree connection like this, the others I have seen were more of a parallel to the surface type application.


gm280

Supreme Mariner
Joined
Jun 26, 2011
Messages
14,593
Arch, if you can't find any like you like, you could always send them off and have them filled polished and re-chromed. They would look amazing and very sharp, but I don't know about the cost or time period. I've seen that done to other metal pieces and amazing at the final results. A lot of the older hot rod bumpers, metal window trim and emblems are done that way. Just a suggestion.
 

sphelps

Supreme Mariner
Joined
Nov 16, 2011
Messages
11,435
I have the same type latches on the MFG ... The hold the hard top down ... One was broken but I did find a replacement at a salvage store .... It didn't look new but it matched the vintage looks of the other ones . :rolleyes:
 

Pusher

Lieutenant
Joined
Sep 2, 2014
Messages
1,273
Looks very close to this one but I don't know measurements and such.

... $_58.JPG and stainless at that!

Amarine 90 Degree Hold Down Boat 90D Clamp-locking Stainless Steel Cam Latch
 

Attachments

  • $_58.JPG
    $_58.JPG
    28.2 KB · Views: 0

archbuilder

Vice Admiral
Joined
Sep 12, 2009
Messages
5,697
GM we have a plater in town and a few more in T-town. I was sort of thinking of that if I couldn't find something economical. But I have a feeling that will be a pricey option. Sam we don't really have the used boat parts up here, so finding another would be a crap shoot, and really this one isn't terrible......I just like the idea of a new nice shinny one. I did look around a bit more and found a perko one, but the cheapest I could find was almost $50 plus shipping. I'm not a cheapo like Wood :D, but that is getting a little crazy simple latch for this build. Thank you for the link Pusher, that looks like it will work and about a 1/3 of the cost of the Perko. For $15 I will give it a whirl.

I had a friend come over tonight and donate a piece of aluminum tubing for the battery hold down. So that required the traditional thank you beers and an update and walk around of the boat. Later I watch the Sooner girls beat the Gators in softball, Booomer Sooner! (sorry Sam, it was a good series)

By the way I did get the brass transom drain tube installed. I broke down and bought the $25 flanging tool. Funny how it cost that much to install a 3$ part!

I should also get the vacuum / pressure tester I ordered to test the drive tomorrow. Its from CDI, which seems odd since I have bought ignition and charging parts from them. But everything they have sold me has been first class, so I am looking forward to getting this tool. I am hoping the seals are good on the drive, if so, I am running with a water pump, gimble bearing, bellows and related parts. I also picked up a quart of automotive urethane paint, in Mercury Black, for the drive today. Lots of details but I can see the light at the end of the tunnel.
 

archbuilder

Vice Admiral
Joined
Sep 12, 2009
Messages
5,697
Ok so tonight I built a de-annodizer tank out of some 2x4s and a 2x12. I used this stuff, sort of vague directions, but works like Frankenstein lab lol! Hopefully Al Gore doesn't find out about it......it actually works!


Here is a shot of some of the rub rail buffed after the bath, buffed out nicely, no issues with the annodizing.


gm280

Supreme Mariner
Joined
Jun 26, 2011
Messages
14,593
Never here of such stuff, but will put that one back into the memory banks for later need. Of course then I will have to remember it, what are the chances? :noidea:

Arch, amazing how lustrous you can buff aluminum out to, isn't it. Looks really good. :thumb:
 
Top