Popular Mechanics 1962 PM38 Build [SPLASHED 2017]

pekstrom

Chief Petty Officer
Joined
Dec 31, 2015
Messages
490
Hey Pek, great project. Still recovering from Open Heart Surgery. I LOVE these old Merc's Can't wait to see her done.

Oh wow! That's some serious stuff! I wish you a good recovery.

Thanks! I sure hope I haven't taken on more than I can pull off. :lol:
 

pekstrom

Chief Petty Officer
Joined
Dec 31, 2015
Messages
490
I'm having a problem and was wondering if anyone here have some tips or ideas. In the lower end cap, there are two oil seals on top of each other. I have managed to get the top one out, but the bottom one seems really stuck. I have tried baking the unit again to loosen up the rubber and open up the bore a bit but that hasn't helped yet. Anyone have any other tricks I can try? Once I get this one out I can start the clean up work and then put the new parts in place.
 

GA_Boater

Honorary Moderator Emeritus
Joined
May 24, 2011
Messages
49,038
Turn the cap upside down an use a punch on the metal ring around the rubber and tap it out. Don't worry if the rubber is scarfed up, it's going in the bin.
 

pekstrom

Chief Petty Officer
Joined
Dec 31, 2015
Messages
490
Turn the cap upside down an use a punch on the metal ring around the rubber and tap it out. Don't worry if the rubber is scarfed up, it's going in the bin.

Alright! Thank you! That worked! I wasn't sure how rough I could be with it. Not that I was all that rough... But now that it is out I can start moving forward again.
 

pekstrom

Chief Petty Officer
Joined
Dec 31, 2015
Messages
490
There hasn't been anything real exciting happening yet on the motor project. I'm working on cleaning up some of the stuff I'll be reusing and removing old gasket residue in some places. I am also trying to get the center bearing / reed block off of the crankshaft so I can clean it thoroughly. There's some stuff caked on to the reeds and in some crevasses but one of the screws won't come out. I managed to break the head of one of my screwdrivers while trying to get the screw to come out. And part of the head is still stuck in the screw head. So now I'm thinking I'll have to drill that screw out. So nothing too exciting. Just taking it slow making sure I get things to where I want them before the great assembly.
 

pekstrom

Chief Petty Officer
Joined
Dec 31, 2015
Messages
490
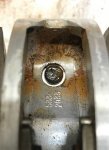
Alright, I only seem to make things worse. I managed to get the other screw out, there are two of them. This is the reed block around the middle of the crankshaft. These screws are supposedly tightened to 150 inch-lb and this one actually broke the tip of one of my screwdrivers. I may have mentioned this already. I bought a drill bit and an extractor bit but no matter what I do, I can't seem to get the extractor bit to bite. And the drill bit doesn't seem to do too much. Any tips for getting this one out?

IMG_4942.jpg
 

Scott Danforth

Grumpy Vintage Moderator still playing with boats
Staff member
Joined
Jul 23, 2011
Messages
47,694
put a nut over it and tig-weld the nut to the head of the screw. let it cool just a bit, then back it out.
 

pekstrom

Chief Petty Officer
Joined
Dec 31, 2015
Messages
490
Wow! It's been a while... So, I am still stuck on that screw. I thank y'all for the tips and advice above but I'm still where I was. I don't have access to a welder so unfortunately that hasn't worked out. I finally got to the 'screw it' moment (no pun intended) and ordered me another used crankshaft and a used reed block. I should be able to get the reeds and reed stops off of the old block. The old crankshaft does have some rust in the sleeve for the drive shaft so it is probably for the better anyway. The new parts should arrive next week I believe. I may start working on the carb, to clean it up and get it ready for assembly while I wait.
 

pekstrom

Chief Petty Officer
Joined
Dec 31, 2015
Messages
490
Alright! Can't hold off much longer. The new crank shaft, main bearing, screws and nuts arrived today! Exciting! Now I need to take the reeds and reed stops off of the old main bearing, clean them and then attach them to the new main bearing. Then I can start putting the new main bearing and connecting rods onto the new crank shaft. Excited and nervous at the same time. Planning to get started this weekend.
 

GA_Boater

Honorary Moderator Emeritus
Joined
May 24, 2011
Messages
49,038
I'll be watching from the west for a cloud of 2 stroke smoke shortly. Maybe get a whiff if the wind is blowing in the right direction. Go get 'em, Pek. :D

Did you get a tool or figure out how to compress the rings?
 

pekstrom

Chief Petty Officer
Joined
Dec 31, 2015
Messages
490
I'll be watching from the west for a cloud of 2 stroke smoke shortly. Maybe get a whiff if the wind is blowing in the right direction. Go get 'em, Pek. :D

Did you get a tool or figure out how to compress the rings?

Hopefully it will just be 2 stroke smoke! :lol:

Yes, I do have a ring compression tool that seems like it should work. Time will tell. I don't have a picture of it. I'll see if I can post one a bit later.

So I get the old reeds off of the old bearing today. And now I wish I had done that sooner. Turns out they aren't dirty, they are rusty. So I opted to get a brand new matched set. I switched gears and got the connecting rods out. I need to figure out how to get all those needles in place before I push the piston pin through. I'm guessing some grease to hold them in place? While doing this I also looked at the old needles for the bearing by the crankshaft, and decided while they look ok, they do feel slightly uneven to the touch. Like they have some rust/grit stuck to them. So I orderred a set of brand new ones of those too. They should get here either late next week or early the week after. I am cleaning some of the other parts so things are slowly moving forward.
 

pekstrom

Chief Petty Officer
Joined
Dec 31, 2015
Messages
490
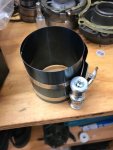
Alright, the following is the ring compression tool I got. It is continuously adjustable for a pretty wide range of diameters. There's a tool for racheting it tight as well.

IMG_5052.jpg

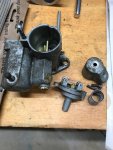
I got the carburetor parts cleaned this afternoon. Next I need to get the repair kit out (and the service manual) and assemble it. There's still some dark gunk on the outside that the carb cleaner bath didn't seem to affect much. I'm going to see if the engine cleaner I have and an old toothbrush will get it off.

IMG_5053.jpg
 

pekstrom

Chief Petty Officer
Joined
Dec 31, 2015
Messages
490
Alright, the following is the ring compression tool I got. It is continuously adjustable for a pretty wide range of diameters. There's a tool for racheting it tight as well.

62042313562__DC7030EF-FED8-463B-9221-E4EC6C4A8533.JPG

I had a couple of them soaking in some rust remover when I took this picture.
 

pekstrom

Chief Petty Officer
Joined
Dec 31, 2015
Messages
490
The new reeds and needles came in, along with some needle bearing assembly grease.

The new reeds installed pretty easily on the main bearing. Still need to tighten the screws properly but turns out I don't have a socket that small for my torque wrench. :facepalm:
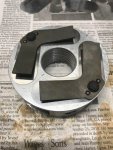
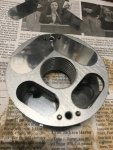
Click image for larger version  Name:	IMG_5058.jpg Views:	1 Size:	109.5 KB ID:	10926870Click image for larger version  Name:	IMG_5059.jpg Views:	1 Size:	111.6 KB ID:	10926871

The needle bearings between the pistons and the connecting rods came together pretty easy too. Once I got the hang of the grease it held on to them nicely while I put things together.
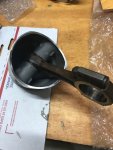
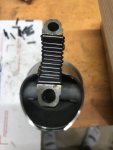
Click image for larger version  Name:	IMG_5060.jpg Views:	1 Size:	86.4 KB ID:	10926872Click image for larger version  Name:	IMG_5061.jpg Views:	1 Size:	53.3 KB ID:	10926873

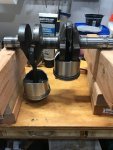
I got ahead of myself a bit and actually put the pistons on the crank shaft too.
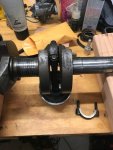
Click image for larger version  Name:	IMG_5062.jpg Views:	1 Size:	84.0 KB ID:	10926874Click image for larger version  Name:	IMG_5063.jpg Views:	1 Size:	92.7 KB ID:	10926875

But then I realized the ring compression tool wouldn't work, so I took them back off of the crank shaft. :lol: :facepalm:

Then I tried to install the first piston into the cylinder, but it didn't go very well. I ended up snapping one of the piston rings somehow. So now I need to get a new one of those. I don't think the ring compression tool works very well. It didn't seem like I could get the rings compressed all the way. I'll have to look for something else. The tool they use in the service manual look big tongs that fit over the crank shaft and down around the piston rings.
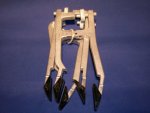
Click image for larger version  Name:	PistonRing-1.jpeg Views:	1 Size:	15.8 KB ID:	10926876

It compresses them in two places. Unfortunately those tools are really expensive so I'd like to avoid having to get a set. I'll have to look around. I'll have to take a closer look at the one Archbuilder used too. The bore is 2.4375" so the choices don't seem that great.

But, at least I've made a little bit of progress!
 
Last edited:

kcassells

Fleet Admiral
Joined
Oct 16, 2012
Messages
8,614
Boy....Engine work is like rebuilding an entire boat. Hats off. I'm not looking forward to it.
 

GA_Boater

Honorary Moderator Emeritus
Joined
May 24, 2011
Messages
49,038
The ring compressor was too tall?

Poor man's ring compressor - Grease, a strip of aluminum flashing and a hose clamp. Smear some grease on the piston and rings, single wrap the flashing around the piston and hold it all with the hose clamp around the rings. Tighten the hose clamp until the piston barely moves inside flashing, insert the piston into the bore and lightly tap the piston through the flashing.

I've done it with just the hose clamp and grease. but the flashing protects the clamp from scratching the piston. I would insert the pistons first and install the crank after both pistons are in the bore.
 
Top