New purchase SX-M

i_build

Petty Officer 2nd Class
Joined
Apr 24, 2005
Messages
136
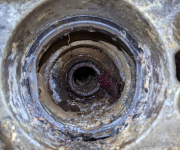
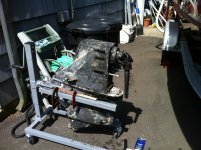
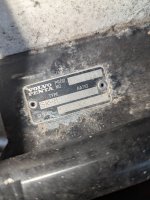
Was in storage 2 years and when I cranked her first time sounded like Gimbal and U-Joints were bad.... and as shown... they were... gear lube not milky at all and smells like regular stinky gear lube so I am assuming seals would be good. Seems to shift fine PO said shift cable new and it looked like it. Outside of Bellows, Gimbal Bearing, Water Pump, U-joints, o-rings for shaft, o-rings for water pump hose and water pump mating surface... plus lube... is there anything else that I should do when stuff looks like this?

It's a 2003 with 400Hrs on the clock. Engine wise... I will do all the standard stuff (5.0GL) / plugs / fuel and oil filter / Dizzy Cap / Wires / Oil / PVC valve.

Thanks
 

Attachments

  • Gimbal from hell.PNG
    Gimbal from hell.PNG
    1.5 MB · Views: 19
Last edited:
Bondo

Moderator
Staff member
Joined
Apr 17, 2002
Messages
70,957
Was in storage 2 years and when I cranked her first time sounded like Gimbal and U-Joints were bad.... and as shown... they were... gear lube not milky at all and smells like regular stinky gear lube so I am assuming seals would be good. Seems to shift fine PO said shift cable new and it looked like it. Outside of Bellows, Gimbal Bearing, Water Pump, U-joints, o-rings for shaft, o-rings for water pump hose and water pump mating surface... plus lube... is there anything else that I should do when stuff looks like this?

It's a 2003 with 400Hrs on the clock. Engine wise... I will do all the standard stuff (5.0GL) / plugs / fuel and oil filter / Dizzy Cap / Wires / Oil / PVC valve.

Thanks
Ayuh,........ A whole lota cleaning,.....
 

i_build

Petty Officer 2nd Class
Joined
Apr 24, 2005
Messages
136
What scares me is that I can't budge the gimbal in the slightest with a back hammer and after cleaning it looks like epoxy around the gimbal so I'm going to buy an official gimbal puller and hopefully it's not 5 tubes of jb weld and it breaks free but I don't know.
 

i_build

Petty Officer 2nd Class
Joined
Apr 24, 2005
Messages
136
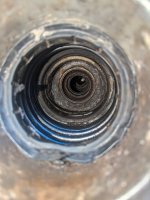
I bought the threaded puller instead of the back hammer... then I bought the biggest crescent wrench I could cause mine were not working as soon a I got to a certain pressure my biggest crescent wasn't good enough but when I got the big crescent the inside of the Gimbal bearing pulled out and ball bearings went everywhere but now I am left with this. I tried using the hook on the back hammer to no avail and the threaded puller wont work anymore. Is that center part with the 2 indents around it the inner that should pivot now that the other part fell apart? I dont know whether I should just pull the pivot housing off and get at it with a hack saw or what. If you have been here before please let me know what the "easiest" way is to get this thing out.
 

Attachments

  • Gimbal part.jpg
    Gimbal part.jpg
    2.4 MB · Views: 15

kenny nunez

Captain
Joined
Jun 20, 2017
Messages
3,290
You need to remove the pivot housing. Then using a a 3/16” drill bit start drilling on one side close to each hole. Just be careful not to drill through the housing. Then try to drive a small chisel through the holes so that you can remove a small piece of the outer retainer. That will weaken the aluminum retainer so that it should come out.
 

Lou C

Supreme Mariner
Joined
Nov 10, 2002
Messages
12,670
Wow that’s bad! You’re lucky that the drive came off!
 

i_build

Petty Officer 2nd Class
Joined
Apr 24, 2005
Messages
136
Thanks Kenny I just ordered the pivot pin removal tool it will come in tomorrow and then Ill start doing as you said. Lou I made a youtube video that was all of about 2 minutes long and it shows how I used a small jack and a sawed off 1/2 inch extension to pop the drive off of my 1966 Ana Capri... i did the same exact method for that drive. The video is here... and yes I know there is risk involved in what I did but now it has worked twice so why not share it . Its got 7200 views. BTW my new boat is a Glastron 249 with Volvo Penta SX drive and 5.0GL engine.
 
Last edited:
i_build

Petty Officer 2nd Class
Joined
Apr 24, 2005
Messages
136
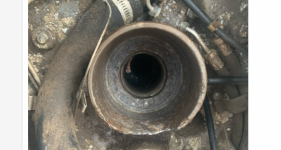
Before I go ahead an try to get this bearing out I have a question regarding the transom plate. The transom plate area for the gimbal has the metal circular casting for the shaft and Ujoints to go through... and it has a ridge that holds the ujoint bellows in place. The lower section of this inlet has corroded away at some point. I would say the ridge exists for 70% of the diameter and the lower 30% had corroded back to the ridge (meaning the ridge is gone) but not beyond it. Do I have to replace the transom plate or assuming the bellows extends beyond the ridge and is clamped after the ridge can I use sealant and replace the bellows every season as it should till I see water intrusion? It will be trailer kept at home. The pic below is from someone else's post and it really looks like what mine is... some people on his post said change the transom plate and of course that's the best solution but he went ahead and cleaned it up and installed his bellows and never posted again (hopefully cause it work and the boat didn't sink) but please let me know cause money is a big factor right now.
1728069474034.png
 

kenny nunez

Captain
Joined
Jun 20, 2017
Messages
3,290
If you grind off the front raised portion of the bellows so that the clamp is binding on solid aluminum you should be ok.
The other option could be to find a good aluminum welder then dress off any extra welded up material.
 

i_build

Petty Officer 2nd Class
Joined
Apr 24, 2005
Messages
136
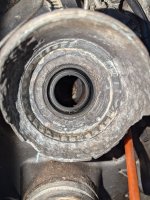
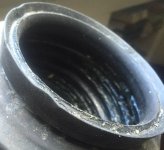
Well... this is my actual part. I did get that bearing out finally. Although Milton killed all my hardwood flooring on the first floor of my house I needed some part of normal life after last week. I consider myself fortunate and bless to even have a floor to walk on. BUT... after drilling all around the aluminum perimeter that thing would still not budge... so I got the Dremel and some grinding bits out and after about 3 hours of grinding got the inner metal piece of the bearing notched out to the aluminum outer part and was able to back hammer it out and then chip away at the aluminum part of the gimbal bearing to what you see now. My wife and I just need to spend some time on the water and I know that the transom shield is needing replacement but I am going to do what Kenny mentioned and grind down the notch on a new bellows and set it back further with mass amounts of bellows adhesive just to have some peace on the water... same water that mother nature used with Milton still is worth the blessings it gives us no matter what. So although I expect to be doing a transom shield before next summer... any tips or advice to try to avoid a mess then.... is there a preferred bellows? maybe not a Volvo Penta SX bellows (possibly larger) for me to mod? I am sure there's recommendations on bearings thousands of times over... but just knowing I am going to be doing a transom shield within the next 4-6 months... is there anything that you might recommend to get me there... I see that the grease feed tube is what can stop me from running the bellows back even further... should I notch the bellows for that tube and double clamp behind and in front of the tube? Since she is only going to be trailered I will avoid full tilt up if I have to... but that's kind of why I was asking whether it might be better to get a different models bellows that might give me some extra extension being that I'm installing beyond the normal. Please let me know... and hope all that are in FL are OK... throughout all the only thing we can't replace is our lives... so if your reading this in FL... although you may not feel like it... you are blessed to be breathing and alive.... some aren't that fortunate. Thanks guys!
 

Attachments

  • Bearing out.jpg
    Bearing out.jpg
    3.6 MB · Views: 16

Bondo

Moderator
Staff member
Joined
Apr 17, 2002
Messages
70,957
but just knowing I am going to be doing a transom shield within the next 4-6 months...
Ayuh,..... That, ^^, is yer only sensible option,......
 

Lou C

Supreme Mariner
Joined
Nov 10, 2002
Messages
12,670
Thanks Kenny I just ordered the pivot pin removal tool it will come in tomorrow and then Ill start doing as you said. Lou I made a youtube video that was all of about 2 minutes long and it shows how I used a small jack and a sawed off 1/2 inch extension to pop the drive off of my 1966 Ana Capri... i did the same exact method for that drive. The video is here... and yes I know there is risk involved in what I did but now it has worked twice so why not share it . Its got 7200 views. BTW my new boat is a Glastron 249 with Volvo Penta SX drive and 5.0GL engine.
Nice vid, that takes some nerve to do but I think it is a case of just enough force in just the right place. Reminds me of the time I had to split my Cobra drive, that thing was not coming apart no matter what (to clean barnacles out of the water intake area). I wound up doing something similar using an all thread rod through the trim ram rod hole, and 2 1/2" bolts in the lower mounting holes on the drive. I put one scissors jack under those 2 bolts and one scissors jack under each end of the trim ram rod and slowly jacked each of the jacks and it popped free with no damage. A good trick to know for salt water boaters, it will work on most outdrives, you do need a stand though and 3 scissors jacks.
No matter what antifouling paint you use, sooner or later you WILL have to split the drive if the boat is left in salt or brackish water, because barnacles and other crap grows in the water intakes and you'll start to run hot.
This is one way to do it without breaking stuff. Ideally you'd do this every 3 seasons or so to keep it from getting stuck. I know on an Alpha you have to do this just to change the impeller but on a Cobra or Volvo, you don't have to and many people probably haven't done this till the engine starts running hot and it is REALLY stuck!
Cobra with bolts and all thread to remove upper.JPG
 
Last edited:
kenny nunez

Captain
Joined
Jun 20, 2017
Messages
3,290
I have repaired a few Mercruisers with the housing either damaged or eroded away.
First remove the stiffening wire from inside the bellows if there is one. Turn the bellows inside out, this makes it easy to grind off the raised bead. Reverse the process and put it back together. Just be sure the clamp is over the bellows where there is a good surface. Sometimes bellows adhesive will let the bellows slip. I quit using the adhesive a long time ago. A clean dry surface will hold just as good.
 

BRICH1260

Lieutenant
Joined
Jul 6, 2011
Messages
1,371
I hate to burst your bubble but I would not put that boat in the water with that current set up. You run the risk of allowing water to get in the bellow and damaging your U joints, new bearings and water in the boat. Thats a pretty good chunk of metal missing. You will need another transom shield.
 

i_build

Petty Officer 2nd Class
Joined
Apr 24, 2005
Messages
136
I want to do it the "right" way but considering I bought the boat from an owner that was ill and needed funds stuck in another state... I never water tested her and I really wanted to just get her in the water and test her out to get an idea of all repairs needed. Compression is good and even... she has a VP 5.0 GL that runs smoother than my Escalade... but I wanted to put a few miles in on the intercoastal to see if manifolds risers pump or anything else needs it... on a real water trial. I basically got the boat for about 50% of what they go for used. I'm going to CAD design and print a bellows pressure tester so I can fill the bellows with water after I mount it to what I have left (grinding the notch on the bellows down) and give Kenny's suggestion a shot. If the bellows holds water during the test and I can flex it all around then I'll give her a test.

While I know my cars and have built a few from just parts... I dont know much about replacing this transom shield. I see there is an inner and outer shield.... but if I am only replacing the outer shield..... can I disconnect the steering, trim ram hydraulics, water, and exhaust and remove the outer shield without removing the engine or do you have to remove the engine to replace just the outer shield?

Also... I am having a hard time finding the Volvo Penta SX-M shield for Prod Number = 386884. I see some WHOLE assemblies including the pivot housing rams and inner part for like 2K and greater used. I see one one Ebay now that "looks" like the one I need... BUT... it says "SX-M EARLIER VERSION 3856990 FF BOTTOM. and that Prod Number is not the same as what I have... not sure that they HAVE to be the same. If you know please help.
 

Attachments

  • Volvo Penta Transom Shield.jpg
    Volvo Penta Transom Shield.jpg
    3.4 MB · Views: 3

kenny nunez

Captain
Joined
Jun 20, 2017
Messages
3,290
How about using a few pounds of compressed air instead of water? There also might be a vent hole in the top of the housing that you will have to plug.
A piece of aluminum the diameter size of the pivot housing end with a schreader valve and a plug in the bearing should work. Then with some soapy water to check for leaks.
As far as removing the gimbal housing goes you need to pull the engine and hopefully the transom is solid.
I also answered your private message.
 

ESGWheel

Chief Petty Officer
Joined
Aug 29, 2015
Messages
469
Here is the best video I has seen for rebuilding an SX Transom Assembly, link. Also recommend you get the manual if not already. Should be VP 7743008.
 

BRICH1260

Lieutenant
Joined
Jul 6, 2011
Messages
1,371
I would not try to test the bellows hold by having it filled with water. You will damage the U joint bearings and cause corrosion. If anything put the bellows on it like you plan and take it to the boat ramp when it is not busy and lower the back end into the water and start the motor. Cycle the steering side to side and trim up and down. Then pull out and take home to see how it held up. If no water, then maybe go back and launch, but I would not venture far from the ramp.
 

i_build

Petty Officer 2nd Class
Joined
Apr 24, 2005
Messages
136
I would not try to test the bellows hold by having it filled with water. You will damage the U joint bearings and cause corrosion. If anything put the bellows on it like you plan and take it to the boat ramp when it is not busy and lower the back end into the water and start the motor. Cycle the steering side to side and trim up and down. Then pull out and take home to see how it held up. If no water, then maybe go back and launch, but I would not venture far from the ramp.
No... I designed a plug for the gimbal bearing and a cap for the other end of the bellows with a fill hole in the side so the bellows is connected as it would be to the Gimbal housing and the "chamber" within the bellows is filled with just fresh water to test the seal to the housing and allow me to flex the bellows as if I were steering / tilting. Once I am done I will attach pics and the STL files if anyone else wants to print them. I did a similar thing for the Intercooler lines on my race car.
 

Lou C

Supreme Mariner
Joined
Nov 10, 2002
Messages
12,670
I've done the bellows on the OMC Cobra which is basically the same as the Volvo SX in fact Volvo just modified the OMC transom mount slightly (longer pivot housing) and changed the drive to cone clutch shifting (the trim cylinders etc were exactly the same as the OMC on the early SXs) and as long as your gimble housing flange is in good shape and the gimble end of the bellows is installed correctly it should seal fine.
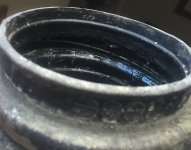
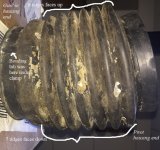
On flange there is a groove, that a ridge on the inner edge of the bellows is supposed to fit into, that is easy to miss (first pic below). Also the bellows has one more fold on one side that is supposed to face down to help it not crack, (second pic) and if you store the boat with the drive down the bellows can last as long as 10 years, in my experience.
The end of the bellows that snaps into the pivot housing should be coated with Triple guard grease and the nose of the bearing carrier that presses into the bellows when you install the drive also should be coated with that grease, that helps the pivot housing end of the bellows seal (third pic).
Done properly I have had no leaks and the bellows on the boat now was installed in 2016. When I start to see small cracks in the folds I replace them.
Most I/O problems I see are simply due to the bad maintenance habits of former owners.
 

Attachments

  • Cobra bellows ridge.jpg
    Cobra bellows ridge.jpg
    99.6 KB · Views: 4
  • Cobra bellows asymetric design.jpg
    Cobra bellows asymetric design.jpg
    266.8 KB · Views: 4
  • Cobra bellows pivot housing end.jpg
    Cobra bellows pivot housing end.jpg
    106.2 KB · Views: 4
Top