Need help with transom repair w/pics

rickryder

Commander
Joined
Jun 24, 2010
Messages
2,722
Re: Need help with transom repair w/pics

Best place I have found is uscomposites.com.... you will need unwaxed resin.... Most of the stuff at Depot and auto stores have wax in them already and you will have to sand between layups....
 

Jon Sob

Master Chief Petty Officer
Joined
Jun 11, 2011
Messages
827
Re: Need help with transom repair w/pics

Thanks RR .... I will check them out.
 

Jon Sob

Master Chief Petty Officer
Joined
Jun 11, 2011
Messages
827
Re: Need help with transom repair w/pics

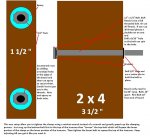
I thought that I saw someone had posted plans or a diagram for making those clamps out of 2x4's for the transom and I don't remember where I saw them ....... does anyone know?
 

Woodonglass

Supreme Mariner
Joined
Dec 29, 2009
Messages
25,927
Re: Need help with transom repair w/pics

Right Here....

Click the pic to enlarge

TransomClamps.JPG

attachment.php
 

Jon Sob

Master Chief Petty Officer
Joined
Jun 11, 2011
Messages
827
Re: Need help with transom repair w/pics

Thanks Wood ...... I should have known you would have them. I am going to make a set in the morning. Thanks again for all your help and advise on my project.
 

Jon Sob

Master Chief Petty Officer
Joined
Jun 11, 2011
Messages
827
Re: Need help with transom repair w/pics

I am looking at resin from Uscomposites and I am not sure what kind to order. I am going to be installing my transom soon and I was wondering if the "435 standard lay up resin" is the stuff to use. I have found everthing else just not sure about the resin .... any advise?
 

Cadwelder

Lieutenant Commander
Joined
Aug 30, 2010
Messages
1,780
Re: Need help with transom repair w/pics

The 404 is a bit stronger but the 435 will do just fine as well....one of those either or.
 

Jon Sob

Master Chief Petty Officer
Joined
Jun 11, 2011
Messages
827
Re: Need help with transom repair w/pics

404 it is .........Thanks guys.
 

Jon Sob

Master Chief Petty Officer
Joined
Jun 11, 2011
Messages
827
Re: Need help with transom repair w/pics

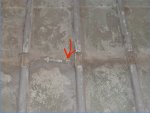
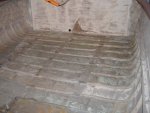
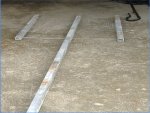
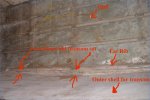
Hi everyone ......... I removed the metal stringers from the boat so I am able to tab around the transom without problems. The bolts holding it in seem to be glassed into the bottom of the hull on the inside and some of them were a little stubborn and came out of the glass. I marked the pic with a red arrow showing the hole where the bolt came from. They other pic shows the stringers. The ribs in the hull are made of wood and are in great shape. I am going to have to check all the bolts to make sure that they are tight. The ones that came out I need to repair and I am not sure the proper way to do that. Should I use PB to put these back in or is there some other way of doing it?
View attachment 101993DSCF1752.JPGDSCF1749.JPG
 

Attachments

  • DSCF1750.JPG
    DSCF1750.JPG
    92.5 KB · Views: 0

Jon Sob

Master Chief Petty Officer
Joined
Jun 11, 2011
Messages
827
Re: Need help with transom repair w/pics

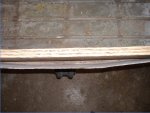
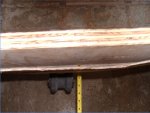
Ok ... This is for you wood workers out there. I tore out my old transom ( actually I shop vac'd it out 'cause it was like wet coffee grinds ) and made a new one. I followed all the advise on here to build the new one and it came out great. Not having anything of the old transom to use as a template I measured as best I can but the problem is that my boat has a bit of a radius to it and is not straight like my new transom is so when I dry fitted the transom in I had about a 1" gap at the bottom center between the transom and the shell. In the pic you can see where I stuck a tape in the drain hole and it is just short of 1". The transom that I made is about 1 1/8" thick. I don't know if I shoud make a spacer out of ply to fill that area or what to do so I am turning to all of you for some advise ..... Please.

DSCF1753.JPGDSCF1755.JPG
 

Jon Sob

Master Chief Petty Officer
Joined
Jun 11, 2011
Messages
827
Re: Need help with transom repair w/pics

The transom touches on both sides but not in the center. The top of the shell will clamp tight to the transom but there is about an inch gap at the bottom and about a third of the way up.
 

Woodonglass

Supreme Mariner
Joined
Dec 29, 2009
Messages
25,927
Re: Need help with transom repair w/pics

Solly Cholly but that's NOT gunna work. You need to build your transom in layers. Also you need to try and be more precise in creating a template so I would strongly recommend you use cardboard and a drafting compass to create a template of the hull and then transfer this to the ply wood. You should use 3 layers of 3/8 in plywood to make your transom and Glue each layer to the outer skin one at a time. Are you using Poly or Epoxy?
 

Cadwelder

Lieutenant Commander
Joined
Aug 30, 2010
Messages
1,780
Re: Need help with transom repair w/pics

The transom touches on both sides but not in the center. The top of the shell will clamp tight to the transom but there is about an inch gap at the bottom and about a third of the way up.

Which of the two isn't flat? The wood for your transom MUST be flat and true, because when you clamp it in the skin is going to conform to the new plywood and glass a permanent warp into your transom. If you have something to clamp with that will hold it perfectly true while it cures your fine.....but I can't stress enough the importance of the transom being true and flat.

Many don't understand that when the transom was first installed it was held true by the original mold, but as a repair you must rely on other methods.
 

Jon Sob

Master Chief Petty Officer
Joined
Jun 11, 2011
Messages
827
Re: Need help with transom repair w/pics

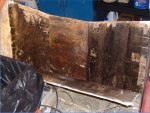
I glued with PL Adhesive three layers of 3/8 ply together to make the transom which was very straight and true. I then was going to attach it to the boat with poly ( Peanut Butter ) but when I dry fit it in the boat I noticed that at the bottom of the boat is not straight but has a radius in it which is the way the end of the hull is formed. This radius is definitely from the manufacturer and not warped from age. When I set my transom in ( because it was straight and the back of the boat isn't ) it left a gap in the middle but was touching on the ends. I attached a pic of the original transom before I tore it out and as you can see they formed this radius with horizontal and vertical pieces of wood and a piece of ply in the middle. Wood ..... are you saying that I should cut each layer of ply and poly it in to the boat one at a time?

DSCF1723.JPG
 

Woodonglass

Supreme Mariner
Joined
Dec 29, 2009
Messages
25,927
Re: Need help with transom repair w/pics

Yep basically you will make Three Identical Transom pieces out of 3/8" plywood. PB glue the first one in. Then glass in a layer of mat and PB glue in the next layer and then finally the last. That way it will conform to the outer skin of the boat. That's the way it's GOTTA be!!!
 

Jon Sob

Master Chief Petty Officer
Joined
Jun 11, 2011
Messages
827
Re: Need help with transom repair w/pics

Here is a pic looking down into the boat where the old transom was and you can see the middle area is about 1 1/2" and the tapers down to nothing on the ends. ( not sure if this pic helps or not )

DSCF1756.jpg
 

Jon Sob

Master Chief Petty Officer
Joined
Jun 11, 2011
Messages
827
Re: Need help with transom repair w/pics

After I glass the layer of mat how long do I wait before I PB the second ply in?
 

rrumba

Ensign
Joined
May 31, 2011
Messages
901
Re: Need help with transom repair w/pics

I like those clamps alot wood. very clever. i think i can use the same setup just making them shorter and going in from the location the keyhole will be.
 

Cadwelder

Lieutenant Commander
Joined
Aug 30, 2010
Messages
1,780
Re: Need help with transom repair w/pics

So this curve (obiviously a manufactuerer mover) is quite instresting. This curve is only at the lower part of the transom, right? It's still flat where the outboard will mount correct?

If this be the case the original transom must have been a "formed" plywood transom. I've seen this once, and I ended up making a the shape myself by laminating thinning wood and gluing them together until I reach the flat part and then adhered it to the standard flat plywood. It was a bit of work shaping it, but a fun challenge.

As far as time frame goes...you can do all three layers at one time. You can glass and matt one layer and then just keep going with the same process. Only have one clamping time that way. Just have everything ready to go.
 
Top