My Rotten Lady

kramerpage

Chief Petty Officer
Joined
Jul 26, 2010
Messages
447
Bump #79


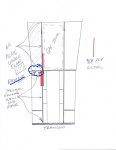
Well the rot was more than I thought. I had to cut the stringer about 43 inches from transom. This is at the engine bulkhead area. I cannot get behind the stringer to sister the joint as planned due to there is no access under the fiberglass floor. So now how do I make the repair?

sister joint.jpg
 

kramerpage

Chief Petty Officer
Joined
Jul 26, 2010
Messages
447
Uhmm, Cut an access hole in the floor??

I was looking at deck plates and their are so many unknowns like what is in that cavity and are their cross braces. I am going to try this described below.
My body is not going to like it at all. But all I need to do in that area is place nuts and washers on bolts that are coming through the stringer area.

Wood,If I sister 18 inches past the joint as you instructed I have a few detail questions please.

1) Do I make the sister pieces the same height as the stringer or can I come down an inch for ease of installation. Stringer is 13 inch high
2) What type of fasteners. 1/4 20 with fender washers and nylock nut?
3) how may and the spacing. Like an upper and lower staggered every 10 inches type of method?
4) Do I use any type of adhesive to bond the new sister plywood to the existing stringer like PL and clamp in wet with the staggered bolts to enforce clamping pressure?
stringer20001.jpg
 

Attachments

  • stringer20001.jpg
    stringer20001.jpg
    34.2 KB · Views: 0
Last edited:

TruckDrivingFool

Lieutenant Commander
Joined
Jul 30, 2007
Messages
1,818
You'll be better off if you glue the sister in and glass it.

If the floor is not rotten then cut it back to access where you need to. Then you can scab it back in once done like this


If it is rotten might as well be replacing it anyway.
 

kramerpage

Chief Petty Officer
Joined
Jul 26, 2010
Messages
447
You'll be better off if you glue the sister in and glass it.

If the floor is not rotten then cut it back to access where you need to. Then you can scab it back in once done like this


If it is rotten might as well be replacing it anyway.

Hello TDF,
The floor is Fiberglass. That's why Woodonglass suggested an access plate. Yes if it was wood and carpet it would be less of a challenge.
 

Woodonglass

Supreme Mariner
Joined
Dec 29, 2009
Messages
25,927
Sister Joint can be 1" shorter than Height of Stringer. Yes needs to be screwed and glued (Resin Peanut Butter) and as TDF states Glass over the entire patch with 2 Layers of 1708 to finish it off.. Sister pieces go on both sides of the stringer. No need for fender washers. 3/4" Deck deck screws are fine. 4" OC spacing. 1/4" plywood is fine for the sister pieces. The Glass will give you the strength.
 

TruckDrivingFool

Lieutenant Commander
Joined
Jul 30, 2007
Messages
1,818
Even if the floor is nothing but a glass lamination the process is the same you'd just have to do a glass layup on the bench to make the cleat for the scab. Skip the screws and glue it all together with resin and csm. Once you have the lamination strip for the scab three steps - glue cleat to existing floor, glue floor filler back in, glass the seam.
 

kramerpage

Chief Petty Officer
Joined
Jul 26, 2010
Messages
447
Even if the floor is nothing but a glass lamination the process is the same you'd just have to do a glass layup on the bench to make the cleat for the scab. Skip the screws and glue it all together with resin and csm. Once you have the lamination strip for the scab three steps - glue cleat to existing floor, glue floor filler back in, glass the seam.

Ok I understand. I don't know how to finish the gel coat on the floor but have been reading up on it. I am thinking this would be easier on my body giving me more access to the stringer.
How do I make a glass lay up on the bench? I am making 100 percent glass cleat strip the same thickness of the floor? I have 1708 and 1.5 CS. Do you make a mold?
 

TruckDrivingFool

Lieutenant Commander
Joined
Jul 30, 2007
Messages
1,818
Watch how Archbuilder did his transom skins, same thing but on a flat piece of plywood or for that matter just glass some thin plywood to use.


kramerpage

Chief Petty Officer
Joined
Jul 26, 2010
Messages
447
Its 5/16 thick. It has a non-skid texture on the top. Its in perfect condition with not one stress crack. That's why I get the jitters thinking about cutting it since my skill set is so low. Well none actually.
 

Woodonglass

Supreme Mariner
Joined
Dec 29, 2009
Messages
25,927
Here's the deal, once you cut the deck out to gain access to the area needed to sister in the stringer and then you replace the deck piece you will only need to repair the seam around the area where you put the old deck piece back in. You'll do this by grinding/sanding the textured gelcoat back approx. 3 " on either side of the cut seam and then fill the seam with PB lay some CSM over it. You'll then lay down 4-5 coats of Gelcoat to finish it off. Gelcoat is thick and will/should build up to the thickness of a penney. You can make a "Pattern Template" by waxing the exisiting deck with Johnsons furniture wax (3 Coats) and then lay down 3 layers of CSM over the waxed area...about 1 sq ft. Use your fingers to press it down HARD into all the little crevices of the deck pattern. In 45 minutes after it's cured you'll be able to peel it off and then when you gelcoat the patched area you can use this piece of CSM laminate coated with wax to press into the gelcoat when it starts to harden and it will be an exact match of the existing pattern. It's really not that hard. YOU CAN DO IT!!!!
 

kramerpage

Chief Petty Officer
Joined
Jul 26, 2010
Messages
447
Well I have good news.... I was confused.... The floor doesn't have a texture in the gel coat. It has a non skid material applied to the top. Like what's in a bathtub. My brother reminded me I was thinking of the 220 Bayliner Trophy down at Lake Cumberland that has the complex texture. Guess Im just getting old...

So I removed the large seat and I'm going to DO IT!!! I need to find a supplier of that non skid stuff but that's the least of my worries at this point.

Sorry about the mistaken post...
20150820_145659_resized.jpg
20150820_145733_resized_1.jpg


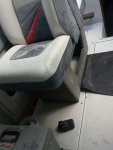
So right where the tool box is to the middle of the seal box frame is the area I need to open up. The hatch to the right is the gas tank area.
 
Last edited:

kramerpage

Chief Petty Officer
Joined
Jul 26, 2010
Messages
447
I'm thinking circular saw so I can control depth. The boat is already full of glass from other work. I love the Sawzall method but it's tough to keep straight and control depth. Say a prayer. Lol
 

kramerpage

Chief Petty Officer
Joined
Jul 26, 2010
Messages
447
No Title

Well I didn't get floor cut today. I had a helper all day so we did things it takes two people to do. Installed waste and water hook ups. Removed some upolstry for repair. Shortened railings to make room for rod holder tree. Removed ski tow eye to make room for fish cooler on platform. Removed helm. Removed bow eye. It needs shore op with some glass repair. Removed all non factory wiring. Three antaenas were removed withe cassette tape player. Rebuilt boat leveler trim cylinders. Prepared more holes to be filled w PB on the exterior gel coat. Dug out and recalled the sky light for the bathroom. Removed and resealed windshield. Boy that's alot.... will cut floor Sunday.
 

Attachments

  • photo228774.jpg
    photo228774.jpg
    153.8 KB · Views: 0
  • photo228775.jpg
    photo228775.jpg
    108.9 KB · Views: 0
  • photo228776.jpg
    photo228776.jpg
    99.6 KB · Views: 0

kramerpage

Chief Petty Officer
Joined
Jul 26, 2010
Messages
447
No Title

Got the floor cut today. Foam was dry. Deck was in good shape. Found wet foam in a forward locker. Tore out bottom of locker and cut out bulk head.

She is a rotten lady....
 

Attachments

  • photo228826.jpg
    photo228826.jpg
    82.6 KB · Views: 0
  • photo228827.jpg
    photo228827.jpg
    96.7 KB · Views: 0
  • photo228828.jpg
    photo228828.jpg
    119.7 KB · Views: 0
Top