My Rotten Lady

Woodonglass

Supreme Mariner
Joined
Dec 29, 2009
Messages
25,927
Here's how I'd recommend doing it. Others might do it differently. I'd use Titebond III wood glue and glue the 3/4" pieces of plywood together to make the blocks. I'd then use a table saw to cut the angle to closely mimic the angle of the hull. ( You might not need to do this if the angle isn't too bad. The PB and fill it in and make up the difference. It's up to you) Epoxy and Poly don't like each other so don't use it. Just coat the Blocks in Poly really well after they're fabricated and then bed them in a some PB and get em level and at the correct Height. Then apply more resin and attach them to the hull with 3-4 layers of 1708 going over the top if you can. You can use CSM between the layers of 1708 but really not needed. Then use the Gel coat to finish it off and make it PURDY!!!! That's the Old Dumb Okie's way of doing it!!!
 
Last edited:

kramerpage

Chief Petty Officer
Joined
Jul 26, 2010
Messages
447
Here's how I'd recommend doing it. Others might do it differently. I'd use Titebond III wood glue and glue the 3/4" pieces of plywood together to make the blocks. I'd then use a table saw to cut the angle to closely mimic the angle of the hull. ( You might not need to do this if the angle isn't too bad. The PB and fill it in and make up the difference. It's up to you) Epoxy and Poly don't like each other so don't use it. Just coat the Blocks in Poly really well after they're fabricated and then bed them in a some PB and get em level and at the correct Height. Then apply more resin and attach them to the hull with 3-4 layers of 1708 going over the top if you can. You can use CSM between the layers of 1708 but really not needed. Then use the Gel coat to finish it off and make it PURDY!!!! That's the Old Dumb Okie's way of doing it!!!

Hey that sounds very simple. You get to reading hours on end and it gets complicated. I know when I use Titebond iii on wood and you try to disassemble the work piece it breaks at the wood not the joint. I have a belt sander with 36 grit. Not a sander but destroyer. lol That will but an angle on her to get it close. THANKS for the tips. I will post some pics when I get started. Im doing one side at a time so I can keep the elevations correct since Im inexperienced.
 

kramerpage

Chief Petty Officer
Joined
Jul 26, 2010
Messages
447
So when I have the poly coated block installed w PB how do I go about specifically covering it? Is first piece from 2 inch down on hull up over block top and up 2 to 3 inch above to stringer which is Ike 10 inch higher than block? Then how to I cover forward and aft part of block or is I just one really big piece which encompassing all inside and outside corners? That seems like it would be hard for an amature. Then each of the four layers extend an inch or so longer than the previous up the stringer and down the hual correct? Also I'm doing this one layer after the other till complete. Moreover all wet so to speak. I have a helper to mix more poly during the process so I don't have to get out of the boat. Thx so much
 

Woodonglass

Supreme Mariner
Joined
Dec 29, 2009
Messages
25,927
I'll try and post a drawing in a bit.


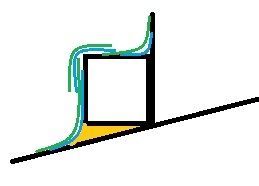
Ok the Yellow is the PB. Once the MM is bedded then you'll use individual layers of 1708 to lay up the sides of the MM and out onto the hull. First layer should extend 1/2 way up the block and approx. 3-4" out onto the hull. Next layer all the way up to the top of the block and 6-8" out onto the hull. Do this on all three sides of the block. Not sure if the Block adheres to the Stringer or not but if it does then use the PB to glue it to the side of the stringer. Then follow the drawing to lay the strips of 1708 from the stringer down onto the top of the block and then finally from the top of the block down over the edge. OR you could try and do it all at once from the hull up over the top and up onto the stringer but that can get a bit tricky and form air bubbles etc. I think the way I show it in the drawing might be a bit easier. Anywhooo that's how this Old Dumb Okie would do it. Maybe somebody else can "Splain" it better!!!!:eek:
 
Last edited:

kramerpage

Chief Petty Officer
Joined
Jul 26, 2010
Messages
447
Hey woodonglass thanks for taking your time to help me. I really appreciate it. I'm loading the gun now. Purchasing supplies 10 disposable 6 inch paint trays. 12 4 inch peanut paint rollers , clamps. More 50 and 80 grit paper.
I have another question. Lol
The poly I'm using has wax so I'm going to do all coats wet. When I'm done I want to apply white gelcote with wax. What's the prep procedure for good gecoat adhesion? Do I need to sand poly and wipe withe acetone before I apply gelcoat? Also if I do a second coat of gel coat do I sand between coats since it has wax? Thanks again. Oh marina called and said they are ready for the boat to install engine. Told them what's going on w rot in boat. They said it would be 3 thousand to do what I'm doing. Geee. This phase of repair will cost me 600 plus time. Today I'm installing all new trailer brake components. Poly brake lines. Dico actuator, 10 inch Dico brake backing plates. Bearings and seals. Stuff I'm good at. Lol
 

Woodonglass

Supreme Mariner
Joined
Dec 29, 2009
Messages
25,927
Yes, sand with 60 grit, wipe down with acetone and apply. Do the same with the gelcoat. It's best to NOT use wax till the last coat but...if it already has it in it then you don't have much choice.
 

kramerpage

Chief Petty Officer
Joined
Jul 26, 2010
Messages
447
I messed up getting poly with wax. That's a lot of sanding. Hopefully I can do all the glass wet and only sand to put on the gelcoat which I guess you would want to do anyway. Thanks again
 

kramerpage

Chief Petty Officer
Joined
Jul 26, 2010
Messages
447
So my progress on the repair has been slow. I have been busy with other things. The rain in Ohio has been indescribable. I am however completely rebuilding the transom plate, gimbal housing, bell housing to a like new condition since that work can be done in the garage. It has been costly and labor intensive. I hope to get to the glassing stage when weather makes a turn but I was thinking that more than 30 days ago....
 

kramerpage

Chief Petty Officer
Joined
Jul 26, 2010
Messages
447
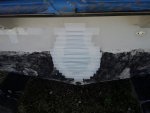
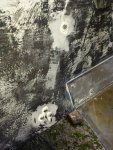
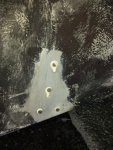
How do I go about repairing these 14 holes in her body. What method, products do I need. I will at the end paint hull with ablative paint. Thanks 20150801_153000.jpg
More
20150801_152945.jpg
More
20150801_152940.jpg
 
Last edited:

Woodonglass

Supreme Mariner
Joined
Dec 29, 2009
Messages
25,927
Tape over the holes on the outside and use "Peanut Butter" (Thickened Resin) to fill em in from the inside using a putty knife or bondo spreader. Then remove the tape on the outside, do a bit more sanding and use some fairing material to do a bit more filling in and smoothing and you're ready for primer and paint!!!;)
 
Last edited:

kramerpage

Chief Petty Officer
Joined
Jul 26, 2010
Messages
447
Tape over the holes on the outside and use "Peanut Butter" (Thickened Resin) to fill em in from the inside using a putty knife or bondo spreader. Then remove the tape on the outside, do a bit more sanding and use some fairing material to do a bit more filling in and smoothing and you're ready for primer and paint!!!;)

Hi Woody,
Most of these holes are 3/4 inch long #8 pan head screws so they don't go thru the transom.
Do I drill them thru or do your method above from the outside.
Also can I use a deburing bit on a drill to enlarge and clean out the hole a little. I originally just pulled every screw out and filled with 5200 since I didn't know really how to repair properly. Thanks
 

DeepBlue2010

Lieutenant
Joined
Aug 19, 2010
Messages
1,305
For that small blind hole, 5200 could be all you need. How long ago did you do that? Not sure if you already mentioned in this thread or the other one and I just don't remember, but are you going to replace the transom on this boat?
 
Last edited:

Woodonglass

Supreme Mariner
Joined
Dec 29, 2009
Messages
25,927
Sorry, if they're only screw holes then I'd enlarge em just a bit and fill the same. I wouldn't use 5200 if you're gunna paint. I've had mixed results with paint adhering to it. It's not the best "BASE" for that. I'd much rather have the resin for that but that's just me. I'd just use a drill with a counter sink to make em a bit bigger and then come along with some PB and fill em in all nice and smooth.
-Countersink.jpg
 
Last edited:

DeepBlue2010

Lieutenant
Joined
Aug 19, 2010
Messages
1,305
If you are planning on installing any transducers in the future, I would try to reuse these hols and just fill the rest with marine sealant like 5200. You can also hide all of these hols by installing a composite board to carry the transducers instead of installing them directly to the transom. Just food for thoughts. There so many different ways to skin this cat
 

kramerpage

Chief Petty Officer
Joined
Jul 26, 2010
Messages
447
No Title

Sorry, if they're only screw holes then I'd enlarge em just a bit and fill the same. I wouldn't use 5200 if you're gunna paint. I've had mixed results with paint adhering to it. It's not the best "BASE" for that. I'd much rather have the resin for that but that's just me. I'd just use a drill with a counter sink to make em a bit bigger and then come along with some PB and fill em in all nice and smooth.
-Countersink.jpg

Got it...thanks. figure I'll do it when I'm making PB for the mounts and stringer. Here's my weapon of choice.
 

Attachments

  • photo227292.jpg
    photo227292.jpg
    72.2 KB · Views: 0

kramerpage

Chief Petty Officer
Joined
Jul 26, 2010
Messages
447
If you are planning on installing any transducers in the future, I would try to reuse these hols and just fill the rest with marine sealant like 5200. You can also hide all of these hols by installing a composite board to carry the transducers instead of installing them directly to the transom. Just food for thoughts. There so many different ways to skin this cat
Yes DB
I want to mount a 3/4 thick 4 inch x 8 inch block ok King Starboard then mount duces to that as I have on other glass boats.
I actually attach that block by buttering the block and the hull with 5200 fast cure. Wait 30 minutes and apply and tape with duct tape. I don't fasten to hull with screws. Works good. Got one on a boat now for over 12 years. Thanks
 

kramerpage

Chief Petty Officer
Joined
Jul 26, 2010
Messages
447
For that small blind hole, 5200 could be all you need. How long ago did you do that? Not sure if you already mentioned in this thread or the other one and I just don't remember, but are you going to replace the transom on this boat?

I am not replacing transom. I drilled numerous holes on staggered rows 1 inch deep. Like 20 in the transom and found all yellow wood and no moisture. When I pulled the trim tab plates I probed all those lower holes and found no water and no dark wood. Now my moisture meter says it's rotted lol but I cannot find evidence of those high readings. I will fill those holes on the inside with 5200 and done.
 

DeepBlue2010

Lieutenant
Joined
Aug 19, 2010
Messages
1,305
moisture meters can be very misleading on boats. If you have good dry gold shavings, you should be fine.
 
Top