my 1991 capri rebuild

bleedblue94

Petty Officer 1st Class
Joined
Oct 11, 2010
Messages
272
Re: my 1991 capri rebuild

I didn't get a chance to read the whole thread completely but you are doing one hel of a job. I tip my hat. I did the same with an old 16 ft Humber 25 years ago. No comparison with a Capri. A lot of work man.
Just curiosity, did you weigh your boat before you stated your project? I use to build sail boats back in the early 70's and learned that too much weight could compromise the speed and balance of the boat. I am pretty sure you took that into consideration.
Good job

thanks for the compliment. im curious what is your concern on the weight? ive only added minimum weight by widening the transom. i think when this is all done even with whatever i add to this boat in structural weight and the upgraded motor will be completely countered by the rot and water weight removed
 

bleedblue94

Petty Officer 1st Class
Joined
Oct 11, 2010
Messages
272
Re: my 1991 capri rebuild

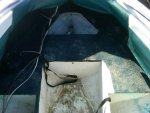
ran out for a couple minutes today to get the rest of the floor out to fully expose the stringers and managed to get it done in about 50 minutes before i headed to work

just a quick pic of the bow area which didnt look too awful
IMG-20120314-00099.jpg

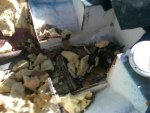
here is with it all hacked up and you can see standing water under the wood and fiberglass, the theme continues: soak & rot
IMG-20120314-00101.jpg

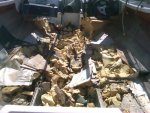
ill have to get at this mess after work
IMG-20120314-00100.jpg

thursday - stringers out before work
friday - cut new stringers and bulkheads then get them a first coat in resin (im adding another front bulkhead to tie the stringers together up there since the stock design has the front bulkhead 2 feet forward of where the stringers end)
saturday - coat the other side of the stringers and bulkheads in resin before work
sunday - a day with the girl
monday - glue everything in with pl

next week do the fillets with PB and then tab and cap everything. hopefully by monday next week i will be adding my cleats and be moving on to cutting the floor.

i do have a question: i see most boats with a sub floor in the ski locker area and the gas tank area. my boat did not have one in the locker and the gas area had a floor with a ton of slits cut for drainage. is there any real benefit to a sub floor in the locker area? im also still debating how im going to install the tank, everyone has instructions/suggestions for metal tanks but this one is poly.
 

F14CRAZY

Ensign
Joined
Aug 12, 2008
Messages
945
Re: my 1991 capri rebuild

I used epoxy when I restored my '85 Capri. That was with three layers of 18 oz roving though. Nobody complained and some even said I overbuilt it that way. Been in a few small craft advisories and no cracks yet
 

bleedblue94

Petty Officer 1st Class
Joined
Oct 11, 2010
Messages
272
Re: my 1991 capri rebuild

I used epoxy when I restored my '85 Capri. That was with three layers of 18 oz roving though. Nobody complained and some even said I overbuilt it that way. Been in a few small craft advisories and no cracks yet

yeah im not worried about how im building it overall, just curious about the subfloor thing
 

bleedblue94

Petty Officer 1st Class
Joined
Oct 11, 2010
Messages
272
Re: my 1991 capri rebuild

need gel coat advice. i have not decided what color i am going to paint the deck, but i will need to paint the fuel tank section and possibly ski locker hole soon. im wondering if anyone knows of a product i can buy at a home depot or lowes that i can use? does any gel coat work, or do i need to find a marine grade to withstand fuel ect? its a newbe question but i have never used gel coat before. thanks
 

Woodonglass

Supreme Mariner
Joined
Dec 29, 2009
Messages
25,924
Re: my 1991 capri rebuild

The big box stores are prolly not gunna have gelcoat. West Marine will carry it or a local boat repair service or marina. You could also look for BilgeKote.
 

bleedblue94

Petty Officer 1st Class
Joined
Oct 11, 2010
Messages
272
Re: my 1991 capri rebuild

The big box stores are prolly not gunna have gelcoat. West Marine will carry it or a local boat repair service or marina. You could also look for BilgeKote.

never heard of it. looks promising. have you worked with it? pros and cons versus gelcoat?
 

bleedblue94

Petty Officer 1st Class
Joined
Oct 11, 2010
Messages
272
Re: my 1991 capri rebuild

thanks. still unsure if i should use this or just gelcoat it, but i do appreciate the info.

stringers and bulkheads are glued in. tabbing and filleting will begin possibly thursday. plan to do everything wet on wet. planning csm, 1708, 1708. also planning to reinforce the keel. it doesnt show any signs of significant wear, but i will (hopefully) never be down here again so i might as well make sure while i have the chance. i think one layer of csm and one layer of 1708 in the keel will be suitable
 

Decker83

Commander
Joined
Apr 5, 2011
Messages
2,592
Re: my 1991 capri rebuild

I am at the same stage. I went with the gel coat from www.uscomposites.com . It is about the same price and IMO will hold up better.
You can get it in a quart or gallon size without any hazzard fees.
 

bleedblue94

Petty Officer 1st Class
Joined
Oct 11, 2010
Messages
272
Re: my 1991 capri rebuild

I am at the same stage. I went with the gel coat from www.uscomposites.com . It is about the same price and IMO will hold up better.
You can get it in a quart or gallon size without any hazzard fees.

yeah it was a struggle but i think ive decided to go with gel coat. i was primarily debating durbak on the deck and bilgekote under the deck, but the cost of just buying a bunch of gelcoat balances everything out and i wont have to worry about repainting ect.

now im trying to decide a color ha. im thinking of buying a bunch of the white. i would use the pure white in the bilge and locker but mix some grey pigment with it for the deck to create an off white. ive never used gelcoat before but it doesnt appear any more difficult then mixing the same way you do resin and then painting it on. i am debating maybe doing something with the webbing solution, just not so sure to what extent. the boat has blue and green on it so i wonder how mixing blue ad green pigment with webbing solution and white gelcoat would work out. ideas?
 

rickryder

Commander
Joined
Jun 24, 2010
Messages
2,722
Re: my 1991 capri rebuild

Been reading your thread. Good job! I used just grey gel coat when I did my resto.... White gets too dirty and reflects the sun. I would do lite blue or green to match the boat. I did a blue/grey interior and the hull is blue and white.
 

bleedblue94

Petty Officer 1st Class
Joined
Oct 11, 2010
Messages
272
Re: my 1991 capri rebuild

Been reading your thread. Good job! I used just grey gel coat when I did my resto.... White gets too dirty and reflects the sun. I would do lite blue or green to match the boat. I did a blue/grey interior and the hull is blue and white.

thanks. ive actually considered the white gelcoat from us composites and mixing the grey pigment in to create an off grey color. im lost on which ill do ha
 

rickryder

Commander
Joined
Jun 24, 2010
Messages
2,722
Re: my 1991 capri rebuild

thanks. ive actually considered the white gelcoat from us composites and mixing the grey pigment in to create an off grey color. im lost on which ill do ha

Thats what I used..... I have pics of it in my thread in my signature below.
 

bleedblue94

Petty Officer 1st Class
Joined
Oct 11, 2010
Messages
272
Re: my 1991 capri rebuild

Thats what I used..... I have pics of it in my thread in my signature below.

like the thread allot. i debated getting a horizon as well for a project. did you use the white base gel coat from us composites and the gunsmoke grey pigment? it looks nice

on a side note i have officially hit my first major issue, well two issues really. when we bed the stringers in we put weight on the fixtures to hold them down nicely in the pl. something happened (either my error or something hitting the hull) and the stringer/bulkhead assembly shifted 3/8" starboard and threw everything off. at this point i was THRILLED i bedded with pl bc today when i found this issue i made a couple of slits in the pl and was able to pry the stringers and bulkheads up without issue, so thats good and means i simply need to sand it off and just bed it again except.... i grabbed the fuel tanks for fun just to see the fitment and thank god i did. i made a massive mistake. did my measurements right but simply didnt have a clear mind when i cut the wood as i cut the stringer height in the forwrard sections at the aft height where the fuel tank and underfloor support goes. that section is 1" shorter. so basically in my haste i cut the stringers about an inch too short all the way around. pure BRAIN FART.

solutions:

recut wood, seal, bed again, then tab ect (costs wood supplies and more time)

OR

lay three 1x1 wood pieces over the gas tank and screw them to the stringers. this will lift the stringers in place position and height wise. i can then do the same in the forward section and use the hull where the floor would meet it to support the 1x1 and suspend the stringers. then wet csm and lay it on the inner side of the stringers to the hull (just as if i were tabbing). this will act as a barrier. i can then mix resin and tear up some of the extra csm i have and add allot of it to the resin for strength and poor the mixture from the outer side of the stringers so it settles under them an fills the gap. the previously molded csm would stop it from running. then continue on and tab and cap these stringers in. i figure this would save me allot of money from using cabosil and time even though it sounds involved.

if i execute this as planned is there really any issue with my plan/idea? i realize ill need a good amount of strands in the resin mix
 

rickryder

Commander
Joined
Jun 24, 2010
Messages
2,722
Re: my 1991 capri rebuild

like the thread allot. i debated getting a horizon as well for a project. did you use the white base gel coat from us composites and the gunsmoke grey pigment? it looks nice

Yes that is correct

on a side note i have officially hit my first major issue, well two issues really. when we bed the stringers in we put weight on the fixtures to hold them down nicely in the pl. something happened (either my error or something hitting the hull) and the stringer/bulkhead assembly shifted 3/8" starboard and threw everything off. at this point i was THRILLED i bedded with pl bc today when i found this issue i made a couple of slits in the pl and was able to pry the stringers and bulkheads up without issue, so thats good and means i simply need to sand it off and just bed it again except.... i grabbed the fuel tanks for fun just to see the fitment and thank god i did. i made a massive mistake. did my measurements right but simply didnt have a clear mind when i cut the wood as i cut the stringer height in the forwrard sections at the aft height where the fuel tank and underfloor support goes. that section is 1" shorter. so basically in my haste i cut the stringers about an inch too short all the way around. pure BRAIN FART.

solutions:

recut wood, seal, bed again, then tab ect (costs wood supplies and more time)

OR

lay three 1x1 wood pieces over the gas tank and screw them to the stringers. this will lift the stringers in place position and height wise. i can then do the same in the forward section and use the hull where the floor would meet it to support the 1x1 and suspend the stringers. then wet csm and lay it on the inner side of the stringers to the hull (just as if i were tabbing). this will act as a barrier. i can then mix resin and tear up some of the extra csm i have and add allot of it to the resin for strength and poor the mixture from the outer side of the stringers so it settles under them an fills the gap. the previously molded csm would stop it from running. then continue on and tab and cap these stringers in. i figure this would save me allot of money from using cabosil and time even though it sounds involved.

Ya lost me here.... I'm a picture kinda guy ;) Your laying the 1x1 across the stringers?

if i execute this as planned is there really any issue with my plan/idea? i realize ill need a good amount of strands in the resin mix

Lay the 1x1 in dry so we can see them.
 

bleedblue94

Petty Officer 1st Class
Joined
Oct 11, 2010
Messages
272
Re: my 1991 capri rebuild

Lay the 1x1 in dry so we can see them.

sorry i ran to work before checking this thread but yes, i would lay the 1x1s horizontally across the hull and cut them to fit right in the groove where the floor would meet the hull, and then drill downward through the 1x1s into the top of the stringers using a screw to pull the stringers up to the 1x1s. this would suspend them at the exact height they would need to be. at that point i would wet and mold my csm to create the barrier on the inner side of the stringers for the full length of them and then pour my resin and torn up csm mixture from the outer side of the stringers and let it run under the stringers. the csm i molded on the inner side would act like a barrier and theoretically let the mixture pool under the stringers. then problem solved and i just fully tab and cap the stringers in like normal

if its still confusing ill snap a few pics right after i get out of work but im planning to get right on this shortly after i get home. i cannot afford to loose the day
 
Top